Download
1 / 22
220 likes | 348 Views
living with the lab. Prototyping with Sheet Metal. living with the lab. Fabricating a Name Plate. Today you will make a name plate. Some possible dimensions are shown below – you decide. You will be provided with a 6 inch long piece of sheet metal that is 1 inch wide. 3 in. 2 in. 1 in

E N D
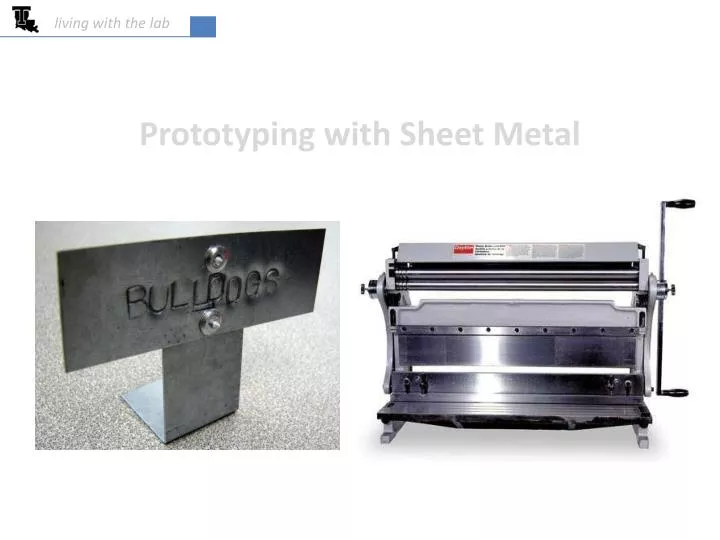
living with the lab Prototyping with Sheet Metal
living with the lab Fabricating a Name Plate Today you will make a name plate. Some possible dimensions are shown below – you decide. You will be provided with a 6 inch long piece of sheet metal that is 1 inch wide. 3 in 2 in 1 in (all pieces) 1 in 2
living with the lab Tools and Supplies lettering punches hammer rivet gun 6 inch piece of sheet metal pen ruler Hand punch (makes holes in sheet metal) 2 rivets
living with the lab Sheet Metal Brake (bending) and Shear (cutting)
living with the lab Safety Checklist Sheet metal edges are sharp and will cut you (like a knife). Avoid the sharp edges and corners. Wear safety glasses. Only one person at a time should use a shearing / bending machine (don’t let one person hold the workpiece and another pull down the handle). Do not remove the safety bar attachment in front of the shearing edge. Keep hands clear of the hand punch when making holes. No “horse play” in the lab. Keep work area clean. Report any unsafe working conditions and/or practices to the instructor. Take all common sense precautions. If you have an accident, report it immediately to the instructor.
living with the lab Lay Out Your Workpiece Use your ruler and pen to make marks on your workpiece for . . . • The location for shearing (cutting) the metal. • The location for bending the metal. • A line to mark the bottom of your letters and the center of your name plate.
living with the lab Class Structure – The Aim is for ALL to Finish It will take the longest amount of time to punch your name into the metal. Each group should take turns punching their names. Each group should use only one punch kit (do not share punch kits between groups since the letters will get mixed up). When the shearing / bending machine becomes available, go over and do your shearing and bending. You can do the shearing / bending first, or you can punch your name first. There is one hand punch for making holes for every two teams.
living with the lab Punch Your Name into Plate Start with the center letter and move to the edges (for centering) DO NOT punch on the countertops or on your tables – it will damage them. Use the vise anvil. Two firm strokes of the hammer on the punch creates a visible impression.
living with the lab Straighten Your Name Plate The plate will become bent when imprinting your name. Straighten it in the vise when finished.
living with the lab Shear your Strip Slowly pull down handle until the shear contacts the metal. Then provide a stronger force to the shear handle to complete the cut. workpiece under shearing edge shearing edge in contact with workpiece guard (do not remove)
living with the lab Bend Your Strip Move control handle until your piece is bent to the desired angle.
living with the lab Punch Rivet Hole #1 Position your name plate and the stand together and tighten up in the vise. Then, punch the first hole (through both pieces). You will need to open the hand punch all the way back open so you can remove the punch.
living with the lab Install Rivet #1 insert rivet all the way into gun Open and close handles repeatedly to draw the mandrel into the rivet. The mandrel will snap off when the two pieces are joined tightly. you don’t want this part to show Insert until head is flush with workpiece blind rivet (pop rivet)
living with the lab Punch Hole #2 and Install Rivet #2 You can hold the nameplate and stand by hand to punch the second hole. Then install the second rivet as before. see next slides for applications Congratulations!!!
living with the lab Things Made of Sheet Metal: Servo Bracket
living with the lab Things Made of Sheet Metal: Double Servo Bracket
living with the lab Things Made of Sheet Metal: Lead Screw With Servo
living with the lab Things Made of Sheet Metal: A Large Duct
living with the lab Things Made of Sheet Metal: Airplanes
living with the lab Things Made of Sheet Metal: Brackets simple bracket more complex part
living with the lab Things Made of Sheet Metal: Various Parts
living with the lab More Types and Sizes of Rivets