Sign Language
650 likes | 1.08k Views
next. Sign Language. By: Natalie Damon. Audience. Special needs students who are more high functioning Elective class for high school students. previous. next. Environment. Small classroom setting for the special needs students Working in pairs for the high school students

Sign Language
E N D
Presentation Transcript
next Sign Language By: Natalie Damon
Audience • Special needs students who are more high functioning • Elective class for high school students previous next
Environment • Small classroom setting for the special needs students • Working in pairs for the high school students • Student/teacher interaction • Projector and screen • Computer lab previous next
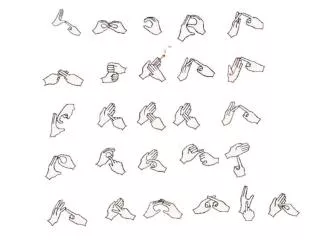
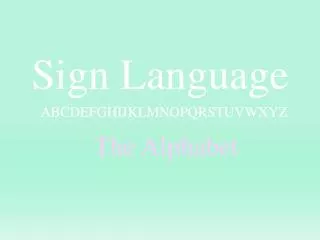
Signing the Alphabet • Given that the signed alphabet will be projected on big screen in the front of the classroom, students will be able to follow along with the teacher and sign the corresponding picture of the signed letter and have a 95% accuracy signing next previous
Signing Small Words (for quiz) • Given that there will be pictures projected on the big screen in front, students will be able to follow along with the teacher and sign the appropriate letters to the word being projected with a 85% accuracy while signing; accuracy went down when signing words because of the difficulty of having to combine multiple letters next previous
Sign Me Up! • Beginner Sign Language! next previous
What would you like to practice today? Letters Go straight to quiz Start at Beginning previous
LETS BEGIN! previous next
Orientation • By understanding how to sign the alphabet correctly, the students will be able to sign anything because they will know how to use the alphabet • Just like in the English language, we need to know the alphabet before we can spell things previous next
“Party in the ” • http://www.youtube.com/watch?v=QmKnQjBf8wM previous next
New Beginner Lets Get Started! next previous
New Beginner Directions • An enlarged picture of the letter alphabet • Click on each letter that you desire to practice • Each letter has step by step directions on how to form your fingers like that letter previous next
Letters *click on the letters for information Go Back to Beginning Go to Application
A • Form hand into fist (follow picture as guide) Go Back to Letters
B • Keep fingers together • Fold thumb across palm of the hand, making sure to keep it straight (follow picture as guide) Go Back to Letters
C • Make the letter “C” with your hands (follow the picture as guide) Go Back to Letters
D • Use pointer finger and point up; as if you were pointing as something (follow picture as guide) Go Back to Letters
E • Curve fingers over • Some spelling of “E” also may have only 3 fingers curved over; it can be used both ways (follow picture as guide) Go Back to Letters
F • Grip the pointer finger and thumb together • Leave the middle, ring, and pinky finger up and touching together (follow picture as guide) Go Back to Letters
G • Use thumb and pointer finger in a pinch formation • Other fingers make part of a fist (follow picture as guide) Go Back to Letters
H • Use pointer and middle finger • Hold thumb, ring and pinky finger to form the rest of a fist (follow picture as guide) Go Back to Letters
I • Raise pinky in the air • Cross thumb over the rest of the curled over fingers (follow picture as guide) Go Back to Letters
Go Back to Letters J • Just like the letter “I”, raise the pinky and cross over the thumb over the curled fingers • Then in the air, start from top to bottom writing the letter “J” in the air (follow picture as guide)
K Go Back to Letters • Make a peace sign using the pointer and middle finger • Place the thumb in between the opening of the pointer and middle finger (follow picture as guide)
L • Use pointer finger and thumb in the shape of an “L” • Curl the rest of the fingers over (follow picture as guide) Go Back to Letters
M • Use thumb as a “bar” curling over the pointer, middle, and ring finger so that it looks similar to the letter “M” (follow picture as guide) Go Back to Letters
N • Similar to the letter “M”, use the thumb as a bar curling over your pointer and middle finger, making what looks like the letter “N” (follow picture as guide) Go Back to Letters
O • Form fingers into a circular shape making the connection with the thumb (follow picture as guide) Go Back to Letters
P Go Back to Letters • Similar to a “K”, use pointer and middle finger placing them horizontally • Place thumb in the direction of the middle finger (follow picture as guide)
Q • Like the pinching form of the letter “G”, just place finger direction downward making a mini arch (follow picture as guide) Go Back to Letters
R • Cross pointer and middle fingers together (like you’re keeping a promise in the phrase “cross your fingers”) (follow picture as guide) Go Back to Letters
S • Similar to the formation of the letter “A”, only cross thumb over the curled fingers or fist (follow picture as guide) Go Back to Letters
T • Curl pointer finger over the thumb leaving the other fingers curled in a fist (follow picture as guide) Go Back to Letters
U • Raise both pointer and middle finger holding them together • Fold thumb to connect with ring finger (follow picture as guide) Go Back to Letters
V • Make a “peace” sign using pointer finger and middle finger (follow picture as guide) Go Back to Letters
W • Use pointer, middle, and ring finger to form a “W” (or as if you were holding up 3 fingers) (follow picture as guide) Go Back to Letters
X • Tuck thumb underneath curled middle, ring, and pinky finger • Use pointer finger and curl it (follow picture as guide) Go Back to Letters
Go Back to Letters Y • Stick out thumb and pinky finger leaving the remaining 3 fingers to curl over (this hand signal is also used in Hawaii meaning “hang loose” (follow picture as guide)
Z • Using pointer finger, draw the letter “Z” in the air (follow picture as guide) Go Back to Letters
Application for Quiz • Directions • Click the back button to go back and next button to go next • Click the Go to quiz button • Click letters button to review letters next
Application for Quiz • Keep track of the letters you struggled with signing on a separate sheet of paper • Write out what you think the finger formation should be if you are unsure previous next
Evaluation Review Letters • Quiz Directions • Look at the letter displayed • Sign the letter • Keep track on a piece of paper which letters you had trouble with • Sign a few of the pictures • Answer the multiple choice questions Go to quiz previous
Quiz: Question #1 Back to beginning • Which is the correct letter? Z
INCORRECT ANSWER! TRY AGAIN Hint: pay attention to the finger positioning Back to Question
INCORRECT ANSWER! TRY AGAIN Hint: Remember drawing in the air Back to Question
CORRECT! GREAT JOB Next Question
Quiz: Question #2 • Which one is the correct letter? R
INCORRECT ANSWER! TRY AGAIN Hint: Pay attention to the finger shape/placement Back to Question
INCORRECT ANSWER! TRY AGAIN Hint: “cross your fingers” Back to Question
CORRECT! GOOD JOB Next Question