Direct I/O Programming
Explore the Pentium mechanism for programming peripheral hardware components using the x86 I/O Address Space. Learn about DAC, VGA, color registers, and system privileges in Linux environments.

Direct I/O Programming
E N D
Presentation Transcript
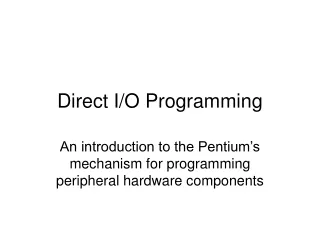
Direct I/O Programming An introduction to the Pentium’s mechanism for programming peripheral hardware components
The x86 I/O Address Space • Many CPU designs utilize a dedicated set of ‘memory-addresses’ to operate devices • But instead the Intel 80x86 family of CPUs employs a separate address-space for I/O Memory space I/O space
Intel ‘IN’ and ‘OUT’ instructions • Intel’s I/O addresses are called ‘ports’ and special instructions access them: ‘in’, ‘out’ • Examples (using Intel assembler syntax): mov dx, 20h ; port-number into DX in al, dx ; read the port’s value out dx, al ; write the port’s value • Intel’s port-addresses are 16-bit numbers, so there are at most 65,536 possible ports
Standard ports • For the sake of IBM-PC compatibility, the uses for a majority of the lower-numbered ports have become industry standards, in particular those used for basic functions of the Video Graphics Array (VGA) system: 0x03B0 – 0x03BB CRT controller (mono) 0x03C0 – 0x03CF other VGA elements 0x03D0 – 0x03DF CRT controller (color)
The main VGA components CRT controller Timer Sequencer Miscellaneous registers Video Display Memory (VRAM) Graphics controller Bus Interface Attribute controller Digital-to-Analog converter VIDEO ROM Video display adapter card
Programming of the DAC • The Digital-to-Analog Converter DAC) has a built-in color table (256 18-bit registers) • These 256 registers get programmed with default color-values during a ‘set-mode’ RED GREEN BLUE Each color-register has three 6-bit components
Hardware does ‘color lookups’ • In ‘truecolor’ display-modes, the DAC color registers are unused by the VGA hardware • But in display-modes that use 8 (or fewer) bits-per-pixel, the hardware uses the array of DAC color-registers as a ‘lookup table’ DAC VRAM • CRT screen
The DAC programming interface Four port-addresses are used for the DAC: 0x03C7 Pixel Address port for reads (w/o) 0x03C8 Pixel Address port for writes (r/w) 0x03C9 Pixel Data for writes or reads (r/w) 0x03C6 DAC Pixel Mask register (r/w) 0x03C7 DAC State register (r/o)
To ‘read’ a color-register #include <sys/io.h> // for the in/out macros unsigned char r, g, b; outb( regID, 0x03C7 ); // which one r = inb( 0x03C9 ); // red component g = inb( 0x03C9 ); // green component b = inb( 0x03C9 ); // blue compenent
To change a color-register #include <sys/io.h> // for the in/out macros unsigned char r, g, b; // initialize these with values desired outb( regID, 0x03C8 ); // which register outb( r, 0x03C9 ); // red component outb( g, 0x03C9 ); // green component outb( b, 0x03C9 ); // blue compenent
A hardware optimization • If you want to read a consecutive series of the DAC color-registers (or write to them), you do not need to output each register ID -- just the first one; the Pixel Index will be automatically incremented after the Pixel Data port is read (or written) three times • Combined with use of the x86 ‘ins’ or ‘outs’ string-instructions, this permits rapid input or output of the color table in a single step
Assembly language example unsigned char table[ 768 ]; // declare global array asm(“ lea table, %esi “); // ESI=source address asm(“ movw $0x3D8, %dx “); // Pixel Index port asm(“ xor %al, %al “); // starting register is 0 asm(“ outb %al, %dx “); // output 0 as Index asm(“ incw %dx “); // Pixel Data port asm(“ cld “); // direction is ‘forward’ asm(“ movl $768, %ecx “); // 3*256 repetitions asm(“ rep insb “); // inputs the entire color-table
Demo: ‘pcx8bpp.cpp’ • To illustrate direct I/O programming of the 256 DAC color registers, we have posted this demo-program on our course website • It uses 640-by-480 graphics mode w/8-bpp • Its image data is obtained from a .pcx file • Note that it ‘memory-maps’ the .pcx file to userspace instead of reading it to a buffer • (It does a Color-To-Grayscale conversion)
Systems Programming issues • Linux is a multi-user operating system, so user-programs are not normally allowed to program any hardware devices directly • How does our demo-program overcome this customary prohibition? (Ordinarily it’s enforced by the CPU’s ‘FLAGS’ register) 15 14 13 12 11 10 9 8 7 6 5 4 3 2 1 0 0 N T IOPL O F D F I F T F S F Z F 0 A F 0 P F 1 C F
Changing I/O Privilege-Level • When the Linux command-shell launches a new user-program (with ‘fork()’), it sets the task’s IOPL to 0 (this means the CPU will only execute ‘in’ or ‘out’ instructions if the task is executing ‘kernel’ instructions • But our ‘dosio.c’ device-driver changes a task’s IOPL, from 0 to 3, when that task ‘opens’ the ‘/dev/dos’ device-file
The ‘iopl3’ utility • Another way you can permit applications to perform direct I/O programming of the peripheral hardware is by executing ‘iopl3’ $ iopl3 • This tool was created by Alex Fedosov (our CS System Administrator) for your use in the USF CS Labs and Classroom • (You could add it to your system at home)
What is ‘mmap()’? • In order to ‘memory-map’ the contents of a file (or a device’s memory such as VRAM) into a user-program virtual address-space, you can use the ‘mmap()’ library function • This function asks the Linux kernel to build ‘page-tables’ that the CPU will use when it interprets the virtual memory-addresses in your application’s code
Physical memory is ‘mapped’ DRAM Kernel space User space \ stack Physical address-space VRAM VRAM 4-GB runtime libraries text and data Page-tables define the ‘mapping’ Virtual address-space
How you use ‘mmap()’ #include <sys/mman.h> // for mmap() int fildes = open( filename, accessmode ); void *mmap( void *virtaddr, int length, int prot, int flags, int fildes, int start );
Examples in our demo • The ‘pcx8bpp.cpp’ demo-program contains three examples of using ‘mmap()’ function: two are in the program’s main source file, the third is in the accompanying ‘int86.cpp’ • 1) 2MB VGA device-memory mapped to shared fixed address, with read-and-write access rights • 2) entire .pcx file mapped to unspecified private address, with read-only access rights • 3) 1MB CPU memory mapped to shared fixed address, with read-write-execute access rights
VESA’s Bios Extensions • All SuperVGA graphics vendors provide a common core of IBM-compatible VGA programming functions (BIOS firmware) • But each vendor also implements ‘extra’ graphics capabilities in nonstandard ways • The Video Electronics Standards Assn has created a compatibility specification which lets software run on differering hardware • Official website: http://www.vesa.org
Our ‘vesainfo.cpp’ tool • Following VESA’s ‘Video Bios Extensions’ document, we created a useful utility that executes firmware routines which reveal capabilities of our SuperVGA hardware, regardless of which vendor supplied it • Among other things, our program will show which of the SuperVGA graphics modes are supported by our vendor’s adapter
ATI Radeon X300 • Our classroom and labs have this product • It supports 56 different display-modes, in addition to the IBM standard VGA modes • Although not supported by firmware code, we could directly program the hardware to utilize still other graphics display modes if we learn how the VGA’s registers function (these are often called ‘tweaked’ modes)
Our ‘vram.c’ device-driver • Our graphics programs will use this Linux kernel module to memory-map the VRAM (so we can directly access it very rapidly) • But this module, as written, only works on systems with the ATI Radeon X300 card (because VENDOR_ID and DEVICE_ID are hard-coded into the module’s source) • If you change these ID-numbers, you can probably use ‘vram.c’ with a different card
What ID-numbers to use? • We provided a tool (named ‘findsvga.cpp’) to help you identify the VENDOR_ID and DEVICE_ID for your VGA card at home • This tool displays information about your system’s equipment, stored in non-volatile memory called PCI Configuration Headers • If you compile and run this program, you will see PRODUCT and VENDOR IDs (in hex) at the beginning of the screen-output
In-class exercise #1 • Try out these new demo-programs on our course website: findsvga.cpp vesainfo.cpp pcx8bpp.cpp • Website: http://cs.usfca.edu/~cruse/cs686
In-class exercise #2 • Write a short program (‘dactable.cpp’) that will read the DAC’s 256 color-registers and display their values in hexadecimal format, like this: 0: 00-00-00 1: 00-00-0F 2: 00-0F-00 3: 00-0F-0F et cetra… • Run your program: a) from the Linux Desktop, and b) from a text-mode terminal. Compare!