Download
1 / 24
240 likes | 411 Views
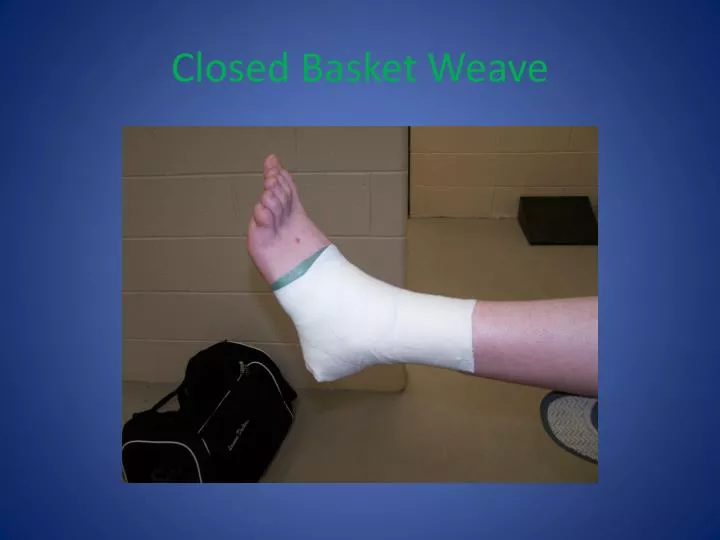
Closed Basket Weave. To Begin:. Clean and Dry Foot at 90 °. To Begin Continued:. Spray Adhesive ( Tuf -Skin). Heel and Lace Pads. Pads with Vaseline. Apply to front and back. Apply Pre-Wrap. Pull firmly to keep smooth Leave about 2 inches at top. Pre-Wrap Continued.

E N D
To Begin: Clean and Dry Foot at 90°
To Begin Continued: Spray Adhesive (Tuf-Skin)
Heel and Lace Pads Pads with Vaseline Apply to front and back
Apply Pre-Wrap Pull firmly to keep smooth Leave about 2 inches at top
Top Anchor Strips Begin on skin Angle first one slightly down
Top Anchor Strips Overlap second strip by 1/2 Angle approximately straight
Bottom Anchor – Figure 8 Set tape in bottom of arch Circle the foot Aim to malleoli
Bottom Anchor – Figure 8 Circle lower ankle (malleoli) Complete and tear
Anchor Strips 2 on top 1 Figure – 8 on the bottom
Support Strips Basket Weave 3 sets of Stirrups and Horseshoes Stirrups - inside to outside
Basket Weave Continued Horseshoes Pull either direction
Support StripsHeel Locks 2 Sets Form 3 X’s on top, bottom, and back of heel
Support StripsFinish 2 Sets of Heel Locks 1 Figure 8
Closure Strips Close open spaces 3 on top 1 on the bottom
CompleteTape Finished tape, no holes, except one at the heel Neat, no wrinkles May gap a little at heel