Comprehensive Linux System Configuration & Administration Talk
490 likes | 533 Views
In this informative lecture, you will learn about the organization, installation, network setup, printer configuration, security measures, and user management in Linux systems. The talk covers various aspects such as hardware compatibility, disk space, installation methods, graphical interface setup, partition configuration, boot loader selection, root password setup, kickstart file usage, network administration, printer setup, user security, network security, and sharing with Windows using SMB protocol. Join us to enhance your Linux skills!

Comprehensive Linux System Configuration & Administration Talk
E N D
Presentation Transcript
Linux System Configuration and Administration Lecture 6: Linux Configuration and Administration
Organization of the Talk • Installation of Linux • System Configuration • Network configuration • Sharing with Windows • Printer Configuration • Some security configuration • Administrations • User Management • User home pages
Installing Linux: Where do you start • Is Your Hardware Compatible? • http://hardware.redhat.com/hcl/ • Do You Have Enough Disk Space? • You have to decide, remove any virus if required, use fips • Can You Install Using the CD-ROM? • Your BIOS may need to be changed to boot from your CD-ROM • Alternative Boot Methods • Boot Diskette • Driver Diskettes • Network Device Drivers Diskette
Gather more info • Use ‘other’ OS to know more • Personal Desktop Installations • Learning About Your Hardware with Windows
Graphical Installation • The Graphical Installation Program User Interface (text mode is also available) • Choose the language, keyboard and mouse • Choose upgrade or new installation • Better to choose fresh installation
Installation of Linux… • Choose personal desktop installation For the first, but next time you bet on Custom • After all Linux is knowing more Choose partition
Installation of Linux… • Configure the partition: • Set the mount point • Set the SWAP size • Set the /boot space • Enable Ext3 formatting
Installation of Linux… Choose the boot loader Grub or Lilo • Configure the “Network Configuration” • DHCP, Firewall, IP address etc..
Installation of Linux… Choose the “Root password” Accept the default package selection or customize using the “Customize option”
Installation of Linux… Installation starts and go on inserting the required CD when asked
Post Installation Create a boot diskette Configure your video card, monitor and screen resolution Reboot and start your Linux….!
System Configuration • The kickstart fileis a simple text file, containing a list of items. It allows easy installation[2] and consistent configuration of new computer systems. • Kickstart Configurator • Kickstart Configurator allows you to create a kickstart file using a graphical user interface, so that you do not have to remember the correct syntax of the file. • To use Kickstart Configurator, you must be running the X Window System. To start Kickstart Configurator, select the Main Menu Button (on the Panel) => System Tools => Kickstart, or type the command /usr/sbin/redhat-config-kickstart. • As you are creating a kickstart file, you can select File => Preview at any time to review your current selections.
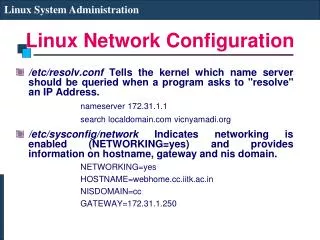
System Configuration… • Networking can always be configured after installation with the Network Administration Tool (redhat-config-network). • For each Ethernet card on the system, click Add Network Device and select the network device and network type of the device. Select eth0 as the network device for the first Ethernet card, select eth1 for the second Ethernet card, and so on. • Network configuration
Printer Configuration • Menu=> Printing=> New Printer => choose the printer and printing tool (e.g. Post script printer) • Testing printer • Just do lpq to see printer status • Lpr <filename> • Should print the file
Printer Configuration • Useful Websites • http://www.webopedia.com/TERM/p/printer.html General denitions of printers and descriptions of printer types. • http://www.linuxprinting.org A database of documents about printing, along with a database of • nearly 1000 printers compatible with Linux printing facilities. • http://www.cups.org/ Documentation, FAQs, and newsgroups about CUPS. • http://www.tldp.org/HOWTO/Printing-HOWTO/index.html The Linux Printing-HOWTO from the Linux Documentation Project.
User Security Authentication In the Authentication section, select whether to use shadow passwords and MD5 encryption for user passwords. The Authentication Configuration options allow you to configure the following methods of authentication: NIS, LDAP, Kerberos 5, Hesiod, SMB, Name Switch Cache These methods are not enabled by default. To enable one or more of these methods, click the appropriate tab, click the checkbox next to Enable, and enter the appropriate information for the authentication method.
Network Security • Firewalls • Choose between High, Medium, and Disabled security levels.
Network Security • Common Access control system • /etc/hosts • /etc/hosts.allow • /etc/hosts.deny • /etc/hosts.equiv • For more info refer docs on iptable, firewall
Sharing With Windows • SMB protocol to share files and printers across a network connection. Operating systems that support this protocol include Microsoft Windows (through its Network Neighborhood), OS/2, and Linux. • SMB implementation in Linux is called samba • There are two things one can do • Share your files/printer with other windows machine • Access windows shared printer/files on linux
Allow Windows to share • You need to start samba server and nmb server • /etc/rc.d/init.d/smb start • Whatever you want to share is added in /etc/samba/smb.conf • Every change in conf file require restarting of server • Just browse OR find computer from windows to see these files/folders • You can share folders, CD, printer
To access windows share • Smbclient is a samba client • Smbclient –L myhost to see all share • Smbclient \\\\myhost\\myshare • This will login to share and you can access the share • \\\\myhost\\printer can be written to print files • Smbmount can be used to mount (map) folders on to local host • Smbumount to unmount • There are tools (GUI) for both sharing and accessing files
User Management • Simple way to add user is adduser command • Passwd will allow to change the passwd • Of course there are host of GUI tools for all these user management • Group all common user to single group • Be careful while editing /etc/passwd • /etc/shadow passwd file may also exist
User Management • Common files to look at • /etc/passwd • /etc/group • /etc/shadow • /etc/samba/smbusers
Web server on Linux • Apache server is mostly available on Linux • Rpm –q –all | grep apache to check • This can be started via init services • /etc/rc.d/init.d/httpd start • Configuration files are at /etc/httpd/conf/ • Normally log files at /var/log/httpd
User home pages • Will allow user to have home pages • http://myhost.com/~user1 • Need to edit /etc/httpd/conf/httpd.conf • Enable UserDir public_html • Any user can have their page at public_html • Eg. /home/user1/public_html for user1 • /home/user2/public_html for user2
System maintenance Using package manager • Package Management Tool • Because people use their computers differently, users might want to install or remove packages after installation. The Package Management Tool allows users to perform these actions. • RPM is good package management tool in RedHat Linux
System maintenance (redhat) • The X Window System is required to run the Package Management Tool. • To start the application, go to the Main Menu Button (on the Panel) => System Settings => Add/Remove Applications, • Type the command redhat-config-packages at shell prompt. • Command line tool rpm
Lost Root Passwd • If you have Lilo installed, type • LILI: linux init 1 • Change the root passwd, reboot aga • If you have installed grub • Type ‘e’ to go to edit mode, add init 1 argument at the end • Boot with knoppix or single floppy linux • Mount the disk and change root passwd • Reboot !!
Cost Effective Linux Solutions • You have PC, with less harddisk for dual OS • You have PC, on which you do not want to install Linux • Good heaven's do not do that • There is a spurt of Linux PC requirements for short duration of time • For Linux LAB in one term OR during LAB examinations • You have old PC, with out sizable hard disk So you need Linux host for all the above case
Cost Effective Linux Solution • Some most easy approach • Network booting • Single CD Linux • Single floppy Linux
Network Booting • No need for harddisk(or harddisk with Linux) on every host • High level work flow • The system boots up, may be with floppy (could be with hard disk also) • Sends dhcp request for IP number, gets one • Mounts the root file system over NFS
Requirements for Network Booting • Setup an LAN infrastructure • Need to setup nfs server • Need to setup dhcp server • Build a kernel image for network booting
Setup an LAN infrastructure Hub Ethernet Cable Ethernet Cable NFS server Your m/c to be booted Your host, NFS server and DHCP server should be on same LAN
Setup nfs server • Edit /etc/exports file before starting the nfs server. • / 10.114.7.115(rw,no_root_squash) • This will export all files with root r/w to host 10.114.7.115 • Save your exports file and from the prompt execute exportfs command • Start the nfs server (nfs daemon) • E.g. /etc/rc.d/inid.d/nfs start
Setup dhcp server • Add in your /etc/dhcpd.conf before starting the dhcp server. • Set the correct MAC address in /etc/dhcpd.conf as follows: subnet <subnet address e.g.10.3.31.0> netmask 255.255.255.0 { } subnet 10.10.10.0 netmask 255.255.255.0 { host master { hardware Ethernet <Mac address of your Ethernet card>; fixed-address <IP address of your machine e.g.10.10.10.1>; option root-path <your root path>”; } } • Save your /etc/dhcpd.conf file • start the dhcpd dameon by “/etc/rc.d/init.d/dhcpd start” command
Build a kernel image for network booting • Linux Kernel compilation steps: • Assumptions: machine x86 (i386); boot loader lilo. • Get plain vanilla kernel from www.kernel.org • Explode it into a directory (better if can do it in /usr/src/) => tar -zxvf linux-2.x.xx.tar.gz • Optional: create a symbolic link ln -s linux-2.x.xx linux • cd to linux directory • cd /usr/src/linux or cd /usr/src/linux-2.x.xx • Select the components support by make menuconfig or make xconfig - save the configuration • Select IP:BOOTP support from Networking options • In File system -> Network File System -> Select • NFS File system support and • Root file system on NFS • Do • Make dep bzImage • Make modules modules_install
Build a kernel image for network booting… • Copy the /usr/src/linux/arch/i386/boot/bzImage to /boot • Do mkbootdisk with new kernel as argument • Optional take a coffee or tea break ?
Putting all together.. • Make sure you are running dhcp server • Make sure you are running nfs server • On any PC that need Linux for temporary time • Boot with new floopy you just made • That’s it !!!
Knoppix Single CD Linux • Knoppix is full Linux on a single CD • Can be freely downloaded from www.knoppix.com • Just make your PC to boot from CD, that is all required • Your current software (OS) on your system will not be lost • If there is less memory, you can create temporary swap on dos partation • You can access dos partation
Knoppix more info • Hardware Requirements • Minimum of 486 PC, 20M ram for text mode, 90M for graphics mode and128M for office suite • Bootable CD drive + key board, mouse, multimedia • Software available • 2.4 kernel, standard drivers, development tools, Internet applications, multimedia applications • Upto 2GB worth software in total • How to load/install start • Step 1 put the 'cd' in drive, switch on the power • All the configuration is “auto” • Step 2 Enjoy working on Linux
Knoppix can be handy • The fact is you need not install Knoppix on harddisk • So can be used in Demo of linux or software on Linux • So you need extra Linux machine lab ?? 2 minutes !! • No extra space on harddisk on old PC's, just use knoppix • Got a new laptop, just boot Linux on that in a jiffy
Knoppix at emergency • Lost root passwd, boot knoppix, mount the harddisk, edit /mnt/etc/passwd, reboot old linux • Can be dangerous, spurious user can do the same • Linux do not boot, boot with knoppix and recover the important files • Best part is you also recover lost dos/windows files as well • You have screwed up your configuration • Boot with knoppix and bring back to default
Single Floppy Linux • Similar to Knoppix, but over a floppy • Will have much lesser applications • Some distributions come with two or more floppy • MuLinux quite esay to use • http://mulinux.nevalabs.org/ • Coyote linux: mostly for network applications • http://www.coyotelinux.com/
References • Chetan Kumar S “Power Linux – Unleash the full potentials of Linux”, BIET, Davangere, Wipro Technologies • http://www.tldp.org/ (The Linux Documentation Project) : It contains a lots and lots of well documented and timely documents to learn and trouble shoot your Linux system (it’s free) • http://www.tldp.org/guides.html • The Linux System Administrators' Guide • Lars Wirzenius, Joanna Oja, Stephen Stafford, and Alex Weeks • It’s free and available at http://www.tldp.org/guides.html • The Linux Cookbook: Tips and Techniques for Everyday Use • Michael Stutz • It’s free and available at http://www.tldp.org/guides.html • The Linux Network Administrator's Guide, Second Edition • Olaf Kirch and Terry Dawson • It’s free and available at http://www.tldp.org/guides.html • http://www.redhat.com/docs/