MORPHIX XT® SUTURE ANCHOR | DJO Global
21 likes | 58 Views
The Morphix XTu00ae Suture Anchor is designed for the reattachment of soft tissue (tendons and ligaments) to bone in tenodesis, tendon transfer, and ligament repair procedures. The design of the Morphix XT Suture Anchor is based on university research into anchor design and performance around the importance of bearing area under the bone in suture anchor fixation. Visit https://www.djoglobal.com/products/medshape/morphix-xt-suture-anchor or call us on 800.321.9549.tt

MORPHIX XT® SUTURE ANCHOR | DJO Global
E N D
Presentation Transcript
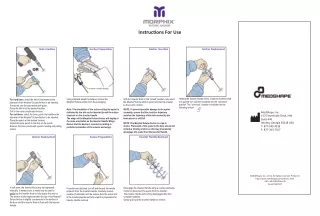
Instructions For Use Hole Creation Anchor Preparation Anchor Insertion Anchor Deployment Inserter Handle Wings Holding the Inserter Handle firmly, rotate the Inserter Knob one quarter turn counter-clockwise into the “unlocked” position. The “unlocked” position is indicated by the following symbol: Using standard aseptic technique, remove the Morphix® Suture Anchor from the packaging. With the Inserter Knob in the “locked” position, fully insert the Morphix® Suture Anchor eyelet into the hole created by the punch / drill bit. For hard bone, select the drill bit that matches the diameter of the Morphix® Suture Anchor to be inserted. If required, use the appropriate drill guide. Place the drill bit at the desired location. Drill to the correct depth and remove. For soft bone, select the bone punch that matches the diameter of the Morphix® Suture Anchor to be inserted. Place the punch at the desired location. Impact the bone punch to the stop on the punch. Remove the bone punch with a gentle twisting and pulling motion. Note: The orientation of the suture exiting the eyelet is indicated by the slot on the inserter tip and the suture channels on the inserter handle. The wings of the MorphixSuture Anchor will deploy in the same orientation as the Inserter Handle Wings. Ensure that the device is inserted according to preferred orientation of the sutures and wings. NOTE: To prevent possible damage to the eyelet assembly, ensure that the insertion trajectory matches the trajectory of the hole created by the bone punch or drill bit. MedShape, Inc. 1575 Northside Drive, NW Suite 440 Atlanta, Georgia 30318 USA T: 877-343-7016 F: 877-343-7017 NOTE: The MorphixSuture Anchor is a tap-in device. Placement of the eyelet in the hole should not include a twisting motion as this may prematurely disengage the eyelet from the Inserter Handle. Suture Preparation Anchor Deployment Inserter Handle Removal ©MedShape, Inc., 2012. All rights reserved. Printed in http://www.medshape.com/patents.html USA. MK 10003 Rev 05 Issued 04/2017 In soft bone, the Inserter Knob may be depressed manually. In harder bone, a mallet may be used to gently tap the Inserter Knob to fully deploy the anchor. The anchor is fully deployed when the top of the Morphix® Suture Anchor is slightly countersunk to the surface of the bone and the Inserter Knob is flush with the Inserter Handle. Disengage the Inserter Handle using a counter-clockwise motion to disconnect the eyelet from the Inserter. The Inserter Handle will be fully disengaged after four complete rotations. Gently pull back the Inserter Handle to remove. If needles are attached, pull off and discard the needle protector from the Inserter Handle. Carefully remove needles (if attached) and the sutures from the suture slot in the Inserter Handle and fully unwind in preparation for Inserter Handle removal.
MedShape, Inc., 1575 Northside Drive, NW Suite 440 Atlanta, GA 30318 Instructi ons For Use Morphix® Suture Anchor SYMBOLS CONTRAINDICATIONS ATTENTION OPERATING SURGEON The following conditions may impair the success of the procedure and should be considered by the surgeon prior to use of the Morphix® Suture Anchor: DESCRIPTION The Morphix® Suture Anchor is designed for implantation into a punched pilot hole for cancellous bone or a pre-drilled hole for cortical bone, providing a means for fi rmly securing soft tissue to bone. The Morphix Suture Anchor is supplied sterile. There is a quantity of one (1) device per package. Consult Instructions For Use. Read all package insert warnings, precautions and instructions.Failure to do so may result in severe patient injury. 1. Surgical procedures other than those listed in the INDICATIONS section of this guide. Active infection. Poor blood supply, which may impair the healing process. Conditions that may compromise bone anchor fi xation, such as severely osteopenic or comminuted bone surface as well as pathologic conditions in the soft tissue to be attached. Inadequate neuromuscular status (e.g. paralysis, inadequate muscle strength). Conditions which may limit the patient’s ability or willingness to restrict activities or follow directions during post-operative healing period (mental illness, senility, alcoholism). 2. 3. 4. The use of this product is intended to be limited to persons trained in the procedure and knowledgeable of the inherent risks. The patient should be fully informed about the need to limit activity during healing. MATERIALS The Morphix® Suture Anchor is manufactured from shape memory PEEK Altera®. The Morphix Suture Anchor is available with a choice of one or more ultra high molecular weight braided polyethylene sutures. The Morphix Suture Anchor is also available, in certain confi gurations, with suture double armed with surgical needles. Catalog Number. 5. Lot Number. LOT 6. Quantity. QTY STORAGE PRECAUTIONS 1. Postoperatively, until healing is complete, the fi xation provided by this device should be protected. The postoperative regimen prescribed by the physician should be strictly followed to avoid adverse stresses being applied to the implant. Expiration Date. Products must be stored in their original unopened packaging in a dry place. They should not be used after the expiration date indicated on the packaging. Do Not Reuse. INDICATIONS The Morphix® Suture Anchor is intended for fi xation of suture to bone in the shoulder, foot/ankle, knee, hand/wrist and elbow in the following procedures: 2. Detailed instructions on the use and limitations of the device should be given to the patient. Manufacturer. Shoulder - Rotator Cuff Repair, Bankart Repair, SLAP Lesion Repair, Biceps Tenodesis, Acromio-Clavicular Separation Repair, Deltoid Repair, Capsular Shift or Capsulolabral Reconstruction Hand/Wrist - Scapholunate Ligament Reconstruction, Ulnar Collateral Ligament Reconstruction, Radial Collateral Ligament Reconstruction Elbow - Biceps Tendon Reattachment, Tennis Elbow Repair, Ulnar or Radial Collateral Ligament Reconstruction Knee - Medial Collateral Ligament Repair, Lateral Collateral Ligament Repair, Patellar Tendon Repair, Posterior Oblique Ligament Repair, Iliotibial Band Tenodesis Foot and Ankle - Lateral Stabilization, Medial Stabilization, Achilles Tendon Repair, Hallux Valgus Reconstruction, Mid-foot Reconstruction, Metatarsal Ligament Repair • 3. Any decision to remove the device should take into consideration the potential risk to the patient of a second surgical procedure. Implant removal should be followed by adequate postoperative management. Do Not Use If Package Is Damaged. • Sterilized Using Ethylene Oxide (ETO). 4. Preoperative and operating procedures, including knowledge of surgical techniques and proper selection and placement of the implant, are important considerations in the successful utilization of this device. • MR Safe: Device poses no known hazards. MR 5. Foreign body sensitivity. Where material sensitivity is suspected, appropriate tests should be made and sensitivity ruled out prior to implantation. • Rx Only CAUTION: Federal (USA) law restricts this device to sale by or on the order of a physician. 6. An internal fi xation device must never be re-used. Re-use may result in device failure, infection, serious patient injury or death. • Inserter Knob Unlocked And Ready For Implantation. 7. Do not re-sterilize this device. 8. The appropriate delivery system is required for proper insertion of the implant. Surgical instruments are available to aid in the proper implantation of the implant. These surgical instruments are provided non-sterile and must be adequately cleaned and sterilized prior to use or re-use. Please refer to ANSI/AAMI ST46, “Good Hospital Practice; Steam Sterilization and Sterility Assurance” for specifi c information. POSSIBLE ADVERSE EFFECTS 1. 2. Infections, both deep and superfi cial. Foreign body reactions ©MedShape,Inc., 2012. All rights reserved. Printed in USA. MK 10003 Rev 05. Issued 04/2017