Download
1 / 37
370 likes | 494 Views
Jewels in Jewelry. Make great jewelry projects step by step, beginner to advanced!. Written By: Maleah Bishop Photographed By: Maleah Bishop. Unlock Simplicity. Contents. Tools……….4-6 Jump Rings……….7 Square Knot…………8 Wrap Loop………..9 Healing & Prosperity……….10

E N D
Jewels in Jewelry Make great jewelry projects step by step, beginner to advanced! Written By: Maleah Bishop Photographed By: Maleah Bishop
Contents Tools……….4-6 Jump Rings……….7 Square Knot…………8 Wrap Loop………..9 Healing & Prosperity……….10 Malachite Dangles………..11-12 Vintage Owl…………13-14 Secret Chest……….15 Amulet of Direction……….16-17 Goddess Pendulum……….18-19 Amethyst Lunar Goddess Amulet……….20-21 Tree of Life Faery Amulet………..22-23 Dragon’s Crystal…………24-25 Chain Link Bracelet………..26-27 Heart 2 Heart………..28-29 Stone Amulet Sachet..........30-31 Melting stones……….32-34 Mystical Mirror….......35-36
Tools Wire comes in many different gauges and colors. Some wire is coated in thin layers and will wear down fast. If gold plated or solid gold wire isn’t available, then brass wire is a good substitute. Some wires you’ll need pliers to bend and curl it. You can get wire in packs for great prices. The cutters are pliers are not cheap, but come in sets sometimes. Always use wire cutters. Scissors are adequate, but the wire will wear the blade down. Head pins and eye pins are useful for charms and putting beads in-between chain. Head pins come in all metal tones and sizes. Sterling silver and gold plated ones are nice for fancier pieces. They’re also stronger and the metal coat will last longer. Once you cut are bend a pin, don’t re-bend it to many times or it will weaken. You can get them in packs of usually 25-100. You can make your own head pins and eye pins with wire, but it’s easier to use pre made and cut ones. You’ll need a lot of different kinds of cords in this book. There are many different kinds and colors. Usually the sale bins with spools of ribbon and cords are in small proportions. Suede comes in many colors. Suede can break but it stretches and gives a great look. Suede is good for keeping knots from slipping. Suede does eventually have small pieces rub of over time. Rattail is silky and isn’t good for tight knots. Rattail also comes in many colors and it isn’t as likely to break as sued. Cotton cords are sometimes coated in beeswax. Cotton cord is strong and beeswax helps keeps the knots from slipping.
Stones come a variety of kinds. Stones beads and tumbled and points of stones can be found at local bead stores and other specialty stores. Top left- chrysacola, top middle- fire opal, top right- rhodenite, middle left- moonstone, middle middle- moss agate, middle right- rutilated quartz, lower middle middle- tiger’s eye, lowest left- moss agate, lowest second left- carnelian, lowest middle- snowflake obsidian, lowest second right- jade, lowest right- crackle quartz. Stones make great pendants and add quality to your pieces. Leather is scraps are available at local craft stores or local tack shops(equine and riding supplier). Leather scraps are useful for making pockets, sewing buttons and jewels as neck pieces. There are smooth textures, suede textures and in-between textures and firmness. Charms come in many metal tones and shapes. Some have inlays. Charms come in packs unless their sterling silver. There are a rainbow’s worth of shapes. You can judge the quality by how fast and easy silver charms tarnish. Charms can be merely beads with a head pin through them or a rock with a hole in it. Patterned beads are great for bracelets and for drawing attention. Often a patterned bead will be a oval, sphere or will have a large surface area. Vibrant stripes and dots, make contrast and liven up solid colors.
Indian beads can add an artistic effect to your pieces. Many of these beads will have sequins, glitter, metal designs, bead texture or jewels. They come in a ton of colors. You can usually buy these in large bags for a good deal. Glass blown beads can be simple or elegant and intricate. Detail and color can vary. There is a wide range of styles and themes of glass beads to choose from. Some are animals, food, flowers, nature or abstract themed. Some can make great pendants and others make stunning additions to a simple pattern. Round nose pliers or Needle nose pliers are useful for making loops. They can also be used to stabilize and close and open jump rings. Although, Flat nose pliers are best for jump rings, round nose pliers will also work. These can usually be bought in packs with cutters and such. There are many different grip patterns too.
Jump Rings Pick the jump ring up with the pliers on both sides. 3. Close the jump ring by turning each hand the opposite direction. 2. Grip it on both sides and turn one hand out and the other toward you.(don’t pull your hands away from you)
Square Knot • Other ways to close a necklace • Sliding knot • Barrel knot • Lark’s head-sliding knot • Josephine-sliding knot 1. 2.
Wrap Loop 1 2 3 4
Healing and Prosperity • Materials: • Garnet chips • 16 Citrine chunks • Wire • .8 mm stretchy cord • Clear nail polish • Scissors • cutters How To Cut 4 pieces of wire long enough to make a tight loop around the circumference of a citrine bead chunk String garnets on them and close each loop by twisting them close Make sure the loop can fit just around the citrine bead. cut any extra wire off to avoid abrasions when wearing the bracelet String citrine onto your cord and add the loops of garnet in between the citrine Add as many beads in-between your loops as you desire Tie it off with a square knot Add clear nail polish over the knot to finish it
Malachite Dangles • Materials: • 6 gold plated daisies • 2 small onyx beads(or any other small black bead) • Malachite chips • 6 Gold headpins • Round nose pliers • Flat nose pliers • 2 gold jump rings • 2 gold earring hooks
How To 1. String on one small black onyx bead, three daisies and 3-4 malachite chips on a head pin 2. Close the head pin and string on 3-4 malachite pieces on another headpin 3. Close the headpin 4. Repeat and make another 5. Use Flat nose pliers to put jump rings on the two malachite dangles 6. Attach the two dangles to the main dangle with the jump rings 7. Add another jump ring to connect a earring hook to the main dangle.
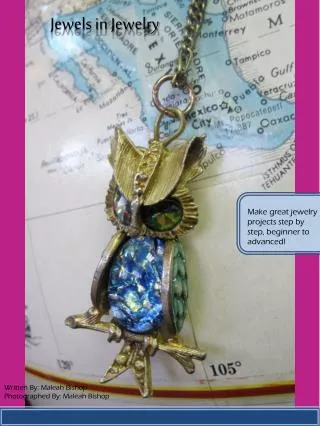
Vintage Owl • Materials: • Vintage owl brooch • Antique gold wire • 3 antique gold jump ring • Antique gold clasp • Antique gold chain(choice of length) • Round nose pliers • Cutters • Flat nose pliers Note: Any antique brooch will do. This owl has a lovely display of art glass, watermelon jewels and metal work. Go to your local antique store or find a old brooch.
How To First find a old brooch or you can buy a old brooch Cut some wire and make a loop a the top Wrap it around the pin and kepp going until tight Finish it off with a simple twist and tuck it under the pin Connect a jump ring to the loop with flat nose pliers String it on your chain Use flat nose pliers to add one jump ring to both ends of the chain Add a toggle or any other clasp to one jump ring Make sure there is no wire sticking out behind the brooch Secure the closure of the pointy part to avoid being polked
Secret Chest • Materials: • Silver hand charm • Silver jump ring • Silver chest • Silver chain(with clasp) • Flat nose pliers How To Take your flat nose pliers and add a jump ring to the hand charm If your using a chain without a clasp already on it, add one with your flat nose pliers String on your charms
Amulet of Direction • Materials: • Cutters • Gold wire • Obsidian arrowhead • 4 silver beads • Brow cord suede ? Inches
How To Wrap your arrow head in a loop of wire Cross it over the arrow head again and again in different directions Once secure, tuck wire under wire already there and bring it back up Make a wrap loop with Round nose pliers String on the desired pattern of beads With the other end of the suede, bring it through the beads so it comes out the other side Tie each end of the suede to the longer piece of suede to finish
Goddess Pendulum • Materials: • Silver head pin • Silver eye pin • 5 silver jump rings • Round nose pliers • Flat nose pliers • Cutters • Silver goddess charm • Clay drop bead • Small onyx bead(or small black bead) • Large glass blown rondle bead • Medium glass blown rondle bead • Silver chain • Silver claw clasp
How To Use round nose pliers to make a charm from your larger glass bead and your smaller one and a eye pin Make a charm with your round nose pliers and your ceramic beads on a head pin Use flat nose pliers and a silver jump ring to connect the ceramic charm to the large glass charm Use flat nose pliers and a jump ring to connect the silver charm to the same bottom of the glass charm as the ceramic charm Use your flat nose pliers again and add a jump ring to the top of the glass charm If needed use jump rings to connect a toggle clasp to the chain String on your pendant or connect it
Amethyst Lunar Goddess Amulet • Materials: • Amethyst Point • Evil eye Hasma hand charm • Silver Goddess Charm(or charm of your choice) • Copper wire • Black Suede Cord 25 inches approx. • Silver jump ring • Gold jump ring • Needle nose pliers • Glue • Tooth picks • Scissors • Long Nose Pliers
How To Wrap your crystal in a wire loop and pull it tight Find ledges and edges to lay your wire on for security Wrap it as many times as needed When you overlap the wire, wrap the wire around the other wire to make a net form Make a loop once around the wire underneath the overlapping wire When it’s secure, make loops with needle nose pliers on both sides of the crystal Attach jump rings to your charms Tie the suede to one loop on the crystal with double knots and string the charms on Tie the other end on with double knots Use glue and stick glue with a tooth pick in-between the knots and tighten them again
Tree of Life Faery Amulet • Materials: • Antique earring hoop • Malachite chips • Purple wire • Silver wire • Silver fairy charm • Waxed black cord 23 inches • 2 silver jump ring • Needle nose pliers • Scissors • Long Nose Pliers
Level: Intermediate How To Twist about 4in. silver wire Make a loop with needle nose pliers at the top of the earring hoop Make 3 in. pieces of purple wire and fold them in half Put the bend around the base of the earring and twist it so you have purple twist coming off the earring Make the trunk as fat as you want Twist all the small twist together half way Add malachite pieces and wrap the excess around the earring Attach a jump ring to the fairy charm String your pendant and charm on Tie it off with square knots
Dragon’s Crystal • Materials: • Quartz point • Silver dragon and witch charm • 2 silver jump rings • Gold wire • Cotton cord 23 inches • Long Nose Pliers • Scissors • Flat nose pliers • Cutters
Level: Intermediate Take your quartz and begin with a couple wraps around the top of the quartz Then wrap it under the wrap around and bring it up and over the top Wrap it around the wrap around and pull the wire tight Bring the wire downward and find a face and edge to lay the wire over the point Bring it up again and wrap it around the wrap around Cross it over again and repeat the steps till there is wire coming down in four places the point. Once you end at the top, make a wrap loop with wire to hang the crystal Add a jump ring to the charm Attach the charm and crystal to the cord Use a piece of wire to wrap around the hole s on the charm and wrap it around the crystal, so the charm lays on top the crystal Tie the cord together Take your quartz and begin with a couple wraps around the top of the quartz Then wrap it under the wrap around and bring it up and over the top Wrap it around the wrap around and pull the wire tight Bring the wire downward and find a face and edge to lay the wire over the point Bring it up again and wrap it around the wrap around Cross it over again and repeat the steps till there is wire coming down in four places the point. Once you end at the top, make a wrap loop with wire to hang the crystal Add a jump ring to the charm Attach the charm and crystal to the cord Use a piece of wire to wrap around the hole s on the charm and wrap it around the crystal, so the charm lays on top the crystal Tie the cord together How To Take your quartz and begin with a couple wraps around the top of the quartz Then wrap it under the wrap around and bring it up and over the top Wrap it around the wrap around and pull the wire tight Bring the wire downward and find a face and edge to lay the wire over the point Bring it up again and wrap it around the wrap around Cross it over again and repeat the steps till there is wire coming down in four places the point. Once you end at the top, make a wrap loop with wire to hang the crystal Add a jump ring to the charm Attach the charm and crystal to the cord Use a piece of wire to wrap around the hole s on the charm and wrap it around the crystal, so the charm lays on top the crystal Tie the cord together
Chain Link Bracelet Level: Beginner-Intermediate Materials: • 34 10mm silver Aluminum jump rings • 30 10mm blue Aluminum jump rings • 30 10 mm black • Silver toggle Aluminum jump rings • Flat nose pliers
x Turn Add rings through x Turn back
Heart 2 Heart • Materials: • Hematite hollow heart • Crimson glass heart charm • 6 Faceted crimson small beads • 4 hematite heart beads • 4 hematite tube beads • 25 hematite round beads • 12 glass tube beads • Toggle clasp • Crimper • 2 Crimp beads • Scissors • Stringing wire
Level: Intermediate How To Use a eye pin and a jump ring to connect the small red heart to the end Bead the large hematite heart on the eye pin Add a small round hematite bead and close the pin with round nose pliers Lay out the pattern starting at one end starting with a toggle clasp, 1 small hematite bead, 1 glass tube bead, 1 small hematite bead, 1 faceted crimson bead, 1 glass tube bead, 1 hematite tube bead, 1 small hematite bead and 1 hematite heart bead.(do this pattern on the other side) Continue with this pattern so it is at the desired length on one side of the table top Repeat the pattern on the other side String it on your beading wire Use crimpers to add the clasp or toggle clasp to the wire Use a jump ring and flat nose pliers to add the pendant
Stone Amulet Sachet • Materials: • Gray Suede cord 32 inches • Needle • Black thread • Magenta crackle sparkle quartz • Aquamarine • Leather piece of paper approx.. • Pen • Scissors • Stone turtle • White leather strip
Level: Advanced How To Depending on the size and diameter of the objects you intend to put inside your pouch, the size of the pouch will be different. Once you have the size, fold your leather in half and draw the pouch on one side On the other flap of leather draw the same pouch but with a top flap. Cut out both shapes Line them up Thread your needle with the thread so your needle is in the middle of the thread. Tie a knot that closes the thread’s ends. This should make it so your thread is double thick. Begin at the corner where the top opening will be. Sew it together with the whipstitch. Do this till your get to the corner opposite of the corner you started at. Trim any extra leather that hangs of the sides Sew on the gray suede on both sides just above where you started and ended your stitches to connect the pouch. Add your stone animal bead by stitching it on at the top of the flap. Make a loop with the strip of leather and sew it on the mid section just below the flap when it closes. Insert your objects Flaps
Materials: • 8 red coral beads • 2 moonstone beads • 3 red coral branch beads • 2 lapis lazuli drops • 6Labradorite beads • 11 small onyx beads20 small swavoski crystal beads • Labradorite faceted drop bead • Carnelian faceted drop bead • Bone horse bead • Bone cat bead • Jade carved meditating boy Level: Advanced • 2 faceted Sodalitebeads • 2 red resin roses • 14 royal blue seed beads • 14 green seed beads • 6 green glass coin beads • 2 gold bead caps • Gold toggle clasp • 5 gold jump rings • 6 gold head pins • Brass wire 20 gauge • Lots and lots of malachite chips • Lots and lots of lapis lazuli chips • Flat nose pliers • Round nose pliers • Cutters • 2 crimp beads • Crimper • Stringing wire
How To Measure out at least 18 and 15 inches of stringing wire Lay out the pattern shown in the image on the previous page on a beading board Make the cat, horse, 2 Lapis Lazuli drops, Carnelian and Labradorite beads into charms. Use Round nose pliers and headpins to make the charms Wrap brass wire around the neck of the jade boy and make a wrap loop and secure String on all the beads and add as many stone chips as you want. Once they’re done, add 7 seed beads of blue color to one end of a strand of your choosing Add the other seven blue seed beads on the other end Do the same with the green on the other strand Add the bead cones to both strands Use crimp beads and a crimper to connect the toggle clasp to the strands Note: Tape the ends to keep the beads from sliding
Mysti-cal Mirror Level: Advanced • Materials: • 20 gauge brass wire • Black round agate stone(no hole) • Flat nose pliers • Round nose pliers • Cutters • Gold chain • Gold jump rings • Gold clasp
Level: Advanced How To Start by unrolling your wire, cut two lengths, about a foot an a half Wrap it around the circumference of the stone. Make the loop again following the same loop Wrap the two loops together with two wraps Bring the wire to the opposite side of your wraps and make wraps there Continue doing this On your last few wraps bring it to the front Cut it off so there is about two inches left until the loop that wraps around the stone Use round nose pliers and curl is so there is a swirl and flatten it against the stone Do step 9 again until the stone won’t fall out the front Finnish with wrapping wire around the top and making a wrap loop at the top. Connect to a chain with a gold jump ring and flat nose pliers
Learn how to make over 10 jewelry projects step by step. Learn to make chain link bracelets, amulet sachets and malachite earrings. Read how to find a use for a old broach and much more. Projects for the beginner to the advanced jewelry maker. Includes a guide to the basic materials and skills needed to start beading.