
Complete Guide to HTML Form Components and Elements
E N D
Presentation Transcript
HTML Forms http://jjcweb.jjay.cuny.edu/ssengupta/
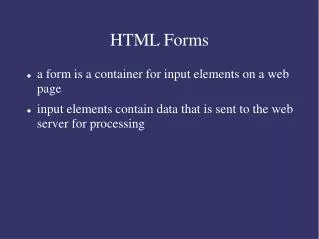
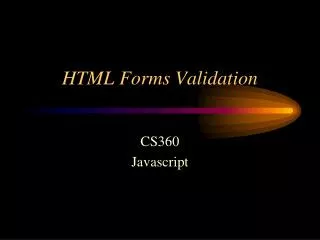
Form components and elements text box First Name Last Name This figure shows a form that contains various control elements commonly used in Web page forms. Address #1 Address #2 State Zip City Country Item Purchased Purchase Date Serial Number drop-down list box Network Operating System (check all that apply) Used For (check one) Netware Home Banyan Vines Business Windows Religious or Charitable Institution radio buttons IBM Lan Server Government check boxes PC/NFS Educational Institution text area Comments?: Send Registration Cancel form button
What have we learned so far… • How to create • Form structure • Fieldset to group different forms • Textbox • <input type=“text” name=“name” id=“id” value=“value” size=“value” maxlength=“value”> • How about password box?
Creating a password field • A password field is a text box in which the characters typed by the user are displayed as bullets or asterisks i.e. ****. • The syntax for creating a Password field is: <input type=“password”> • Using a password field is NOT equivalent to having a secure connection. • The password itself is NOT encrypted. • The password field only acts as a mask for a field entry as it is entered.
Next form element • What if the choice must be made from a pre-determined set of items? • Drop-down element or selection list
Creating a selection list • a selection list is a list box from which a user selects a particular value or set of values • good for that a fixed set of possible responses is to be selected • help prevent spelling mistakes and erroneous entries. • Created using <select> tag. • The <option> tag is used to specify each of the selection items.
Using <select> & <option> tags • general syntax for <select> and <option> tags is: <select name=“name” id=“id”> <option value=“value1”> item1 </option> <option value=“value2”> item2 </option> . . . </select> • name and idattribute identify the selection field • each <option> tag represents an individual item in the selection list • the text in the selection list is indicated by the text in item1, item2, and so forth
size = "1" size = "9" So you get a Selection List as shown below…
Modifying the appearance of a selection list • By default, the <select> tag displays one option from the selection list, along with a list arrow to view additional selection options • The number of options displayed can be modified with the size attribute. • The syntax of the size attribute is: <select size=“value”> • value is the number of items that a selection list displays in the form • by specifying a value greater than 1, the selection list changes from a drop-down list box to a list box
size = "1" size = "4" size = "7" size = "9" Selection lists with different size values • if the size value equals to the number of options in the selection list, scroll bar is either not displayed or is dimmed
Making multiple selections • The previous drop-down list allows us to choose only one item at a time… • What if the user needs to choose multiple items from a selection list? • What do we do as the web designers?
Making multiple selections • Adding the multiple attribute to the <select> tag allows multiple selections from a list. • The syntax for this attribute is: <select multiple> … </select> • A common method to make multiple selections from a selection list is to hold down a specific key while making selections. • for noncontiguous selections, press and hold the Ctrl key while you make your selections • for a contiguous selection, select the first item, press and hold the Shift key, and then select the last item in the range
Additional advantage: Setting default option • Specify which of the options should be selected automatically by default by the designer, • Using selected attribute • Syntax for this attribute is: <option selected=“selected” value=“value”> text </option>
option group label a single option group Working with option groups • the most recent releases of HTML allows you to organize selection lists into distinct groups called option groups
Option Groups (generic structure) <select> <optgroup label=“item”> <option value=“value"> label </option> <option value=“value"> label </option> </optgroup> <optgroup label=“item”> <option value=“value"> label </option> <option value=“value"> label </option> </optgroup> </select>
option group label a single option group Create the following option groups
Working with radio buttons • Radio buttons display a list of choices from which a user makes a selection. • Only one radio button can be selected at a time. • The syntax to create a radio button is: <input type=“radio” name=“name” id=“id” value=“value”> • name identifies the field containing the radio button • idattribute identifies the specific option. Only required if you intend to use a field label with the radio button • value attribute indicates the value sent to the CGI script, if that radio button is selected by the user
Working with radio buttons (cont.) • The name attribute must be included, because it groups distinct radio buttons together. • selecting one radio button in the group automatically deselects all of the other radio buttons in that group • Insert descriptive text next to the button. • Enclose text within a label tag to allow the user to select the radio button or label.
Selection lists vs. radio buttons • Use selection list, if • you have a long list of options • you want to allow users to select more than one option (use a selection list with the multiple attribute) • Use radio buttons, if • you have a short list of options, and only one option is allowed at a time
Working with check boxes • Check box is another similar control element used for selection purpose… • A check box is either selected or not, there is only one check box per field. • Check boxes are created using the following syntax: <input type=“checkbox” name=“name” id=“id” value=“value”> • name and id attribute identify the check box • the value attribute specifies the value that is sent to the CGI script when the check box is selected • To select a check box by default <input type=“checkbox” checked=“checked”>
Creating a text area • We have seen text box…now we create text area…mostly used for comments from users • to create a text area for a text box, use tag <textarea> <textarea name=“name” id=“id” rows=“value” cols=“value”> default text </textarea> • rows and cols attributes define the dimensions of the text box • rowsattribute indicates the number of lines in the text box • default text can be specified in the text box when the form is initially displayed.
Creating a text area (cont.) <label for=“comments”>Comments</label><br> <textarea name=“comments” id=“comments” rows=“5” cols=“50”> Enter comments here. </textarea> default text dimensions of text area resulting text area
Using wrap attribute (cont.) • wrap user’s comments to the next line in the text area • value of wrap attribute is soft,hard or off • soft value automatically wraps the text to the next line when it exceeds the width of the box • hard value also wraps text automatically, in the meantime, preserves any line wrapping that takes place in the text box when sending it to CGI • off value sets all the text to be displayed in a single line • default value for wrap attribute is soft