Download
1 / 14
140 likes | 273 Views
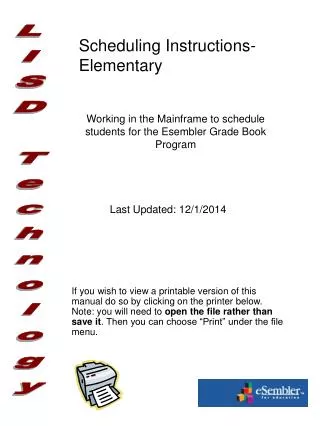
Scheduling Instructions- Elementary. LISD Technology. Last Updated: 12/1/2014. Working in the Mainframe to schedule students for the Esembler Grade Book Program.

E N D
Scheduling Instructions- Elementary LISD Technology Last Updated: 12/1/2014 Working in the Mainframe to schedule students for the Esembler Grade Book Program If you wish to view a printable version of this manual do so by clicking on the printer below. Note: you will need to open the file rather than save it. Then you can choose “Print” under the file menu.
Table of Contents Introduction………………………………………………………………...page 3 04 instructor maintenance- Printing report ………………………………page 4 04 instructor maintenance- cleaning up ………………………..………..page 5 06 changes to schedules- departmentalized…………………………….page 6 06 changes to schedules- fine arts……………………………………….page 7 08 changes to student schedules- new students……………………..…page 8 08 changes to student schedules- special changes…………………….page 9 06 adding section numbers to courses..………………………………..page 10 Appendix A- Advisor Numbers……………………………………….….page 11 Appendix B- Elementary Course Numbers…………………………….Page 12 Page 2
Introduction The District is using a grade book program called Esembler. This program relies on information from our student information management system, Region 10 Service Center. In order for a student to appear in a teacher’s grade book, they will need to be scheduled into classes with course and section numbers. This is the identical process that the secondary campuses have always used. There is, however, a great level of automation that can be used for this scheduling at the beginning of the year. A comparison between the previous and the new process of attaching students to teachers is listed in the table below. Page 3
04 instructor maintenance- Printing report The report you produce will be used to make correction to the Instructor file on your campus. • Choose the Section 04. You will be cleaning up this section and assigning teacher id #’s. • You should print a report before you clean up the file. To do this type in an “R” and type in your location code. You will then press the “enter” key. • On the screen that appears choose “F6” to print and use the location you normally print region 10 reports to. Use this printout as a reference for making changes. 1 2 3 Page 4
04 instructor maintenance- cleaning up The 04 instructor maintenance must be cleaned up in order for Esembler to match the information we have on our network. Check appendix for details • Press the “f3” key to go back after printing the report or go back to the main menu and choose section “04”. Use this report to select teacher records to correct on the 04 screen. • On the main screen, choose the code “C”, type in your location code and then the id you wish to edit. Press enter. • At the change screen, make the appropriate changes. If you wish to code something with your own code, the period section is not used for anything, please feel free to use it. • After making the corrections, press enter. You can then place a “C” in the function box at the bottom and type in the next id to change. Press “Enter”. • You will need to clean up the file by doing the following: • Add or correct social security numbers for all the teaching staff. • Change teacher id numbers to match the standards. (see appendix for standards) • Make sure that the teacher’s legal last name (as it is in personnel) is in the last name field and that the first initial is in the appropriate field. Take out anything else in those fields. • Make sure that all teachers giving any type of grades have been assigned an id matching standards. (see appendix for standards) F3 1 2 3 4 5 123-34-5678 Page 5
06 changes to schedules- departmentalized Some campuses have classes that trade kids with other teachers- this is called departmentalization. Make these changes before running the schedule. • Choose the option “06 Master Section Maintenance”. • On the main screen, type in your location code. You will next type in “5000” if your 5th grade departmentalizes, “4000” for 4th grade, etc. Leave the “N” chosen in the course only option. • The first course will be listed with a description of that course. You can scroll through the list of courses by pressing “enter”. A complete list of courses is available in the appendix. • Each course is broken into sections, which are attached to a teacher id. These “section” numbers match the last 2 digits of the teacher’s id. They will need to be changed to reflect the actual assignment of children in a departmentalized situation. • Scroll to the course sections you need to change by pressing enter. (you could also return to the main screen and type in the course number you need) At the bottom of the screen you will type in a “C” in CD, the section number to change in Sec and the instructor who actually teaches that section in the Ins box. Press Enter. The screen will update. Example: In this example, section numbers 02-05 were changed to reflect the fact that teacher # 504 teaches those, not the “Home room” teacher. This applies to the course listed at the top, 5100 Lang. Composition. 1 2 3 4 5 Example Page 6
06 changes to schedules- fine arts Your campus may teach different fine arts than the traditional 4. These steps will take you through adding or replacing fine arts classes in the proxies. • Choose the option “06 Master Section Maintenance”. The mass scheduler will add all courses automatically. The four fine arts courses to be added are PE, Art, Music and Spanish. If your campus does not teach Spanish it will need to be replaced. • On the main screen, type in your location code. You will next type in “0101”. Leave the “N” in the course only option. Press “Enter”. • The “Proxy” will be listed with a description of which teacher it applies to. Listed below will be all of the classes to be assigned to those students. This is based on what advisor number you have assigned them. • At the bottom of the screen is an editable list of course numbers. Type in a “C” in CD. • Use the “Tab” key to go to the block with 1620 in it. Using the list in the appendix, type in the course number you do teach on your campus. • The next block beside the 4 digit course is the section number. All fine arts are 01, so it will not need to be changed. Press Enter twice and repeat steps 4-6 for the new proxy number. Stop at proxy “0508”. Example: In this example, this campus teaches library skills not Spanish. They have changed “Spanish” to “Library” by changing the course number to 1640 for Library. 1 2 3 4 5 Example Page 7
08 changes to student schedules- new students These instructions are for new students in your campus coming in during the year. The only change to your enrollment procedures is to put an “A” in the “Type” section when enrolling a student. 1 • Choose the option “08 Student Master Maintenance”. When a new student comes in during the school year, they will need to be scheduled using this section. The following steps need to be done after completing your normal student add procedures and assigning them to an advisor number. Put in an “A” in the “Type” section. • On the main screen, type in your location code. You will next type in the student id # and under the option section, type “05”. Press enter twice. • At the bottom you will need to go in to change the screen to sm47 as opposed to sm44. Press Enter. • On the screen that appears, type in the advisor number of the teacher you are attaching the student to with a “0” in front if it. Press Enter. • Check the screen that comes up to make sure that the listing of classes is as expected. Press Enter. • The next screen indicates the student’s schedule. To add a course, find the next available blank at the bottom. Type in “A4” and then the course number and section number (remember fine arts are always 01) Press “Enter” • To delete a course, put in “d4” on the course you want to delete. Press “Enter”. Example: In this example, this campus teaches library skills as well as the other fine arts classes. They chose to add course 1640 (Library) to the list. 2 3 4 5 6 7 Example Page 8
08 changes to student schedules- special changes These instructions are for adding special classes to individual students such as LEAP, MTA and special education classes. 1 • Choose the option “08 Student Master Maintenance”. When a student is added to MTA, LEAP or any type of special ed class, they will have to have those added to their schedule. • On the main screen, type in your location code. You will next type in the student id # and under the option section, type “05”. Press “Enter”. • The next screen indicates the student’s schedule. Refer to the list of courses in the appendix. To add a course, find the next available blank at the bottom. Type in “A4” and then the course number and section number (remember fine arts are always 01) Press Enter. • Note if there is no blank, the screen prompts you to type in “more” to see additional lines for scheduling • To delete a course, put in “d4” on the course you want to delete. Press Enter 2 3 4 5 Page 9
06 adding sections to courses These instructions regard adding sections to existing courses for the purpose of adding teachers so that students can be scheduled for that teacher. 1 • After you add a teacher or change the teacher’s id in the 04 Instructor Maintenance, Choose the option “06 Master Section Maintenance”. You will need to go in and create a section for that teacher to teach in order for any students to be added to the teacher’s schedule. • On the main screen, type in your location code. You will next type in the starting course number for the grade level. You will need to add sections for each of the courses taught in the specific grade level. • The next screen indicates the course number, description of the course and what the existing section numbers are. You will be adding the next section number at this screen. Remember that the section number is a reflection of the teacher id. (section 01 is taught by teacher 101or 201or 301, etc.) • At the bottom of the screen type in “A” for add, fill in the section number and attach it to a teacher id. The room number can be x or you can actually type it in. The “MAX” feature needs to be set to 030 (unless it is Fine Arts which would be 150). • Tab over the next three fields to the one indicated in the example to the right. Fill this in with the info as shown on the other sections listed above. (leave out dashes) Press “Enter” Note: if this is a departmentalized grade, pay attention to who actually teaches the section you are listing. It may be different than the home room teacher. 2 3 4 5 Page 10
Appendix A- Advisor Numbers Page 11
Appendix B3- Courses TU Page 14