Download
1 / 28
300 likes | 1.16k Views
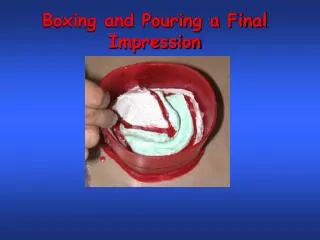
Custom Trays: The Key to a Great Final Impression. Visit 2. Clinical procedure. Lab. procedure. Evaluation of final impression trays. Border molding. Boxing/Pouring. Master casts. Final impression. Record Bases. Occlusal Rims. Patient Visit #2. Outline.

E N D
Visit 2 Clinical procedure Lab. procedure Evaluation of final impression trays Border molding Boxing/Pouring Master casts Final impression Record Bases Occlusal Rims Patient Visit #2
Outline • Over view of border molding & making a final impression. • Make custom trays on the preliminary cast. • Outline the tray borders on the cast. • Block out the undercuts. • Apply the relief wax. • Place & shape the Triad resin material. • Cure the resin. • Adjust the tray.
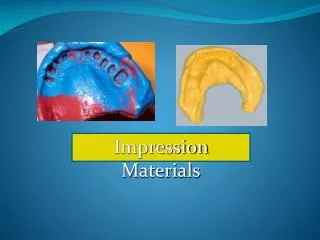
Border-Molding Definition: Shaping of an impression material by the manipulation or action of tissues adjacent to the borders of an impression tray Objective: To determine the contours, height and width of the borders of the complete denture
Custom trays are constructed prior to the final impression appointment.
Why? • Stock trays are universal. They are not made to fit a specific patient’s mouth. • Stock trays are difficult, if not impossible, to adjust to fit a patient’s mouth. • The most accurate impression is one that has an even thickness of impression material. • Custom trays require a minimum amount of impression material.
Requirements of a custom tray: • They must be rigid so as not to distort the impression. • They must be able to be adjusted to fit the patient’s mouth. • The tray handles must not interfere with the border molding process. • The tray must allow for an even thickness of impression material.
How to make a custom tray: • Draw the outline on the cast. • Block out the undercuts. • Place the wax spacer on the cast. • Place the Triad on the cast. • Mold the Triad into the proper shape. • Cure the tray in a curing oven. • Trim the tray. • Cut back the wax.
Draw the outline on the cast Since alginate impressions in stock trays will always leave the vestibular areas over-extended, an outline is drawn 2 mm short of periphery in the labial and buccal vestibular areas to arbitrarily define the borders of the tray until they are adjusted to fit the mouth. The line is left long in the posterior palate and the retromolar pad areas to allow the impressions to capture the soft tissues in these areas.
Block out the undercuts Major undercuts on the preliminary cast are blocked out with wax before the impression tray is made. This is necessary so that the tray can be inserted in the mouth without chafing the soft tissue and be removed from the master cast once the final impression is made and poured in yellow stone.
Place a wax spacer on the cast A piece of wax is dipped in a hot water bath or heated over a Bunsen burner to soften it uniformly. One layer of warm baseplate wax is pressed into place over the maxillary cast with the thumb and finger pressure. It is trimmed along the external borders of the land area by pressing it against the sharp external edge of the cast.
Trim the wax to the outline 1 thickness of baseplate wax is cut back 2 mm from the depth of the vestibule. The dark line that was scribed on the cast should be visible through the wax and provide an easy guide as to where the cut needs to be made. It should be easily visible after the wax is removed from the cast.
The same basic procedures described for the making a maxillary tray also apply to the mandibular tray. The wax is pressed into the lingual area first and then the buccal and labial areas, and cut by pressing the wax against the outer border of the land area. The wax is trimmed to the line marked on the cast at 2 mm from the depth of the buccal and labial vestibules. The wax is left long over the retromolar pad and lingual flange areas, but does not extend onto the land area.
Trim the wax to the outline The wax is left a little long in the posterior palate and retromolar pad areas to allow the tray to be constructed long in these areas and permit recording the posterior palatal area where the palatal seal will be formed and the retromolar pad, which is the most stable support area of the mandibuar ridge. The areas over all frenum attachments are relieved to the 2mm distance to allow for full movement of the lip.
Place the Triad on the cast One thickness of Triad tray material is placed onto the wax. It is pressed into the lingual area (mandibular) or palatal area (maxillary) first to prevent air pockets from forming, then pressed over the ridge and buccal areas. It is pinched off at the edge of the land area and cut along the edge of the lingual vestibule with a red handled knife to remove this section.
Place the Triad on the cast The Triad is pressed into the internal border of the land area with the thumbnail to form the external border of the tray. This is done around the entire border of the cast.
Add a tray handle A handle is molded onto the tray. It must arise from the crest of the ridge in the anterior of the tray and should be at a 45o angle to the crest of the ridge. It must be just long enough to accommodate the width of the thumb. This will allow sufficient access for the border molding to be accomplished in this area by allowing the lip to be pulled along the surface without binding. It also provides enough surface area for the tray to be securely held while placing and removing it during the impression procedures.
Add a tray handle The handle for the lower tray is made longer and narrower than the one made for the upper tray. This allows the tongue to move freely around it and perfect the border molding in the lingual area. Finger rests are placed on the crest of the posterior ridges that are narrower than the width of the tray to raise the finger above the area that is being border-molded and to prevent recording the width of the finger in the final impression. Sufficient distance must be provided between these and the handle for the tongue to pass through.
Cure the Triad in the curing oven The tray is cured on the cast in a curing unit for three minutes. It is removed from the cast and placed in the curing unit with the waxed side up for an additional two minutes. A quick look will show where the Triad material extends beyond the wax.
The thumb is placed on the handle to determine if there is sufficient thickness and length of the handle to allow adequate grasp for the tray to be placed and removed during the impression procedure.
Trim the tray The wax is allowed to cool, then the tray material is trimmed back to the level of the wax spacer. A lathe will speed up the process and a handpiece can be used to refine the cutback. A laboratory diamond is especially made for this task and will greatly reduce the time spent adjusting the Triad.
After the tray borders have been reduced and the tray has been finished, it is placed back on the cast to verify that it has been sufficiently cut back 2 mm short of the vestibule to allow for sufficient bulk of the border molding compound.
Cut back the wax An additional 2mm of wax is removed from the inside of the tray to allow the border molding material to overlap the edge of the tray and form a U-shaped joint. This joint will be strong enough to firmly retain the compound on the tray. A few millimeters of wax is also removed from the posterior palatal area to allow for the palatal seal to be developed in the final impression.
This ‘U’-shaped joint will provide sufficient strength to the compound so that it doesn’t fracture off during the border-molding or impression phases.
The tray is tried into the patient’s mouth and the borders are reduced 2 mm short of the depth of the vestibules and the frenuli attachments. This is determined by pulling the lip outward and having the patient raise the tongue. This assures that there is sufficient room for the border-molding,
Custom trays are border-molded with dental compound (also known as modeling plastic) prior to making a final impression. This material softens with heat and hardens at mouth temperature, allowing several adjustments to record the vestibular areas very accurately.
The impression is then just a thin “wash” of polysulfide impression material over the compound-modified custom tray.