Download
1 / 10
100 likes | 150 Views
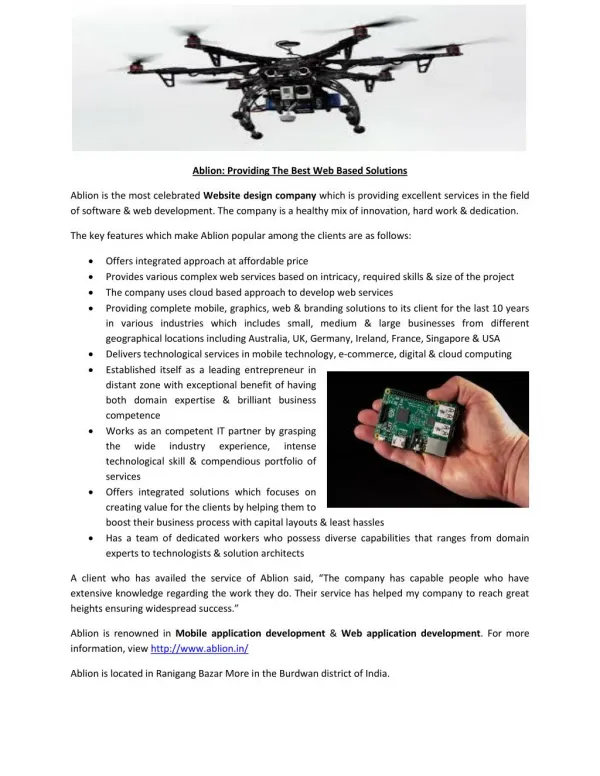
CO1552 Web Application Development. HTML Forms. HTML Forms. Websites can be made more interactive by providing facilities for users to provide data To get user entered data, we can use a HTML form

E N D
CO1552 Web Application Development HTML Forms
HTML Forms • Websites can be made more interactive by providing facilities for users to provide data • To get user entered data, we can use a HTML form • A Form is a part of a html page that contains form elements that are used to capture user entered data • There are many different form elements within HTML that we can use to build forms, many of the common GUI controls are provided for
The FORM Tag • The form tag creates a form for a user to input data • A form can contain a number of different input mechanisms from text boxes, radio buttons, check boxes, and more • A form can have the following attributes
What does a form do? • The aim of the <form> tag is to receive user input in some way and then to send this data to a specified destination (the url of a web server) for further processing • Form data can be sent to many different places • Sent to an an email account • A web scripting page for further processing (ASP, PHP, CGI etc) • A typical definition of a <form> tag would be as below, <form name=”aform” action=”http://www.myserver.com/processpage.php” method=”post”> • Any data within the <form> and </form> tags will be packaged up and sent to the named recipient
Mailing form data • By setting the ‘action’ attribute of a form to, action=mailto:charles.dobson@cumbria.ac.uk) • all of the values entered by a user are packaged up and sent to the email address specified in the above. • If you test this method on a computer with no mail client software to use then it will not work • Much safer to send the data to a web server then get the web server to do the e-mailing • The web server will need a script (PHP, Perl of ASP, to handle this) • Data is received as a set of name-value pairs, one for each of the named form elements on your page and the value that was entered
Form Elements • Text Input Box - a textbox is a method for the user to type data in to the form • A standard text input box contains only 1 line and is usually used to accept a small amount of data. • To accept a larger amount of data, over more than one line, use a textarea control • <input type=”text” name=”surname” value=”Change this text” size=”20” maxlength=”30”> • Using the above definition, we would have a text input box into which the user could enter data • Only 20 characters worth of text would be displayed on screen, but the user could enter a maximum of 30 characters • Text Area • A text area is used to collect more than a single line of textual data from the user. A user can enter line breaks within a text area input control. • You can define the size of a textarea, but you cannot (easily) define the maximum amount of data that a user can enter. • A typical definition of a textarea would be, • <textarea name=”memo” cols=”30” rows=”6”></textarea> • This definition would give us a text area that the user could enter a lot of textual data (even with line breaks) that was 30 columns wide, and 6 rows high.
More form elements Password Boxes • Same as a text input box but rather than display the text as typed in by the user, the browser displays a “starred” out version of the text • A typical definition of a password box may be, • <input type=”password” name=”pwd” value=”Your Password” size=”20” maxlength=”30”> Check-Boxes • A check-box is used when there is a series of options for a user to select a value from • You would particularly use a check box when the user can select more than one option such as what sandwich fillings they wanted or Pizza toppings….. • A typical definition might be, <input type="checkbox" name="sandwich_ham" value="ham" checked> <input type="checkbox" name="sandwich_salad" value="salad" checked> <input type="checkbox" name="sandwich_mayo" value="mayonnaise" > Radio Boxes • A radio-button is used when you want the user to select one option from a list of options • Use the name property to ensure that they all have the same name. • You would define a radio-group in the following way. <strong>Are you sure you are a vegetarian?</strong><br> Yes<input type=”radio” name=”answer” value=”yes”> No<input type=”radio” name=”answer” value=”no”> Unsure<input type=”radio” name=”answer” value=”unsure”>
More form Elements Drop-down Listboxes • You can use a drop-down list box to present the user with a list of values that they access by dropping down the list. • You would define a drop-down box in the following manner, <select name=”choice” size=”2”> <option value=”val-opt1” selected=”selected”>Option 1</option> <option value=”val-opt2”>Option 2</option> <option value=”val-opt3”>Option 3</option> </select> • Note that it is the “value” attribute that is sent to the action url, NOT the text that is displayed within the <option>…</option> tags. Buttons • There are three different types of button within a HTML form. There are your normal buttons that do nothing unless you have written some JavaScript to accompany them. • There is also a submit button and a reset button. These both have pre-defined actions. When a user clicks on a reset button, all the values of a form a reset to the default values. • When a user clicks on the submit button, all the values entered in to the form are packaged up and sent to the URL specified with the forms action attribute. • Note that it is pointless creating a HTML form without a submit mechanism. Your user will have typed all their data in, but then not be able to send it to anyone!
Form Formatting • If you have ever used a form on another website before, you may have noticed that forms are normally well formatted and are quite neat and professional. • This is accomplished by using a mixture of a table tag and a form tag. The following is a very basic way of displaying a well formatted form within a browser. <form action=”http://www.myserver.com/processpage.php” method=”post” name=”aform”> <table border=”0”> <tr> <td>Your Name:</td> <td><input type=”text” name=”yourname”></td> </tr> <tr> <td>Your County:</td> <td><select name=”county”> <option value=”Cumbria”>Cumbria</option> <option value=”Lancs”>Lancashire</option></td> </tr> <tr> <td colspan=”2” align=”right”><input type=”submit”></td> </tr> </table> </form>
Try it….. • I have made available a mail forwarding script on my home server • If you send your forms to http://kcd.sytes.net/co1552/formmail.php they will be processed and mailed back to you • You must provide a ‘recipient’ input field on your form which contains your e-mail address • The rest of the form can contain whatever you like • There is an example pgae and form at http://kcd.sytes.net/co1552/basic_form.htm • Experiment! • This script will be removed after today (15th Jan 2008)