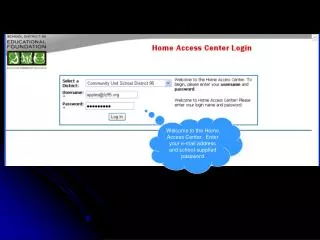

1. Enter E-Mail and Password
E N D
Presentation Transcript
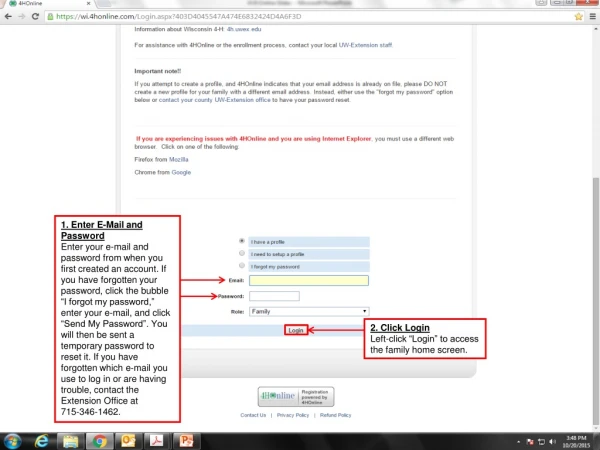
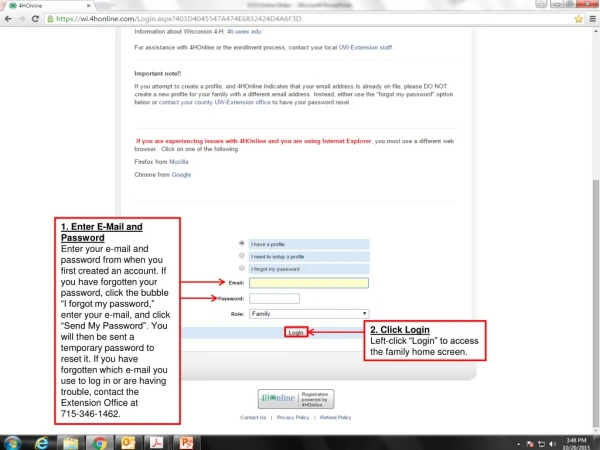
1. Enter E-Mail and Password Enter your e-mail and password from when you first created an account. If you have forgotten your password, click the bubble “I forgot my password,” enter your e-mail, and click “Send My Password”. You will then be sent a temporary password to reset it. If you have forgotten which e-mail you use to log in or are having trouble, contact the Extension Office at 715-346-1462. 2. Click Login Left-click “Login” to access the family home screen.
2. Continue to Family Left-click “Continue to Family” to see your member list.
1. Edit Left-click the “Edit” button across from the member you are re-enrolling. Each member must be re-enrolled one at a time. If the Enrollment Status column shows that they are “Inactive” or “Incomplete,” then the member has not yet been re-enrolled.
1. Re-Enroll Left-click this button to begin the re-enrollment process for the member (you may have to scroll down with the scroll bar or your mouse wheel if you cannot see the full screen).
1. Profile Information Confirm that this information is up-to-date. To update any information, left-click the field next to it. For drop-down menus, select an option from the ones presented. For written fields, hold the backspace key to clear the field and type a new response. 2. Scroll Bar Left-click and hold the scroll bar or use a mouse wheel to fill out the bottom sections of this screen.
1. Volunteer If you are re-enrolling an adult, make sure “Yes” is selected. Parents of 4-H youth who do not volunteer or involve themselves in club activities do not need to go through enrollment. Youth may also be volunteers. 2. Demographic Info Please make sure this information is up-to-date before proceeding. You do not have to list a race if you prefer not to state it. All of this information is kept strictly confidential and is used by the state for its federal reporting requirements. 3. Continue If all information is up-to-date and accurate, left-click “Continue > >”
1. Checkboxes Read the terms and conditions and left-click each checkbox on this screen to agree. 2. Scroll Bar Left-click and hold the scroll bar or use a mouse wheel to fill out the bottom sections of this screen.
1. Checkboxes Continue reading the terms and conditions and left-click the checkboxes to agree. The photo release is not required. 2. Accomodation If your disability accommodation status has changed, left-click this field and select a new option. 3. Continue When all checkboxes are selected and information is updated, left-click “Continue > >”
1. Health Form An updated health form is not required at the time of re-enrollment, but you will be asked to update it if you attend a camping trip or other applicable event. Left-click the fields to enter new or updated information. 2. Scroll Bar Left-click and hold the scroll bar or use a mouse wheel to fill out the bottom sections of this screen.
1. Signature If you have filled out the health form for the first time, left-click the blank field and type your legal name. If you are completing a youth’s health form for the first time, you will also have to type their name in a box that will appear below. 2. Date If you have made updates to the health form, left-click the field and enter the current date in mm/dd/yyyy format. You can also left-click the calendar icon and select today’s date on the window that appears. 3. Continue: Left-click “Continue > >” to save your changes and proceed to the next screen.
1. Volunteer Screening NOTE: This screen will only appear if you are re-enrolling as an adult volunteer for the first time, or if you are re-enrolling as an adult volunteer and have not completed a background check in four years.If you do not see this screen, skip the current page and the next page in these instructions. Left-click the fields next to each applicable item and type your answer. Questions 3 and 4 are required only if you have not been a full-time resident in Wisconsin during the past 3 years. 2. Scroll Bar Left-click and hold the scroll bar or use a mouse wheel to fill out the bottom sections of this screen.
1. Continue: If you are on the Volunteer Screening screen, click “Continue > >” to save your work and proceed to the last section. If you were not presented with the Volunteer Screening screen after the Health Form screen, skip this page in the instructions.
1. Club Status: At this screen, you can change your primary club, remove yourself from a club’s roster, or add secondary clubs. To add clubs, left-click the drop-down menu to present your options. Then left-click the “Add Club” button. To remove a club, left-click the “Delete” button next to that club on your club list. To change your primary club, left click the circular button in the leftmost column next to the club of which you intend to be a primary member. 2. Continue: Once you are satisfied with your club selection (or if you have no changes to make), left-click “Continue > >”
1. Select Projects: Left-click the first drop-down menu and then left-click the club in which you want to add project. Then left-click the second drop-down menu, select the project in which you want to enroll. 2. Project Materials: This is an optional field where you can indicate your interest in project literature. Some club leaders may use this to submit their literature order to the UW-Extension office. Keep in mind that any pieces of literature you order above five (5) will need to be paid-for out-of-pocket. To select literature for the project you would like to add, left-click the drop-down menu and then left-click the literature you are interested in. 3. Add Projects: Left-click this button to add your project and any literature you may have selected in the “Project Materials” drop-down menu. 4. Submit Enrollment: You may submit your re-enrollment at this screen by left-clicking “Submit Enrollment.” Left-clicking “Continue” will bring you to the Groups screen, which the county does not use at this time. If you have additional members to re-enroll, repeat this process for each one.