Download
1 / 9
90 likes | 126 Views
Cleaning Critical Orifice and Focusing Nozzle. Step 0. Check CPC flow.

E N D
Step 0. Check CPC flow • To better understand what is going on with the instrument and to see if cleaning makes a difference, check the instrument flow at the inlet of the CPC. Use a flow calibrator (e.g., BIOS or Gilibrator), not a rotameter to measure the flow • The CPC flow is reported by a flow meter downstream of the CPC in the NOAA aerosol system, so you should also be able to see if the CPC flow value has changed with time by looking at CPX2 ‘CPC status’ plots which show CPC flow and CPC drier flow.
Step 1. Remove CPC from rack Drain butanol from CPC. Disconnect power, comm-port cable, inlet and outlet, remove butanol tubes. Plug the vacuum outlet Slightly tilt rack-mount case forward and lift CPC up out of rack
Step 2. Remove optics block from column • Remove the 2 Allen head screws holding the optics block to the column • Remove the 2 Phillips head screws holding the optics block to the back panel • Disconnect the vacuum tube from the hose barb on the back panel
Step 3. Locate the critical orifice and the focusing nozzle • The critical orifice (C.O.) is held in the block by a small o-ring. Pry the o-ring out with a small screwdriver to access the C.O. • The focusing nozzle is located at the bottom of the optics block. Pry the nozzle out with a small screwdriver.
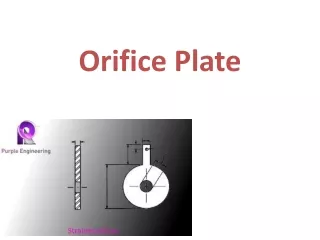
Step 4. Remove the critical orifice and the focusing nozzle • The critical orifice (C.O.) is a small sapphire annulus embedded in a plastic holder. The hole is only a few tenths of a mm in diameter. It controls the flow rate of air through the CPC. • The focusing nozzle focuses the aerosol stream so that it shoots through the laser beam. It has a hole approximately 0.5 mm in diameter.
Step 5. Clean the C.O. and the focusing nozzle • Get a wooden toothpick, or some other small sliver of wood. This will be used to clean the C.O. and nozzle. It must be made of wood or another soft material because the C.O. can break, especially if a hard metal pin is used. • You may have to take a knife and shave some wood from the tip of the toothpick to make it slender enough to fit inside the C.O. • Turn the toothpick in your fingers so that it rotates within the C.O. and the focusing nozzle orifice. This will clean off any deposits that have accumulated on the edges of the holes. • Use a gentle solvent (e.g., ethanol, isopropyl alcohol) to remove the loosened deposits and do a final clean of the orifice and nozzle. • Do not use a tissue or the fuzzy end of a qtip (cotton swab) for cleaning – they may leave bits of fiber on the parts.
Step 6. Reassemble the unit • Insert C.O., o-ring, and focusing nozzle into the optics block as before • Re-attach tubing, and tighten Allen and Phillips screws to ensure a tight seal • Make sure no electrical or tubing connections were broken or disconnected during the maintenance; if so, please repair or reconnect
Step 7. Perform a flow check • Cleaning the C.O. will probably change the flow through the instrument. Use a flow calibrator (BIOS, Gilibrator, etc.) to check the flow. Compare to the flow value you got in Step 0. • The volume flow through the 3760 instrument should be approximately 1.4 lpm, assuming a critical (i.e., ~0.5 x atmospheric pressure) vacuum is applied to the unit. • The volume flow through the 3010 instrument should be approximately 1.0 lpm, assuming a critical (i.e., ~0.5 x atmospheric pressure) vacuum is applied to the unit.