Download
1 / 15
150 likes | 170 Views
Detailed step-by-step instructions for assembling a Receiver Plate with necessary parts, layout tips, and tooling board setup. Includes installing shields, coils, cores, and final assembly.

E N D
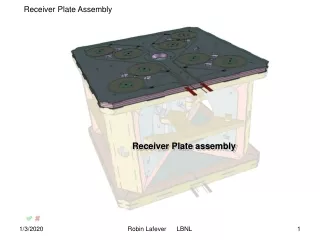
Receiver Plate assembly Robin Lafever LBNL
Parts layout To assemble one Receiver Plate, we need: Shield set, TBD 16 ReceiverCoils on Delrin Bobbins Tooling board, .75” Melamine Skins, .125” Plywood Cores, .375” ESB foam board Robin Lafever LBNL
Tooling Board with all possible Pins Tooling board is set up on a FLAT surface. Granite table, steel table, or Jig plate stock Robin Lafever LBNL
Tooling Board with likely Pins Tooling board is set up on a FLAT surface. Granite table, steel table, or Jig plate stock. Robin Lafever LBNL
Shield installation Shields are applied to the skin in a separate operation. Robin Lafever LBNL
The skin is flippedso that the shields will end upon the outside of the assembly. Wet surface 1 ( glue is actually on the bottom of the next plate ) Robin Lafever LBNL
Glue .375” ESB foam Shield Core Wet surface 2 Wet surface 1 Robin Lafever LBNL
Glue .375” ESB foam Center Core Dry surface Wet surface 2 Wet surface 1 Robin Lafever LBNL
A step is missing here: At this point the assembly gets clamped, and cured. Install .375” ESB foam Coil Cores Leave the loose until the Coils are installed Robin Lafever LBNL
At this point, the Electronikers need access to Install Receiver coils Robin Lafever LBNL
At this point, the Electronikers need access to Install Receiver coils Install leads, andhook up shield circuits And Null the Coils as best as possible Anything else?TBD Coils are tacked into place, gentlyand the glue-up proceeds Robin Lafever LBNL
Glue .375” ESB foam Shield Core Robin Lafever LBNL
Again, the Shields are installed onto the Skinin a separate operation. Robin Lafever LBNL
Glue on Skin/Shield plate Final assembly ready for clamping. Robin Lafever LBNL
Completed Receiver Plate assembly, ready for testing. Robin Lafever LBNL