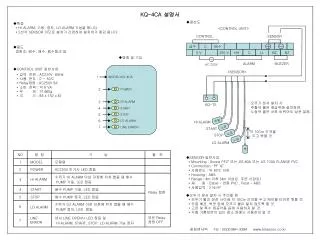
Download
1 / 7
70 likes | 107 Views
Onvis Security Alarm Contact Sensor (evaluation) - camera khu00f4ng du00e2y hu1ea3i nam<br>With the recent news that the Abode Iota hub/Camera has ended up being HomeKit suitable, which likewise consists of an alarm system, the idea of shielding one's home-- by means of HomeKit-- has come forward again in many peoples' minds. Obviously, this isn't something brand-new, but with the aforementioned Abode, as well as Honeywell being quite costly for some, or perhaps even overkill if you're living in a small apartment or shared holiday accommodation, camera khu00f4ng du00e2y hu1ea3i nam so tools like the Aqara hub with its integrated alarm have actually been of interest to the budget-conscious. When it concerns tight spending plans, this brand-new gadget from Onvis-- the Security Alarm Contact Sensor-- may be things some are looking for, with a consolidated get in touch with sensing unit and alarm, as well as a number of various other sensors included for good step, and no need for a center. However can a budget tool with whatever tossed into such a tiny device be any kind of good? Let's learn.<br><br>PRODUCT PACKAGING.<br><br>Front of box.<br><br>Side of box with specifications and demands.<br><br>Side of box with symbols for standard functionality.<br>Normal readers of my reviews will understand I appreciate decent packaging, as high as I dislike inadequate packaging, and also I'm delighted to claim this lands in the former group. It genuinely is a 'box' in regards to the very thick, sturdy card (like the kind you would certainly get for an iPhone) that's utilised, so the dainty little gadget within is well safeguarded. The front is straightforward sufficient, with the item envisioned along with the ever before encouraging Apple HomeKit logo design. The rear is all about the fine print and also isn't really of any major interest. One side of the box provides you a couple of symbols indicating the fundamental features of the device, whilst the opposite goes into specifications and also requirements;.<br><br>Safety alarm system-- Adjustable alarm system approximately 120dB. Four alarm system settings-- Home, Away, Night, Off.<br>Get in touch with sensor-- Detect on/off standing of your door or window from anywhere.<br>Notices-- Sends notices to your tool.<br>Temperature/Humidity-- Shows temperature level and humidity for the location where the alarm is based.<br>House automation-- Create personalized automations as well as scenes to manage your residence with any kind of HomeKit enabled devices.<br>In regards to specs and also needs, the device utilizes two AAA batteries, with a standby time of 1.5 years, and also Bluetooth LE 5.0 as its approach of communication. They recommend that you're going for the very least iOS12.1, as well as if you desire remote accessibility or create scenes and automations, you'll need a Home Hub, like the Apple TV4 (or higher), a HomePod, or a suitable iPad that's completely powered and linked to wifi. All rather typical stuff. You'll require to download and install the Onvis application for accessibility to certain setups and updates, although aside from these, you don't need to make use of the application for anything else, so you can use the Home application or various other 3rd celebration applications, like Eve, as I'll describe later.<br><br><br>Alarm, magnet as well as batteries.<br><br>Extra 3M sticker labels, guidebook, screws as well as a customer support card.<br>As soon as the box is opened, you'll see a little bag of contents, that includes the handbook (all in English) consisting of HomeKit code, a spare set of double-sided 3M stickers, a set of screws with rawl plugs, and also a client service card. Underneath that is the gadget itself-- The alarm/sensor, the going along with magnet and also 2 AAA batteries, all securely held in location with extremely dense foam. Equally as a side note, the batteries in the photo above will certainly more than likely vary from your own, as batteries weren't supplied when Onvis sent the tool to me-- delivering concerns evidently-- so I give these myself.<br><br>THE DEVICE.<br><br>Alarm/sensor and magnet.<br><br>Side of alarm/sensor.<br><br>Opposite side of alarm/sensor with HomeKit code.<br>The Alarm/sensor is made of very shiny white plastic as well as has the alarm audio speaker precisely the front, with the Onvis logo design directly below. When the door sensor is triggered, below that is a hidden LED that blinks. Near the bottom is a reset button, need to you need to get the gadget back to factory settings. When I initially saw this tool online, I really believed it was bigger, yet it's actually not as big as I assumed. The primary sensor is 90 x 38 x 21.4 mm/ 3.54 x 1.49 x 0.84 in. The magnet component has to do with a third of the size, at 34.9 x 15.7 x 14.8 mm/ 1.37 x 0.62 x 0.58 in.<br><br>Base of alarm/sensor.<br><br>Leading of alarm/sensor.<br>Around the body of the main device are openings, which I can just assume are 2 permit the dimension of temperature level and also humidity. Yes, not just does this have a call sensing unit with an integrated alarm system, however it additionally includes temperature level and moisture sensing units. This may seem a little bit strange, as well as I 'd possibly concur that it appears a little bit unjustified, yet if you don't already have any of these sensors, after that it does offer a lot more worth for cash, although if this is situated on your front door, I'm unsure how vital readings of these kinds would certainly be. I presume it's all to placement. This is also the instance with Onvis' various other HomeKit device, the SMS1 Motion sensor, which also has temperature level as well as humidity sensors integrated. You can review our testimonial of the SMS1 below.<br><br>Alam/sensor and also magnet, with markings for proper positioning.<br><br>Alarm/battery area.<br>Both the main sensing unit and also the coming with magnet have an indented circle on one side to reveal where the sensor as well as the magnet need to line up. The hand-operated states that the void between both requirements to be less than 20mm/ 0.79 in. Initially, I thought this was in referral to the distance in between the two parts once they would certainly been placed on your door, with the door closed, but it, actually, indicates that both circles need to align to within 20mm of each other in the upright airplane, so if for any reason you're not able line the circle markers up exactly, then attempt to guarantee they're within the 20mm limitation. No matter this, it's always excellent method to keep the sensor and also magnet near.<br><br>The battery compartment holds 2 AAA batteries and also is typical besides the reality it's really easy to open up and close. I 'd probably state also easy in some areas, and also it probably would've been a great concept to include a tiny screw that quits the door from being slid off so easily, in similar way that some video clip buzzer video cameras can be protected. Despite it just being utilized for inside your home, there could be a circumstance where somebody does manage to get into your home, but isn't discouraged by the alarm system and is rapidly able to deactivate it by taking the batteries out extremely quickly, which a protected screw would stop or at least seriously slow such an attempt down. Obviously, you would certainly obtain the notification, yet if you're far from home and also you're wishing the neighbours are paying attention, it's entirely possible that the alarm system would certainly get overlooked if it only blasts out for a few secs, with some individuals simply assuming the alarm was set off inadvertently. In a lot of situations, a prospective burglar would certainly hightail it out of there as soon as the alarm system is set off, so the possible circumstances mentioned is perhaps an extreme one, although still quite possible.<br><br>SETUP AND SETUP.<br><br>Onvis Alarm in Home app.<br><br>Onvis Alarm in Onvis application.<br>As the device is a fully-fledged HomeKit offering, you can just add it to the Home app in the same way you would any other. Nonetheless, much like other HomeKit gadgets, it's also good method to have the suppliers' app for not just updates however settings that aren't always readily available in the routine Home application. As you can see in the screencaps above, once installed, the device quits 4 separate ceramic tiles, although in the Home app they will at first be packed into one tile, so you're going to need to 'unbundle' them in the setups. There's a ceramic tile for the contact sensing unit, temperature level and also humidity. Furthermore, you get the alarm ceramic tile. This is virtually the same scenario with the Onvis application, offering you 4 ceramic tiles.<br><br>- camera hikvision hu1ea3i nam When it comes to tailor-making specific facets of the alarm, it's finest to do it in the Onvis application, as this is additionally where you'll be able to download any type of firmware updates (tip: there will certainly be ones waiting ...). In the settings web page, you can transform the name of the gadget, in addition to adjustment its place. You can set any of the 4 states we've already discussed-- Home, Away, Night and also Off.<br><br>You can likewise set the default quantity of the alarm-- Low, Mid and also High. I've been notified that if you intend to release an external audio resource for your alarm rather than the built-in alarm, such as your HomePod as an example, the firm are functioning to add a mute choice to the alarm system settings soon. Further down, you get to be able to readjust how long the alarm system rings for, with a minimum of 10 seconds as well as a maximum of 600 seconds (10 mins). Finally, if you're in requirement of removing the device, you can do so with the help of the large red 'Remove Accessory' switch.<br><br>ALARM SYSTEM MODES.<br><br>Alarm states in the Home app.<br><br>Alarm system states in the Onvis app.<br>When you press on the alarm ceramic tile in either app you obtain access to the four separate alarm 'states'-- Home, Away, Night and Off. This could appear a little bit complicated to some who are simply made use of to having 'Off' and also 'Away', but essentially, these states are the starting point for your own arrangements or automations. The Onvis handbook explains exactly how they regard these different states thus;.<br><br>House (it's described as Stay when you receive alerts)-- Home is occupied, and the homeowners are active. The safety and security alarm plays a 'ding dong' audio when the door opens (note: it's absolutely nothing like 'ding dong'). So, essentially this is the door not set to 'alarm system', but simply alert, so you recognize a person has come home, while you-- or somebody else-- is home.<br>Away-- The safety and security alarm system 'beeps' (the alarm seems) for 30 seconds when a person activates the get in touch with sensing unit. The Alarm time can be set from in between 10 and also 600 secs in the Onvis app. This is the fundamental armed alarm system.<br>Evening-- The house is occupied and also the locals are sleeping. The safety alarm system 'beeps' (the alarm sounds) for 30 seconds when a person causes the get in touch with sensor. The Alarm time can be set from between 10 and 600 seconds in the Onvis app. This is the same as the fundamental armed alarm, but as I'll describe later, they can vary.<br>Off-- The alarm system is deactivated. Really easy.<br>Keep in mind: At present, the 'Historic Records' switch appears to hang, although the firm have actually currently sent a fix for this, so it should no longer be a problem once the application upgrade has actually passed the common App Store review procedure.<br><br>In order to get the Away and also Night alarm settings to function in different ways, you need to produce an automation that's suitable for these scenarios, although in each case, these two settings will always cause the integrated alarm.<br><br>I'm going to begin with the Home app for the moment, to explain that whilst you have the four separate alarm states to select from in the Home app, you aren't able to set up external/3rd party tools to cause them because of this. This is relatively comparable to how the Aqara center operates in regards to alarm systems, in that the Home application only assists in triggering or shutting off the various modes, not configuring them. So properly, in the case of the Aqara hub, you need to set the tool that activates the alarm system (which needs to be a youngster device bound to the center-- i.e. Mijia or Aqara gadgets) in the Aqara or Mi Home application, depending on which of the two you're utilizing. In reference to the Aqara center, at present, you just have the arm or disarm (Away or Off) choices in the Home application. With the Onvis tool, this increases on what settings you intend to pick from, although it's to what you finish with those settings that make a difference. What should be understood, however, is that just like the Aqara center, only the Onvis call sensing unit can actually activate the alarm system. The large difference here is that with Aqara, you can choose your gadgets as the triggers for the alarm. As the onvis is a device unto itself, only its very own trigger tool-- the get in touch with sensing unit-- can be used. As Onvis also make a motion sensing unit, in addition to the honest HomeKit cam we pointed out a while back, it would certainly make a lot of sense to include these as extra outside trigger tools for the alarm, as well as after mentioning this to Onvis, they have actually informed me they're servicing an update to resolve this capability.<br><br>With all that claimed, what can you make with these settings? I 'd prompt you in this circumstances to start considering something like the Eve app, or various other 3rd celebration applications that permit complete control of these settings in automations. I'll demonstrate why these apps are essential to attain this later on, however initially, its excellent to start describing the various settings in better detail. so for instance, you could want to either established a Scene (or automation), that sets the alarm to Away mode, (which by default arms the alarm). The scene can also consist of turning lights or heating off, naturally.<br><br>For Home mode, this acts nearly the like Away mode, with the primary distinction being that whilst the alarm is 'equipped', as opposed to the piercing alarm noise being triggered when the get in touch with sensor reports the door being opened, it will certainly play a chime, which I formerly claimed was labelled a 'ding dong' sound. In actual reality, it's a little like the digital two-note beeps you might listen to if you unlock to a neighborhood corner store. This is seemingly designed to allow individuals who are currently home, recognize that the door has been opened, yet as they're home, there should be no cause for concern, as it merely notifies you that possibly your children have actually gotten back, or maybe your significant other has returned from work. You could intend to create a scene that, when the call sensor is caused under this setting, it additionally transforms one light red in the area (or areas) you invest a lot of your time in, to let you and also others recognize somebody has returned, as or else in order to be informed by the chime alone, it would certainly have to be set to optimal volume if you were at the various other end of your house.<br><br>Evening setting is even more of the exact same yet is more comparable to Away mode in that if the door opens up, the regular 120dB alarm will appear. As before, it needs to be specified that so as to get a different experience from Night setting compared to Away mode, you could want to work out the proper scene and equivalent automation. So, if the alarm system is triggered in Away mode, you'll desire the alarm to activate (as it will certainly do by default), and maybe have red lights come on where the entry is, to frighten the would-be burglar. Yet, if you establish Night mode you could desire extra lights to set off possibly, like your room lights ahead on at 100% illumination, to inform you if your phone is readied to 'do not disturb' for example.<br><br>The sensing unit will play a tone to allow you know when you pick any of the 4 settings in either the Home or Onvis application;.<br><br>When you select either the Night or Away settings, the sensing unit will certainly give out a short single tone.<br>If you select the Home setting, it will offer the two-tone audio mentioned previously.<br>If you pick the Off setting, it will certainly hand out 2 brief tones in succession.<br>CREATING SCENES AND AUTOMATIONS FOR THE MODES.<br><br>Evening alarm setting automation in the Eve application.<br><br>Evening alarm mode automation in the Home application.<br><br>Additional automation details in the Home app.<br>Regrettably, the Home application does not support automations that use the various modes, so it's down to the Eve application or comparable 3rd party applications to do the preliminary job. In the very first picture over, I've developed a basic automation;.<br><br>If the Onvis contact sensor 'call state' is 'no' (indicating the door is open).<br>With the condition that the Onvis alarm system mode is set to 'Night Arm'.<br>Then trigger the 'Lights Bright' scene (this transforms the room light on at 100% illumination).<br>As you can also see from the 3rd and also 2nd screenshots, as soon as you've produced the automation, it will appear in the Home app, practically as though it was produced there in the first place. If you take a look at the other alternatives available in both applications, you actually can develop some really intricate alarm situations, so you're just limited by your creativity and also what gadgets you have that can be included in claimed automations.<br><br>PHYSICAL PLACEMENT OF THE ALARM/SENSOR.<br><br>Like several call sensing units, the Onvis relies upon 2 components-- the sensor and a magnet. The magnet is typically fitted to the door jamb, with the sensor part suitable to the door. Sadly, as is additionally the case with a lot of get in touch with sensors, the magnet within the primary sensing unit is just on one side, and also when it comes to my front door, the door opens on the left from within. The link between the magnet as well as the sensor on the Onvis is on the right.<br><br>- dahua hu1ea3i nam Closeup-- put sidewards at the top of the door.<br>This indicates that in my situation (left-hand door), the sensor has to be either positioned upside down or positioned at top of the door, laterally. Neither looks terrific, as the Onvis logo design is upside down for the first option, and sideway for the 2nd. It's truly not completion of the globe, yet it would certainly have perhaps been an excellent idea for Onvis to add a magnet to both sides of the primary sensor, in order to fit door that opens up left wing as well as right. If you have a door with a large door jamb that can accommodate the text, after that it's also ok to place the sensing unit there naturally, but unless you occur to reside in a palace or castle, many modern residences and doors just have reasonably slim door jambs.<br><br>IN DAILY USE.<br><br>Onvis Alarm Sensor put on primary door.<br>When I at first mounted the Onvis sensing unit, all worked out, but after the very first 24 hours, I did run into a number of concerns. The very first one associates with notices; For some reason, the Onvis was sending arbitrary alerts to my phone by means of the Home app. These notices just reported on the state of the alarm-- Away or Off for example. A colleague of mine has actually reported the very same concerns with his examination unit and also has been experiencing numerous of these alerts. In my case, it has actually been possibly 2 or 3 a day, and also as of writing this testimonial, they seem to have actually greatly stopped. The firm understand this problem, and also I'm informed a repair is virtually all set. The other issue I initially had was that the tool detached on a number of occasions. I removed and also returned the batteries and also it returned, yet what I at some point observed was that it was essentially a little also far from my apple iphone as well as Home Hub (Apple TV4K), therefore would certainly disconnect as a result of an absence of a link. I was able to simply remedy this by turning on a second Apple TELEVISION I had in the same room as the Onvis, that was previously not set to serve as a Home Hub. As soon as I did this, I have not experienced any further disconnections, which is an alleviation. It does show, nonetheless, that regardless of this being a Bluetooth 5.0 device, which must have four times the reach of Bluetooth 4.2, the reach and also signal isn't as strong as I 'd expected. Could this be an insect within the coding for the Bluetooth chip? I don't understand, yet I feel it ought to be much better, and with any luck, the company can address this if it is indeed less than it needs to be. Actually, as many people understand, there are some severe problems still to repair with the Home app in iphone 13, so it's hard to position too much blame with the tool itself, as a minimum of three times a day, I need to reboot the apple iphone in order for the Home app to behave itself, which makes screening tools similar to this even more harder, if you have not obtained an app to create a typical, steady atmosphere to check it in.<br><br>Although admittedly, I'm not a substantial fan of Bluetooth devices, their Bluetooth movement sensing unit has actually been really trustworthy, and so far, since turning on the 2nd Apple TV, the Alarm Sensor has actually behaved very well also. Undoubtedly, to truly know how reliable something is in a more comprehensive sense, it takes a very long time to evaluate, but one could also say regarding the length of time one should test a device to regard it dependable-- if something is made for years of service, and also you evaluate it for a year prior to it stops working, was that enough time to consider it reputable? I'll leave that for you to choose, but also for the time being, thinking about the existing state of points, it appears suitable sufficient, especially for the rate.<br><br>SUMMARIZING.<br><br>- camera kbvision hu1ea3i nam I didn't have extremely high assumptions for this tool, simply based on the concept of exactly how it functions contrasted to a committed or even semi-dedicated alarm configuration. However, whilst this probably isn't appropriate for bigger house maybe, there are certain use situations for this; possibly you want to use this for a different privy or garage door (within series of program), or perhaps even a backup to a door with a sensor already in position. I would recommend that a tool like this is optimal for individuals in smaller sized apartment or condos or perhaps people that stay in shared lodging, with their very own lockable room possibly. It might also be useful in student holiday accommodation, where there often tend to be a great deal more goings and also comings. It's additionally reasonable to highlight the truth that as it's Bluetooth, there's no demand for a center, as well as it does not depend on wifi (besides remote accessibility), so it does have a great deal going for it.<br><br>I've currently highlighted the possibility for this device to be disabled by just eliminating the batteries, although as I also mentioned, it's unlikely that somebody will certainly spend the time to find the alarm and also determine how to open it, with 120dB blasting their eardrums, especially when it's bound to attract a reasonable little interest, so this is an uncommon scenario, to be reasonable. Inevitably, it would be much better if you could pick various other tools to cause the alarm based on the type of setting the alarm remains in, yet this is just how it is with all alarm in HomeKit, in that the alarm can only be triggered by gadgets in its very own community. This is where, in some ways, the Aqara system has the side, as you can appoint different sensing units to work as the trigger in different modes. The Aqara system doesn't presently expose the four settings in HomeKit currently though, and also the United States Aqara center is nearly twice the cost of this Onvis alarm sensing unit, even before you start getting sensors, which can vary in between $10-- $20 each. If you currently have some Aqara sensors as well as the hub, you possibly won't require this, presuming Aqara does bring the four modes into HomeKit.<br><br>- camera hai nam

E N D
Onvis Security Alarm Contact Sensor (review) - camera ip hai nam With the recent information that the Abode Iota hub/Camera has become HomeKit compatible, which additionally consists of an alarm, the concept of safeguarding one's home-- by means of HomeKit-- has actually come to the fore again in many peoples' minds. Obviously, this isn't something brand-new, however with the aforementioned Abode, and also Honeywell being quite pricey for some, or maybe even overkill if you're staying in a small apartment or shared holiday accommodation, camera wifi hai nam so gadgets like the Aqara center with its built- in alarm have been of rate of interest to the budget-conscious. When it involves limited budget plans, this new device from Onvis-- the Security Alarm Contact Sensor-- could be the thing some are searching for, with a mixed get in touch with sensor and also alarm system, in addition to a couple of other sensors included completely measure, as well as no requirement for a center. Yet can a budget device with every little thing thrown into such a tiny tool be any great? Allow's discover. PRODUCT PACKAGING. Front of box. Side of box with demands and also specs. Side of box with icons for basic capability. Routine visitors of my reviews will understand I value respectable packaging, as much as I hate inadequate product packaging, and I'm glad to claim this lands in the former category. It absolutely is a 'box' in terms of the very thick, strong card (like the kind you 'd obtain for an iPhone) that's used, so the dainty little device within is well protected. The front is straightforward enough, with the product imagined together with the ever before encouraging Apple HomeKit logo. The back is all about the fine print as well as isn't really of any type of significant passion. One side of package offers you a few symbols showing the fundamental functions of the tool, whilst the other side goes into needs as well as specs;. Security alarm-- Adjustable alarm system as much as 120dB. Four alarm system modes-- Home, Away, Night, Off. Get in touch with sensor-- Detect on/off condition of your door or home window from anywhere. Notifications-- Sends notices to your device. Temperature/Humidity-- Shows temperature and moisture for the location where the alarm is based. Residence automation-- Create customized automations and scenes to manage your residence with any type of HomeKit enabled accessories. In terms of specifications and requirements, the device uses two AAA batteries, with a standby time of 1.5 years, and Bluetooth LE 5.0 as its technique of communication. They recommend that you're going for the very least iOS12.1, and also if you desire remote accessibility or develop scenes and also automations, you'll require a Home Hub, like the Apple TV4 (or higher), a HomePod, or an appropriate iPad that's permanently powered and connected to wifi. All rather standard stuff. You'll need to download the Onvis app for accessibility to specific settings as well as updates, although besides these, you don't need to make use of the app for anything else, so you can make use of the Home application or various other 3rd party apps, like Eve, as I'll describe later on. Alarm system, magnet and batteries.
Spare 3M stickers, guidebook, screws and also a customer support card. As soon as the box is opened, you'll see a tiny bag of contents, that includes the handbook (all in English) consisting of HomeKit code, a spare collection of double-sided 3M sticker labels, a set of screws with rawl plugs, and a customer support card. Beneath that is the device itself-- The alarm/sensor, the coming with magnet as well as two AAA batteries, all firmly kept in location with really thick foam. Equally as a side note, the batteries in the picture above will most likely differ from your own, as batteries thiết bị chống trộm qua điện thoại weren't provided when Onvis sent out the device to me-- shipping problems obviously-- so I supply these myself. THE DEVICE. Alarm/sensor and magnet. Side of alarm/sensor. Opposite of alarm/sensor with HomeKit code. The Alarm/sensor is made from really shiny white plastic as well as has the alarm system audio speaker right on the front, with the Onvis logo directly listed below. Underneath that is a concealed LED that blinks when the door sensor is triggered. At the bottom is a reset button, need to you need to get the tool back to manufacturing facility settings. When I initially saw this tool online, I really believed it was bigger, yet it's really not as large as I assumed. The major sensor is 90 x 38 x 21.4 mm/ 3.54 x 1.49 x 0.84 in. The magnet component is about a 3rd of the dimension, at 34.9 x 15.7 x 14.8 mm/ 1.37 x 0.62 x 0.58 in. Base of alarm/sensor. Leading of alarm/sensor. All around the body of the main gadget are openings, which I can just think are two allow for the dimension of temperature level and also humidity. Yes, not just does this have a contact sensor with an integrated alarm system, but it also consists of temperature level as well as humidity sensors. This may appear a bit strange, and I 'd possibly concur that it seems a little bit gratuitous, yet if you don't already have any of these sensors, then it does supply a thiết bị báo trộm giá sỉ lot more worth for cash, although if this is situated on your front door, I'm not exactly sure how important analyses of these kinds would be. I guess it's all to positioning. This is also the instance with Onvis' other HomeKit device, the SMS1 Motion sensing unit, which also has temperature level and also humidity sensing units integrated. You can read our testimonial of the SMS1 right here. Alam/sensor and magnet, with markings for correct placement. Alarm/battery area. Both the major sensing unit and the accompanying magnet have an indented circle on one side to show where the sensor as well as the magnet should align. The hand-operated states that the space between the two requirements to be less than 20mm/ 0.79 in. At first, I believed this was in recommendation to the range in between the two parts once they would certainly been positioned on your door, with the door closed, however it, in fact, suggests that both circles need to align to within 20mm of each other in the upright aircraft, so if for any kind of factor you're incapable line the circle pens up specifically, after that attempt to guarantee they're within the 20mm limitation. Despite this, it's constantly good method to maintain the sensing unit as well as magnet near. The battery area holds two AAA batteries and also is typical with the exception of the reality it's really very easy to
open as well as close. I 'd probably say as well simple in some areas, and also it most likely would've been an excellent suggestion to include a tiny screw that quits the door from being slid off so quickly, in similar way that some video doorbell cameras can be protected. Regardless of it just being made use of for inside, there could be a situation where somebody does procure right into your home, yet isn't hindered by the alarm as well as is swiftly able to deactivate it by taking the batteries out very fast, which a secure screw would quit or at the very least seriously slow such an attempt down. Certainly, you would certainly obtain the notice, but if you're far from home as well as you're really hoping the neighbours are listening, it's completely possible that the alarm would get neglected if it only blasts out for a couple of secs, with some individuals simply thinking the alarm system was caused accidentally. In many situations, a prospective thief would certainly hightail it out of there as soon as the alarm system is caused, so the possible instance pointed out is maybe a severe one, although still rather feasible. INSTALLATION AND SETUP. Onvis Alarm in Home app. Onvis Alarm in Onvis app. As the device is a fully-fledged HomeKit offering, you can simply include it to the Home application similarly you would certainly any other. However, just like other HomeKit devices, it's additionally excellent practice to have the producers' application for not just updates however setups that aren't constantly offered in the normal Home app. As you can see in the screencaps over, when set up, the gadget surrenders four separate ceramic tiles, although in the Home app they will originally be packed right into one floor tile, so you're going to need to 'unbundle' them in the setups. There's a tile for the get in touch with moisture, temperature level and sensing unit. In addition, you obtain the alarm system ceramic tile. This is basically the exact same scenario with the Onvis app, giving you 4 floor tiles. - camera reolink hải nam When it pertains to customising certain elements of the alarm system, it's ideal to do it in the Onvis app, as this is additionally where you'll be able to download any kind of firmware updates (hint: there will certainly be ones waiting ...). In the setups web page, you can alter the name of the tool, in addition to change its area. You can set any of the four states we've already mentioned-- Home, Away, Night and also Off. You can additionally set the default quantity of the alarm system-- Low, Mid as well as High. I've been informed that if you want to deploy an external noise source for your alarm system rather than the built-in alarm system, such as your HomePod for example, the business are functioning to include a mute option to the alarm system modes soon. Even more down, you reach have the ability to change how much time the alarm system rings for, with a minimum of 10 seconds and also a maximum of 600 secs (10 mins). Ultimately, if you're in demand of getting rid of the tool, you can do so with the help of the huge red 'Remove Accessory' switch. ALARM MODES. Alarm system states in the Home app. Alarm states in the Onvis app. When you press on the alarm tile in either app you get access to the 4 different alarm 'states'-- Home, Away, Night and also Off. This might appear a little bit complicated to some who are simply made use of to having 'Off' and 'Away', however basically, these states are the beginning point for your own arrangements or automations. The Onvis manual explains exactly how they regard these various states therefore;. Home (it's described as Stay when you obtain notices)-- Home is inhabited, as well as the homeowners are active. The protection alarm plays a 'ding dong' noise when the door opens (note: it's absolutely nothing like 'ding dong'). So, basically this is the door not set to 'alarm system', however merely notification, so you understand
someone has actually returned, while you-- or someone else-- is residence. Away-- The safety alarm 'beeps' (the alarm system sounds) for 30 secs when a person causes the get in touch with sensing unit. The Alarm time can be established from in between 10 and 600 thiết bị chống trộm nhà ở secs in the Onvis app. This is the fundamental armed alarm system. Evening-- The house is occupied and the residents are sleeping. The security alarm 'beeps' (the alarm appears) for 30 seconds when someone sets off the call sensing unit. The Alarm time can be set from in between 10 and 600 secs in the Onvis application. This is the same as the fundamental armed alarm system, but as I'll describe later on, they can differ. Off-- The alarm system is disarmed. Extremely basic. Keep in mind: At existing, the 'Historic Records' switch seems to hang, although the company have actually already submitted a fix for this, so it should no more be an issue once the app upgrade has actually passed the standard App Store testimonial process. To get the Away as well as Night alarm system modes to work differently, you need to develop an automation that's suitable for these situations, although in each case, these two modes will constantly trigger the built-in alarm system. I'm mosting likely to begin with the Home app for the moment, to make clear that whilst you have the four different alarm system states to select from in the Home application, you aren't able to set up external/3rd celebration devices to trigger them therefore. This is relatively comparable to just how the Aqara center operates in terms of alarms, because the Home application only assists in turning on or deactivating the different settings, not configuring them. So successfully, in the case of the Aqara center, you need to establish the gadget that sets off the alarm system (which has to be a child device bound to the center-- i.e. Mijia or Aqara tools) in the Aqara or Mi Home application, depending on which of both you're using. In reference to the Aqara center, today, you just have the arm or disarm (Away or Off) options in the Home app. With the Onvis tool, this expands on what modes you intend to choose from, although it's to what you make with those modes that make a distinction. What ought to be understood, nonetheless, is that much like the Aqara center, only the Onvis contact sensing unit can in fact activate the alarm. The large difference below is that with Aqara, you can decide on your tools as the triggers for the alarm system. As the onvis is a gadget unto itself, only its very own trigger gadget-- the contact sensor-- can be used. As Onvis additionally make a motion sensing unit, in addition to the upcoming HomeKit cam we pointed out a while back, it would make a great deal of feeling to include these as additional outside trigger devices for the alarm, as well as after discussing this to Onvis, they have educated me they're working with an upgrade to resolve this performance. With all that stated, what can you finish with these modes? I would certainly advise you in this instance to start considering something like the Eve app, or other 3rd event applications that permit complete control of these modes in automations. I'll show why these apps are important to achieve this later on, but first, its great to begin describing the various settings in far better detail. so for instance, you may wish to either established a Scene (or automation), that sets the alarm to Away mode, (which by default arms the alarm). The scene can additionally include transforming lights or heating off, naturally. For Home mode, this acts almost the like Away setting, with the main distinction being that whilst the alarm is 'armed', rather than the piercing alarm system noise being caused when the contact sensor reports the door being opened, it will play a chime, which I formerly stated was classified a 'ding dong' noise. In actual truth, it's a bit like the digital two-note beeps you might listen to if you open the door to a regional convenience store. This is seemingly created to let people who are already home, know that the door has been opened, yet as they're home, there need to be no cause for issue, as it merely alerts you that maybe your children have arrived home, or perhaps your better half has returned from work. You may wish to create a scene that, when the contact sensor is
triggered under this setting, it additionally transforms one light red in the area (or areas) you invest a lot of your time in, to allow you and others understand somebody has gotten back, as or else in order to be informed by the chime alone, it 'd need to be set to optimal quantity if you were at the various other end of your house. Night setting is even more of the same but is a lot more comparable to Away mode in that if the door opens up, the regular 120dB alarm will certainly seem. As previously, it needs to be mentioned that in order to get a different experience from Night setting compared to Away setting, you could wish to exercise the proper scene and matching automation. So, if the alarm system is set off in Away setting, you'll want the alarm system to turn on (as it will certainly do by default), and maybe have actually traffic signals begun where the entryway is, to frighten the would-be trespasser. However, if you establish Night setting you may desire extra lights to cause possibly, like your room lights to come on at 100% brightness, to inform you if your phone is readied to 'do not disrupt' for instance. When you choose any of the four modes in either the Home or Onvis app, the sensing unit will certainly play a tone to allow you understand;. The sensor will provide out a brief single tone when you select either the Night or Away modes. If you select the Home mode, it will certainly provide the two-tone noise mentioned formerly. It will offer out two brief tones in sequence if you select the Off setting. PRODUCING SCENES AND AUTOMATIONS FOR THE MODES. Evening alarm system mode automation in the Eve app. Night alarm system setting automation in the Home application. Further automation information in the Home application. Regrettably, the Home app does not sustain automations that utilise the various modes, so it's down to the Eve application or comparable 3rd event applications to do the initial job. In the initial photo above, I've developed a basic automation;. If the Onvis get in touch with sensor 'contact state' is 'no' (implying the door is open). With the condition that the Onvis alarm system setting is set to 'Night Arm'. After that turn on the 'Lights Bright' scene (this transforms the room light on at 100% illumination).
As you can also see from the second and also 3rd screenshots, as soon as you've developed the automation, it will certainly appear in the Home application, practically as though it was created there in the first place. If you take a look at the various other alternatives offered in both applications, you truly can create some extremely complicated alarm system scenarios, so you're just limited by your imagination and also what devices you have that can be consisted of in claimed automations. PHYSICAL PLACEMENT OF THE ALARM/SENSOR. Like numerous get in touch with sensors, the Onvis relies upon two components-- a magnet and also the sensor. The magnet is usually fitted to the door jamb, with the sensing unit part fitting to the door. However, as is also the case with a lot of contact sensors, the magnet within the major sensing unit is only on one side, and when it comes to my front door, the door opens on the left from within. The connection in between the magnet and the sensor on the Onvis is on the right. - camera không dây hải nam Closeup-- positioned sidewards on top of the door. This indicates that in my situation (left-hand door), the sensing unit needs to be either placed upside-down or positioned at top of the door, sidewards. Neither looks terrific, as the Onvis logo is upside-down for the first option, as well as sideway for the second. It's really not the end of the globe, yet it would certainly have perhaps been a great suggestion for Onvis to include a magnet to both sides of the main sensor, in order to accommodate door that opens on the left and right. If you have a door with a very large door jamb that can suit the text, after that it's likewise alright to put the sensing unit there certainly, however unless you happen to live in a palace or castle, many modern-day residences as well as doors just have reasonably thin door jambs. IN DAILY USE. Onvis Alarm Sensor positioned on major door. When I at first installed the Onvis sensor, all went well, but after the first 24 hours, I did experience a https://camerawifihd.info/thiet-bi-chong-trom/ number of problems. The very first one associates with alerts; For some factor, the Onvis was sending out random notifications to my phone through the Home application. These notices merely reported on the state of the alarm-- Away or Off for instance. An associate of mine has reported the exact same concerns with his examination device and has actually been experiencing numerous of these notices. In my situation, it has been maybe 2 or 3 thiết bị báo trộm rẻ nhất a day, and as of creating this evaluation, they appear to have mainly quit. The business recognize this concern, and I'm told a repair is virtually prepared. The various other issue I originally had was that the tool separated on a number of celebrations. I eliminated and returned the batteries as well as it came back, but what I at some point saw was that it was basically a little too far from my iPhone as well as Home Hub (Apple TV4K), and so would certainly separate because of an absence of a connection. I was able to just treat this by triggering a second Apple TELEVISION I had in the exact same room as the Onvis, that was previously not set to serve as a Home Hub. As quickly as I did this, I haven't experienced any type of further disconnections, which is a relief. It does show, however, that in spite of this being a Bluetooth 5.0 gadget, which ought to have 4 times the reach of Bluetooth 4.2, the reach and signal isn't as solid as I 'd anticipated. Could this be a bug within the coding for the Bluetooth chip? I don't know, yet I feel it ought to be better, and ideally, the firm can resolve this if it is without a doubt less than it needs to be. In reality, as many people realize, there are some serious concerns still to repair with the Home app in iphone 13, so it's difficult to position too much blame with the device itself, as at the very least 3 times a day, I need to reboot the iPhone in order for the Home application to behave itself, which makes testing gadgets like this all the more harder, if you haven't gotten an app to create a typical, stable setting to evaluate it in. Although unquestionably, I'm not a large fan of Bluetooth tools, their Bluetooth movement sensing unit has been really trustworthy, and so far, because triggering the 2nd Apple TELEVISION, the Alarm Sensor has actually
behaved effectively as well. Obviously, to really understand how trustworthy something is in a broader feeling, it takes a very long time to evaluate, however one could also say regarding the length of time one should evaluate a gadget to consider it dependable-- if something is created for many years of service, as well as you test it for a year before it stops working, was that enough time to deem it trusted? I'll leave that for you to determine, but for the time being, taking into account the present state of points, it seems suitable enough, particularly for the rate. SUMMING UP. - camera reolink hải nam I really did not have very high expectations for this gadget, just based on the concept of just how it functions contrasted to a specialized or perhaps semi-dedicated alarm system setup. Nevertheless, whilst this possibly isn't ideal for bigger residence perhaps, there are definite usage cases for this; maybe you wish to utilize this for a different privy or garage door (within series of course), or perhaps even a backup to a door with a sensor currently in position. I would recommend that a device like this is perfect for individuals in smaller homes or perhaps people who reside in common lodging, with their own lockable room probably. It could additionally serve in pupil holiday accommodation, where there have a tendency to be a lot even more goings and upcomings. It's also reasonable to highlight the fact that as it's Bluetooth, there's no demand for a hub, and it does not count on wifi (besides remote gain access to), so it does have a whole lot going all out. I've currently highlighted the capacity for this device to be disabled by merely removing the batteries, although as I also specified, it's unlikely that someone will spend the moment to situate the alarm system as well as figure out how to open it, with 120dB blasting their tympanums, particularly when it's bound to attract a fair bit of attention, so this is an unusual situation, to be reasonable. Eventually, it would certainly be better if you could select other tools to cause the alarm based upon the sort of mode the alarm remains in, however this is exactly how it is with all alarm in HomeKit, because the alarm system can only be activated by devices in its very own ecological community. This is where, somehow, the Aqara system has the side, as you can appoint various sensing units to serve as the trigger in different settings. The Aqara system does not presently reveal the 4 settings in HomeKit at this time though, and also the United States Aqara center is virtually two times the cost of this Onvis alarm sensing unit, also prior to you begin getting sensing units, which can range between $10-- $20 each. If you currently have some Aqara sensors and the hub, you most likely won't require this, assuming Aqara does bring the four settings into HomeKit. - camera chong trom hai nam