Download
1 / 9
90 likes | 103 Views
The Seig X2 is the perfect milling machine that does the job and survives Texan weather. These machines have been used for decades and provide a robust platform for milling operations. <br>This machines come with a hanle that has precision turning placed on ball bearings. These ball bearsings are made from high grade steel that performs well under tough circumstances. <br>

E N D
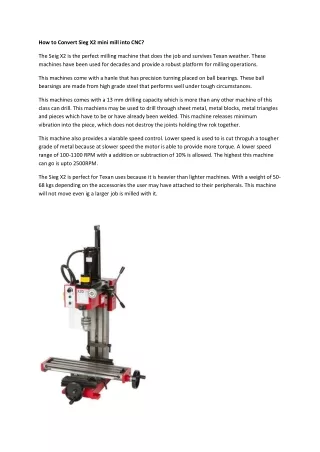
How to Convert Sieg X2 mini mill into CNC? The Seig X2 is the perfect milling machine that does the job and survives Texan weather. These machines have been used for decades and provide a robust platform for milling operations. This machines come with a hanle that has precision turning placed on ball bearings. These ball bearsings are made from high grade steel that performs well under tough circumstances. This machines comes with a 13 mm drilling capacity which is more than any other machine of this class can drill. This machiens may be used to drill through sheet metal, metal blocks, metal triangles and pieces which have to be or have already been welded. This machine releases minimum vibration into the piece, which does not destroy the joints holding thw rok together. This machine also provides a viarable speed control. Lower speed is used to is cut throguh a tougher grade of metal because at slower speed the motor is able to provide more torque. A lower speed range of 100-1100 RPM with a addition or subtraction of 10% is allowed. The highest this machine can go is upto 2500RPM. The Sieg X2 is perfect for Texan uses because it is heavier than lighter machines. With a weight of 50- 68 kgs depending on the accessories the user may have attached to their peripherals. This machine will not move even ig a larger job is milled with it.
The drilling head can drill through tough metal. The drill bits are replaceable and can be changed periodically over longer use. A small turning handle on the table on the bottom provides the user the ability to precisely change the position of the XY table on the bottom. The Sieg X2 mini mill is a 350 watt variable speed milling machine. This machine has the largest XY travel in its class has an R8 spindle taper and comes with a robust dovetail column and air spring head support. This type of manually operated mill has been the backbone of the industry for almost a 100 years now. This machine provides robust drilling and milling capabilities in a small, light weight yet durable form factor. This is due to superior design and workmanship standard this machine is built with. With the advent of machine to machine communication and programmable logic devices the need for a human operator to observe the machine or to guide it in its job has become obsolete. These machines can be boot-strapped with a DIY microcontroller and servo motors and converted into a CNC machine. A typical conversion kit includes ball screws, ball nuts, bearings, 3 high precision servo motors, stainless steel cap screws and helical couplings. All of these parts are made from anodised aluminium because the anodization provides corrosion resistance and the metal is light weight.
It is very easy to convert the milling machine into a CNC. These parts do not require any additional hole drilling or grinding of any kind. Texans love them big screws. This Sieg X2 mill is the best to buy. These conversion kits are better than getting your own parts made as they will be more costly and will require you to spend hours designing the perfect components. The procedure for this requires the user to remove the handles from the X-Y bed. The table can be removed this way and Y lead screw can also be removed. This is the screw that is holding the bed together. These screws can be found on either end of the table. It is advised to keep a pair of pliers, screw drivers and grease handy. These nuts and bolts have been industrially fixed in place and may require a bit of convincing to un-screw. After these screws have been removed the table can be easily slid of the frame holding it. The Y lead screw is the driving screw which is turned by hand to move the Y axis.
This screw will be replaced by a ball and nut screw in the same position as the one which was used before it. The screw is used to turn the bottom table of the machine. The table comes with two channels which are half and inch apart. These channels are used to fasten a jig with bolts so that a job which has unusual edges and geometries to it can be fastened. These channels are made from well machines parts which are made in a CNC also. The CNC used to build this machine has a drill bit which can withstand higher pressures put on it.
There will be some tweaking required once in a while to get things in place so do not worry if the machine does not fit together like lego. It was never built to do that. After this bolt has been put into place you can now mount the quarter inch plate into place and we can start with the assembly of the z and x axis motor. The x axis motor will be mounted at the other end of the table. Flip the mill now and remove the gas spring from the z-axis. This is done by removing the cap screw from the back of the machine which holds the gas spring from inside the column. The next part which has to be removed is the spline rail.
To remove the spline the head must be taken off the top and the screws holding it in place must be taken out. After doing this properly the spline rail will look something like this.
After doing this we are almost done converting the mill into a CNC. The only thing left to completely convert the Sieg X2 mill into a CNC is to put the electronics in place. The Sieg X2 mill is a machine which can move in 3 axes. The X,Y,Z. Three servo motors will be required to control these axes. The motors will also need a driver to stabilize the current and a power supply. The list of components used for this job are 1-3 pcs 270 oz-in stepper motors, NEMA23 NEMA23 270oz/in 2.8A 1/4" Dual Shaft Stepper Motor 2-3 pcs: KL-5056 Drivers: DIP switch current setting with 8 different value, up to 5.6A peak, 1.26A 1.80A, 2.36A, 2.92A, 3.51A, 4.09A, 4.64A, 5.2A, Selectable resolutions: 2, 4, 8, 16, 32, 64, 126, 5, 10,20,25,40,50,100,125 3-1 pcs 48V/7.3A Power Supply 110VAC/220VAC 4-1 pcs C10 6 axis Breakout board (you can wire x, y, x limit switch, E-stop)
5-1pcs 5V power supply 110VAC/220VAC The schematic to put all these electronics in place is given below. These parts sure do come handy. Texans love this big machines. This machine is even used to drill holes in bullet cartridges. These cartridges are made from high grade steel which even the high pressure generated from the expanding gunpowder cannot make. This proves the loyalty and the robustness of this machine. The circuit used to run the electronics for this machine is built from premium copper. The Printed Circuit Board laminate is made from conducting copper foil, which the layers of the laminate are embossed into. The copper foil has etched layers on it which generate the artwork necessary to conduct electricity. The printed circuit board on these electronic parts are made from a material called FR4. This material has excellent fire retardant properties. This material is manufactured widely throughout the world, which make it very easy to replace and find new parts for this machine.
It is best to get a servo motor with the maximum number of inside edges because these machines provide the smallest possible movement. These movements can be tied specifically to each pulse which is travelling through the printed circuit board.