ENGINE OIL
22. ENGINE OIL. Figure 22-1 The SAE viscosity rating required is often printed on the engine oil filler cap.

ENGINE OIL
E N D
Presentation Transcript
22 ENGINE OIL
Figure 22-1 The SAE viscosity rating required is often printed on the engine oil filler cap.
Figure 22-2 API doughnut for a SAE 5W-30, SN engine oil. When compared to a reference oil, the “energy conserving” designation indicates a 1.1% better fuel economy for SAE 10W-30 oils and 0.5% better fuel economy for SAE 5W-30 oils.
REAL WORLD FIX: The Case of the Wrong Oil Viscosity A 2007 Dodge Durango 5.7 liter Hemi with a multiple displacement system (MDS) had the oil changed at a shop. SAE 10W-30 was used as this was the “standard” bulk oil in the shop. After the oil change, the vehicle was returned to the customer. Within a few minutes, however, the “check engine” light came on. The technician checked for diagnostic trouble codes (DTCs) and found a P0521 DTC stored. The technician checked service information and discovered that the code could be set if the incorrect viscosity engine oil had been used. The description of the P0521 read: “Oil pressure not reaching specified at 1250 RPM.” The technician changed the oil and used the specified SAE 5W-20, then cleared the DTC. A test drive confirmed that the change to the correct viscosity oil solved the problem.
Figure 22-3 The International Lubricant Standardization and Approval Committee (ILSAC) starburst symbol. If this symbol is on the front of the container of oil, then it is acceptable for use in almost any gasoline engine.
TECH TIP: Three Oil Change Facts Three facts that are important to know when changing oil are: 1. Recommended SAE viscosity (thickness) for the temperature range that is anticipated before the next oil change (such as SAE 5W-30) 2. Quality rating as recommended by the engine or vehicle manufacturer such as API SM and other specified rating such as the ILSAC and vehicle manufacturer’s specifications 3. Recommended oil change interval (time or mileage) (usually every 5,000 miles or every six months)
Figure 22-4 ACEA ratings are included on the back of the oil container if it meets any of the standards. ACEA ratings apply to European vehicles only such as BMW, Mercedes, Audi, and VW.
Figure 22-5 Viscosity index (VI) improver is a polymer and feels like finely ground foam rubber. When dissolved in the oil, it expands when hot to keep the oil from thinning.
TECH TIP: Dirty Engine Oil Can Cause Oil Burning Service technicians have known for a long time that some of their customers never change the engine oil. Often these customers believe that because their engine uses oil and they add a new quart every week, they are doing the same thing as changing the oil. But dirty, oxidized engine oil could cause piston rings to stick and not seal the cylinder. Therefore, when the oil and filter are changed, the clean oil may free the piston rings, especially if the vehicle is driven on a long trip during which the oil is allowed to reach the normal operating temperature. An engine that is mechanically sound, but burning oil, may be “fixed” by simply changing the oil and filter.
FREQUENTLY ASKED QUESTION: Can Newer Engine Oils Be Used in Engines That Use Flat-Bottom Lifters No. Newer oil standards are designed to reduce phosphates in the engine oil that may leak past piston rings and end up in the exhaust system. These additives found in oil can then damage the catalytic converter. The levels of phosphate and zinc, commonly referred to as zinc dialkyl dithiophosphate ( ZDDP or ZDP), have been reduced because they can cause damage to the catalytic converter. Even though engines consume very little oil, if the oil contains zinc, the efficiency of the catalytic converter is reduced. The use of ZDDP was intended to reduce sliding friction in an engine. Sliding friction is usually found in engines that use flat-bottom lifters. Most, if not all, engines produced over the past 15 years have used roller lifters or cam followers, so using the new oil without ZDDP is not a concern. Even diesel oils have reduced amounts of the zinc, so many camshaft manufacturers are recommending the use of an additive. Older oils had up to 0.15% ZDDP and now SM-rated oils list the zinc at just 0.08% or 800 parts per million.
FREQUENTLY ASKED QUESTION: Can Newer Engine Oils Be Used in Engines That Use Flat-Bottom Lifters (cont.) • Engine oil had about 1,200 ppm zinc prior to 2001. • In 2001, the zinc was reduced to 1,000 ppm; and in 2005, reduced again to the current 800 ppm. • API ratings do not specify the zinc content, just oil performance. If driving a vehicle with flat-bottom lifters, use engine oil specifically designed for older engines, such as Shell Rotella T, or use an additive, such as General Motor’s engine oil supplement (EOS), part number 1052367 or 88862586, or a zinc additive. Check with camshaft manufacturers for their recommended oil or additive to use. - SEE FIGURE 22–6 .
Figure 22-6 Using a zinc additive is important when using SM or SN-rated oil in an engine equipped with a flat-bottom lifter, especially during the break-in period.
Figure 22-7 Mobil 1 synthetic engine oil is used by several vehicle manufacturers in new engines.
Figure 22-8 Both oils have been cooled to -20°F (-29°C). Notice that the synthetic oil on the left flows more freely than the mineral oil on the right even though both are SAE 5W-30.
TECH TIP: Use Synthetic Engine Oil in Lawn and Garden Equipment Most four-cycle lawn and garden equipment engines are air cooled and operate hotter than many liquid-cooled engines. Lawn mowers and other small engines are often operated near or at maximum speed and power output for hours at a time. These operating conditions are hard on any engine oil. Try using synthetic oil. The cost is not as big a factor because most small four-cycle lawn mower engines require only about 1/2 quart (1/2 liter) of oil. The synthetic oil is able to perform under high temperatures better than conventional mineral oils.
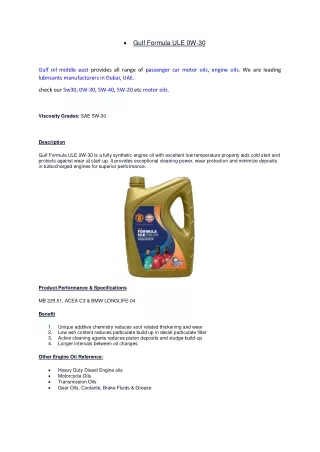
Figure 22-9 European vehicle manufacturers usually specify engine oil with a broad viscosity range, such as SAE 5W-40, and their own unique standards, such as the Mercedes specification 229.51. Always use the oil specified by the vehicle manufacturer.
Figure 22-10 A rubber diaphragm acts as an antidrainback valve to keep the oil in the filter when the engine is stopped and the oil pressure drops to zero.
Figure 22-11 A cutaway of a typical spin-on oil filter. Engine oil enters the filter through the small holes around the center of the filter and flows through the pleated paper filtering media and out the large hole in the center of the filter. The center metal cylinder with holes is designed to keep the paper filter from collapsing under the pressure. The bypass valve can be built into the center on the oil filter or is part of the oil filter housing and located in the engine.
Figure 22-12 A typical filter crusher. The hydraulic ram forces out most of the oil from the filter. The oil is trapped underneath the crusher and is recycled.
FREQUENTLY ASKED QUESTION: Why Change Oil If the Oil Filter Can Trap All the Dirt? Many persons believe that oil filters will remove all dirt from the oil being circulated through the filtering material. Most oil filters will filter particles that are about 10 to 20 microns in size. A micron is one-millionth of a meter or 0.000039 in. Most dirt and carbon particles that turn engine oil black are less than a micron in size. In other words, it takes about 3 million of these carbon particles to cover a pin head. To help visualize the smallness of a micron, consider that a typical human hair is 60 microns in diameter. In fact, anything smaller than 40 microns is not visible to the human eye. The dispersants added to engine oil prevent dirt from adhering together to form sludge. It is the same dispersant additive that prevents dirt from being filtered or removed by other means. If an oil filter could filter particles down to 1 micron, it would be so restrictive that the engine would not receive sufficient oil through the filter for lubrication. Oil recycling companies use special chemicals to break down the dispersants, which permit the dirt in the oil to combine into larger units that can be filtered or processed out of the oil.
Figure 22-13 Many vehicle manufacturers can display the percentage of oil life remaining, whereas others simply turn on a warning lamp when it has been determined that an oil change is required.
TECH TIP: Follow the Seasons Vehicle owners often forget when they last changed the oil. This is particularly true of the person who owns or is responsible for several vehicles. A helpful method for remembering when the oil should be changed is to change it at the start of each season of the year. • Fall (September 21) • Winter (December 21) • Spring (March 21) • Summer (June 21) Remembering that the oil needs to be changed on these dates helps owners budget for the expense and the time needed.
TECH TIP: The Pick Trick Removing an oil filter that is installed upside down can be a real mess. When this design filter is loosened, oil flows out from around the sealing gasket. To prevent this from happening, use a pick to poke a hole in the top of the filter, as shown in - FIGURE 22–14 . This small hole allows air to get into the filter, thereby allowing the oil to drain back into the engine rather than remain in the filter. After punching a hole in the filter, be sure to wait several minutes to allow time for the trapped oil to drain down into the engine before loosening the filter.
Figure 22-14 (a) A pick is pushed through the top of an oil filter that is positioned vertically.
Figure 22-14 (b) When the pick is removed, a small hole allows air to get into the top of the filter which then allows the oil to drain out of the filter and back into the engine.
TECH TIP: Change Oil Every Friday? A vehicle less than one year old came back to the dealer for some repair work. While writing the repair order, the service advisor noted that the vehicle had 88,000 miles on the odometer and was, therefore, out of warranty for the repair. Because the owner approved the repair anyway, the service advisor asked how he had accumulated so many miles in such a short time. The owner said that he was a traveling salesperson with a territory of “east of the Mississippi River.” Because the vehicle looked to be in new condition, the technician asked the salesperson how often he had the oil changed. The salesperson smiled and said proudly, “Every Friday.” Many fleet vehicles put on over 2,000 miles per week. How about changing their oil based on the time since last changed instead of by mileage?
OIL CHANGE 1 Before entering the customer’s car for the first time, be sure to install a seat cover as well as a steering wheel cover to protect the vehicle’s interior.
OIL CHANGE 2 Run the engine until it is close to operating temperature. This will help the used oil drain more quickly and thoroughly.
OIL CHANGE 3 Raise the vehicle on a hoist, and place the oil drain container in position under the oil drain plug. Be sure to wear protective gloves.
OIL CHANGE 4 Remove the plug and allow the hot oil to drain from the engine. Use caution during this step as hot oil can cause painful burns!
OIL CHANGE 5 While the engine oil continues to drain, remove the engine oil filter using a filter wrench. Some oil will drain from the filter, so be sure to have the oil drain container underneath when removing it.
OIL CHANGE 6 Compare the new oil filter with the old one to be sure that it is the correct replacement.
OIL CHANGE 7 The wise service technician adds oil to the oil filter whenever possible. This provides faster filling of the filter during start-up and a reduced amount of time that the engine does not have oil pressure.
OIL CHANGE 8 Apply a thin layer of clean engine oil to the gasket of the new filter. This oil film will allow the rubber gasket to slide and compress as the oil filter is being tightened.
OIL CHANGE 9 Clean the area where the oil filter gasket seats to be sure that no part of the gasket remains that could cause an oil leak if not fully removed.
OIL CHANGE 10 Install the new oil filter and tighten it by hand. Do not use an oil filter wrench to tighten the filter! Most filters should be tightened 3/4 of a turn after the gasket contacts the engine.
OIL CHANGE 11 Carefully inspect the oil drain plug and gasket. Replace the gasket as needed. Install the drain plug and tighten firmly but do not overtighten!
OIL CHANGE 12 Lower the vehicle and clean around the oil fill cap before removing it.
OIL CHANGE 13 Use a funnel to add the specified amount of oil to the engine at the oil fill opening. When finished, replace the oil fill cap.
OIL CHANGE 14 Start the engine and allow it to idle while watching the oil pressure gauge and/or oil pressure warning lamp. Oil pressure should be indicated within 15 seconds of starting the engine.
OIL CHANGE 15 Stop the engine and let it sit for a few minutes to allow the oil to drain back into the oil pan. Look underneath the vehicle to check for any oil leaks at the oil drain plug(s) or oil filter.
OIL CHANGE 16 Remove the oil-level dipstick and wipe it clean with a shop cloth.
OIL CHANGE 17 Reinstall the oil-level dipstick. Remove the dipstick a second time and read the oil level.
OIL CHANGE 18 The oil level should be between the MIN and the MAX lines. In this case, the oil level should be somewhere in the cross-hatched area of the dipstick.