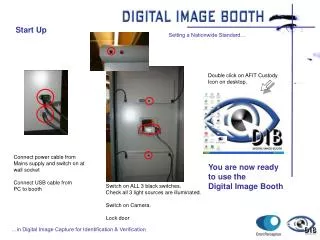
Start Up
Start Up. Double click on AFIT Custody Icon on desktop. Connect power cable from Mains supply and switch on at wall socket Connect USB cable from PC to booth. You are now ready to use the Digital Image Booth. Switch on ALL 3 black switches. Check all 3 light sources are illuminated.

Start Up
E N D
Presentation Transcript
Start Up Double click on AFIT Custody Icon on desktop. Connect power cable from Mains supply and switch on at wall socket Connect USB cable from PC to booth You are now ready to use the Digital Image Booth Switch on ALL 3 black switches. Check all 3 light sources are illuminated. Switch on Camera. Lock door
You should now see the DIB /AFIT Custody screen. The Snap button is highlighted indicating the system is ready to capture an image. Ask the subject to enter the booth and seat themselves on the stool.
Setting a Nationwide Standard… • Seat subject in booth • Adjust stool so that eyebrows are level with the red guideline by way of the height adjustment ring under the seat cushion. • Ensure subject has a straight back – as a guide the right ear should be inline with the left hand upright. …in Digital Image Capture for Identification & Verification
Click the snap button ONCE to capture your image when you are confident the subject is seated correctly. (A quick visual inspection on screen can be done by looking at the right hand side of the image and the alignment of the eyes.)
Once the picture is taken the software analyzes the image for compliance to the rigorous standards set. If the image is FIND compliant you will receive a green light on the left hand side of the screen and a save button will appear. Should you receive a red light only the resume button will be visible and the operator has no option but to re-take the photo. We will go into red lights and faults further on in this guide.
Click the Save button via your mouse/pointer control The image is then sized to FIND standards and saved to the correct directory within NICHE RMS and can be accessed immediately by the Custody Suite Operative. Open the Subjects custody file. Go to the image input screen. Click on the camera icon. The FIND compliant image can then be ‘double clicked’ for insertion into the custody file.
Once the image has been saved to the Custody File, the booth can be used to take further images. Repeat the image capture process as previously. The ‘new’ image taken will automatically overwrite the image in the NICHE directory - NOT the custody file image. This failsafe action allows for only one image to be available for a custody file at any one time and avoids insertion of wrong images for the corresponding subject. The following slides will show examples of verification, possible reasons and the answers to achieve a green light result with every image. RED LIGHT
Head Tilt: Head tilt affects the compliancy of the image. Minor tilting (taking into account various postures encountered) can be adjusted by the AFIT Custody Software without any user intervention required to achieve a green light result. Solution: Click the resume button. Ask the subject to straighten their head. This can be seen during the live video relay before image capture re-take image.
Head Forward or looking Down: Also affects the compliancy of the image. AFIT Custody Software will be unable to get a measurement of the subjects eyes. Solution: Click the resume button. Ask the subject to lift their head or sit upright. This can be seen during the live video relay before image capture. re-take image.
Head backward or looking up: Also affects the compliancy of the image. AFIT Custody Software will be unable to get a measurement of the subjects eyes. Solution: Click the resume button. Ask the subject to straighten/lower their head. This can be seen during the live video relay before image capture re-take image.
Extras in DIB Suite Additional features and there useage: Height Scale: Range: 24” to 84” (also cm reading) with Digital display screen. Choice of inches or cm’s Weighing Platform: Calibrated and will weigh up to 300Kilos. Reading sent to digital display screen. Choice of Kg’s or lb’s Smartwater recognition UV lighting: Safe low level UV (BLB) for use when trying to detect smartwater security suspects.
Height Scale: Range: 24” to 84” (also cm reading) with Digital display screen. Choice of inches or cm’s Height reading is displayed on the digital read-out in units chosen by the operative. Lower the head guide so it rests on the subjects head. Get subject to stand with their back to the height measure and heels touching the lower plate. The height measure will auto power-down after 5 minutes. Press START button to re-start application and await a positive reading before taking measurement. If digital display shows -------- , then move head platten until signal is accepted and a reading is showing.
Weighing Platform: Calibrated and will weigh up to 300Kilos. Reading sent to digital display screen. Choice of Kg’s or lb’s Ensure screen is reading 0.0 before weighing. Get subject to stand with their feet fully on the platform Take reading from digital display in unit measure of choice. For very large subjects (protuding stomachs) get them to enter the booth facing backwards. The weighing scales will auto power-down after 5 minutes. Press on/off button to re-start application and await 0.0 reading before taking measurement. The scales are calibrated before installation. Do not allow subjects to JUMP on scales.
‘Smartwater’ detection Lighting Safe UV lighting fitted independent of other lightsources. The UV Lights are controlled by the RED switch on the outside of the booth. For more accurate useage, switch off ALL 3 photo light sources by way of the black buttons. Seat or stand subject in DIB suite. If smartwater residue is present the offender and his/her clothing will show traces of the coloured die.