Turning Around
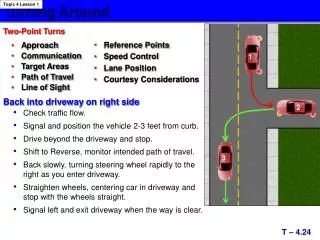
Turning Around. Topic 4 Lesson 1. Two-Point Turns. Reference Points Speed Control Lane Position Courtesy Considerations. Approach Communication Target Areas Path of Travel Line of Sight. 1. Back into driveway on right side. 2. Check traffic flow.

Turning Around
E N D
Presentation Transcript
Turning Around Topic 4 Lesson 1 Two-Point Turns • Reference Points • Speed Control • Lane Position • Courtesy Considerations • Approach • Communication • Target Areas • Path of Travel • Line of Sight 1 Back into driveway on right side 2 • Check traffic flow. • Signal and position the vehicle 2-3 feet from curb. • Drive beyond the driveway and stop. • Shift to Reverse, monitor intended path of travel. • Back slowly, turning steering wheel rapidly to the right as you enter driveway. • Straighten wheels, centering car in driveway and stop with the wheels straight. • Signal left and exit driveway when the way is clear. 3 T – 4.24
Turning Around Topic 4 Lesson 1 Two-Point Turns • Approach • Communication • Target Areas • Path of Travel • Line of Sight • Reference Points • Speed Control • Lane Position • Courtesy Considerations 1 Pull into driveway on left side • Check traffic flow. • Signal and position your vehicle 3-6 inches from center yellow line. • When traffic is clear, pull into the driveway and stop. • Shift to Reverse, monitor intended path. • Back slowly, turning steering wheel rapidly to the right as you exit driveway. • Straighten wheels, centering car in proper lane. • Shift into Drive. Check traffic and accelerate to normal speed. 2 3 T – 4.25
Turning Around Topic 4 Lesson 1 Three-point Turn 2 4 1 3 5 • References • Speed Control • Lane Position • Courtesy Considerations • Approach • Communication • Target Areas • Path of Travel • Line of Sight NOTE: The safest way to change direction is to drive around the block! T – 4.26
Angle Parking Topic 5 Lesson 1 Parking at a 30 Degree Angle to the Curb • Signal intention and position vehicle 3-5 feet from the space in which the vehicle is to be parked. • Move forward until the steering wheel is aligned with the first pavement line. • Visually target the middle of the parking space and turn the wheel sharply at a slow, controlled speed. • Steer toward the target in the center of the space to straighten the wheels and stop when the front bumper is 3-6 inches from the curb. T – 4.27
Perpendicular Parking Topic 5 Lesson 1 Parking at a 90 Degree Angle to the Curb • Signal intention and position the vehicle 5 – 6 feet away from the space. • Move forward until the driver’s body is aligned with the first pavement line. • Visually target the center of the parking space and turn the wheel rapidly while controlling speed. • Steer towards the target and straighten the wheels. • Position the front bumper 3 – 6 inches from the curb. • http://www.youtube.com/watch?v=xyV44OHh8_I&safety_mode=true&persist_safety_mode=1&safe=active T – 4.28
Parallel Parking Topic 5 Lesson 1 Parking Parallel to the Curb • Select a space that is at least five feet longer than your vehicle. Flash your brake lights and put on your turn signal as you approach the space. • Monitor the traffic to the rear. • Place your vehicle 2 – 3 feet from the vehicle you want to park behind with back bumpers even. • Put your vehicle in Reverse. Back slowly and turn the steering wheel sharply. • Stop when your steering wheel is aligned with the back bumper of the front vehicle. • Continue backing slowly while steering sharply in the opposite direction. Use quick glances to the front and rear. • Center the vehicle in the space. Wheels should be 6 – 12 inches from the curb. • http://www.youtube.com/watch?v=TMrO_-bsooQ&safety_mode=true&persist_safety_mode=1&safe=active T – 4.29
Topic 5 Lesson 1 Hill Parking When parking on a hill, you need to take special precautions to ensure your vehicle will not roll into the street and into traffic. UpHill - Curb Down Hill UpHill + Curb • Approach • Communication • Target Areas • Path of Travel • Line of Sight • Speed Adjustment • Lane Position • Reference Points • Courtesy Considerations T – 4.30
Topic 1 Lesson 1 Characteristics of an Expressway • Controlled access (limited entry and exit) • High speed (up to 65 mph) • Divided by a barrier or median • Multiple lanes • May have minimum speed limit • Only for motorized vehicles T – 6.1
Topic 1 Lesson 2 Cloverleaf Interchange A cloverleaf interchangehas a series of entrance and exit ramps that resemble the outline of a four leaf clover. This design allows for the interchange of two expressways or major roadways. has shared entrance and exit weave lanes. Traffic is permitted to move ONLY in the direction indicated by the arrows. T – 6.2
Topic 1 Lesson 2 Diamond Interchange A diamond interchangeis designed to be used when a road with slower speeds crosses a busy expressway. This design allows: • for the interchange of a major roadway with a secondary dual or multiple lane roadway. Traffic is permitted to move ONLY in the direction indicated by the arrows. T – 6.3
Topic 1 Lesson 2 Trumpet Interchange A trumpet interchangeis used when an intersecting side road forms a T intersection with the expressway. This design: accommodates the T-intersection flow of traffic at the junction of two roadways. allows for traffic on a secondary two-way street to merge onto a multiple lane roadway. Traffic is permitted to move ONLY in the direction indicated by the arrows. T – 6.4
Topic 1 Lesson 2 Frontage Road Interchange Frontage Road Interchangesallow vehicles using parallel secondary two-way or one-way roadways to merge onto a major multiple lane roadway. This design allows: • drivers to exit a multiple lane roadway and use the parallel frontage road. • secondary road traffic flows to mix efficiently with higher speed traffic flows on the multiple lane roadway. Traffic is permitted to move ONLY in the direction indicated by the arrows. T – 6.5
Common Expressway Signs Topic 1 Lesson 3 Guide signs Interstate signs Speed limit signs Warning signs A major contributor to your decision as to how you will maintain a safe path of travel, proper lane position, and your lane choice, is based on the information provided by the road signs and lane markings. T – 6.6
Common Expressway Signals Topic 1 Lesson 3 Reversible lane signals Lane Signals A GREEN arrow over a lane — the lane is open for travel. A RED “X” over a lane — travel in that lane is closed or prohibited. A YELLOW “X” over a lane — travel in that lane is about to change or close. T – 6.7
Entrance Ramps Topic 2 Lesson 1 Entrance ramps provide one-way directional access to an expressway. The ramp is divided into three sections: Merge Area 1. The Entrance or Access Ramp —gives the driver time to begin evaluating traffic conditions. 2. The Acceleration Lane —allows a driver to adjust vehicle speed to the speed of traffic on the expressway. Acceleration Lane 3. The Merging Area — allows the driver to merge onto the expressway. Entrance Ramp T – 6.9
Entering the Entrance Ramp Topic 2 Lesson 1 Enter the Entrance Ramp Begin Searching for a Gap / Open Space Identify Gap / Space Entrance Ramp Entrance Ramp T – 6.10
Acceleration Lane Topic 2 Lesson 1 • Use the left-lane signal indicator • Adjust speed to match the speed of the traffic on the expressway • Monitor gap on expressway Acceleration Lane T – 6.11
Entering Merge Area Topic 2 Lesson 1 • Accelerate to blend with the speed of traffic on the expressway • Check Rear and Left Rear Zones Merge Area Merge Area T – 6.12
Selecting the Appropriate Lane Topic 2 Lesson 1 When merging onto an expressway, stay in the right lane until you become accustomed to the faster traffic flow. • Center Vehicle in Proper Lane • Adjust Speed to Traffic Flow and Legal Limit T – 6.15
Topic 2 Lesson 2 Reduced Risk Lane Changes Reasons for changing lanes include: Exit Ramp • Entering or exiting • Allowing another driver to enter • Following large or slow-moving vehicles • Lane ahead becomes blocked • Being tailgated • Animals • Passing Entrance Ramp T – 6.16
Topic 2 Lesson 2 Reduced Risk Lane Changes Steps to safely change lanes: • Maintain a safe following distance from the vehicles in front of you. • Check traffic ahead, behind and to the sides (mirrors and head check). • Signal your intention to change lanes. • Select a safe gap in traffic. • Re-check blind spots in the direction of the lane change. • Adjust your speed — if clear, steer smoothly to the new lane, if not, wait and cancel your turn signal. • Move one lane at a time. Scan in direction of the BLUE arrows T – 6.16a
Choosing Lanes at Exit or Entrance Topic 2 Lesson 2 • Right Lane: • Heavier and slower vehicles • Vehicles entering the expressway • Vehicles getting ready to exit Exit / Entry Right Lane Center Lane Left Lane • Center Lane: • Long distance or passing • Left Lane: • Higher speed and passing traffic T – 6.17
Passing on Multi-Lane Roads Topic 2 Lesson 3 • Check traffic ahead, to the sides, and behind • Signal • Make a head check • Accelerate smoothly • Change lanes smoothly • Cancel signal • Pass and signal to return • Check mirrors • When both sets of headlights of the vehicle being passed are visible, return to the lane • Cancel signal • Adjust speed and/or vehicle position to create space all around your vehicle The RED line shows path of the red car. TheBLUE arrows show where the driver’s eyes are searching. T – 6.19
When Being Passed Topic 2 Lesson 3 • Monitor passing vehicle’s position • Move to lane position 3 to increase space cushion • Do not increase speed—decelerate if necessary • Once passed, create space ahead and behind move away T – 6.20
Multiple Lane Roadway Exit Topic 2 Lesson 4 An expressway exit has two components: Exit Ramp 1. The Deceleration Lane —gives the driver the time and space needed to adjust his/her vehicle’s speed to the slower posted ramp speed without disrupting the flow of traffic on the expressway. Deceleration Lane 2. The Exit Ramp —allows traffic to enter an adjoining roadway. T – 6.21
Topic 2 Lesson 4 Identify the Exit Early • Exits are marked with guide signs, usually one to two miles before the exit. • You can determine if an exit is a right exit or a left exit by the position of the exit number on the sign. So, Exit 45A is a right exit, because in this picture the exit number on the upper right-hand side of the sign. • In Virginia, exit numbers correspond with mile marker numbers. • About one-half mile (20- to 30- seconds) before the exit, signal and move to the lane closest to the deceleration lane. T – 6.21a
Topic 2 Lesson 4 Exiting the Expressway • Signal • Maintain speed while on the expressway • Use mirrors to check behind and to the sides • Check mirror blindzones • Move into deceleration lane • Prepare to decelerate quickly Exit Ramp Deceleration Lane Deceleration Lane T – 6.22
Weave Lane Topic 2 Lesson 4 Traffic entering and exiting the expressway uses the same lane. To avoid a conflict, the driver in the BLUE car entering from the entrance ramp must yield the right-of-way to the driver in the RED car who is leaving the expressway. T – 6.25
Topic 2 Lesson 4 Potential Exiting Problems There may be a STOP sign or a traffic light at the end of the exit ramp. The driver must adjust from a fast speed to a STOP in a short distance. • “Weave” lane conflicts • Short deceleration lane • Sharp curve on ramp • Traffic stopped on the exit ramp T – 6.26
Topic 3 Lesson 1 On the Expressway… Do Not: • Drive over or across the median or yellow painted line. • Make a left turn or a U-turn on crossovers (designed for emergency vehicles only). • Use the left lane except for passing. • Change lanes without signaling and checking for an adequate gap in traffic. T – 6.27
Topic 3 Lesson 1 On the Expressway… Do Not: • Drive onto an expressway except from an on-ramp. • Park or Stop on an expressway shoulder unless you have an emergency or mechanical difficulties. • Backup. • Walk or ride a bike. T – 6.28
Topic 3 Lesson 1 Highway Hypnosis Plan breaks and rest stops to combat highway hypnosis or go to a safe area for rest or sleep when tired. Is a dulled or drowsy condition that can occur when driving long distances Situation becomes worse when the driver’s eyes focus on the center line. T – 6.31
Topic 3 Lesson 1 Ramp Metering • Used to control large volumes of traffic entering expressways • Uses a system of lights and sensors • Allows only a few cars at a time to enter congested limited access highways T – 6.32
Topic 3 Lesson 1 Short Trips on Expressways • Know the name, route, and number of the entrance and exit to be used • Check vehicle for maintenance problems • Take a local map Plan a time to travel to avoid congestion around major cities T – 6.33
Topic 3 Lesson 2 Increase Following Distance INCREASE • When following large trucks or buses • When following motorcycles • When driving in bad weather • When being tailgated • When driving with a heavy load or pulling a trailer • When entering/exiting the expressway T – 6.36
Topic 3 Lesson 2 Special Roadway Conditions Expressways through cities • Avoid driving in the right lane when vehicles are merging • Search for signs, signals, and roadway markings • Search for exits early and adjust position in adequate time to exit safely • Don’t make last minute lane changes to gain access to an exit • Monitor the zones around your vehicle and adjust position to create space cushions Disabled vehicles • Don’t be a “rubber necker” • Give the disabled vehicle plenty of room • Pull as far off the roadway as possible if your vehicle becomes disabled T – 6.37
Topic 3 Lesson 2 Special Roadway Conditions Construction areas Use caution when approaching: • Search ahead for warning signs. • Reduce your speed. • Adjust position to maintain a space around your vehicle. Toll booths • Exact change booths — The driver deposits coins (exact change) into a machine. • Attendant operated booths — For large vehicles or drivers without exact change. • Electronically operated booths — For drivers with prepaid accounts (Smart Tag). When exiting a toll-booth plaza, search traffic to both sides for open space, accelerate smoothly, and adjust speed to blend with the flow of traffic. T – 6.37a