Checkers: Setting the Board
Learn how to set up a checkers board using HTML, create a function for dynamic gameplay, and track checkers with arrays. Includes example codes and explanations for a comprehensive understanding.

Checkers: Setting the Board
E N D
Presentation Transcript
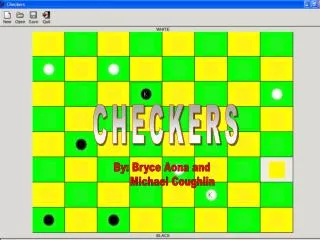
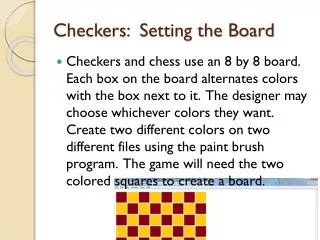
Checkers: Setting the Board • Checkers and chess use an 8 by 8 board. Each box on the board alternates colors with the box next to it. The designer may choose whichever colors they want. Create two different colors on two different files using the paint brush program. The game will need the two colored squares to create a board.
Creating the html • For this assignment we will be using 64 img commands. The img commands will be created with HTML code. Each line of images will have 8 small boxes that appear on the screen. Notice that the next line starts with a different color than the previous line started with. In HTML, one way to get a new line is the <br> command. This will break the line into two different lines for appearances.
Function setBoard() explanation • The function shows an example of how to display two boxes. However, this game requires 64 boxes. Use for loops to have the code repeat. Their should be two separate loops, one inside or “nested” inside the other.
Function setBoard() <html> <script type="text/javascript"> setBoard() function setBoard(){ for(b=0;b<4;b++){ for(a=0;a<4;a++){ document.write('<img height="60" width="60" src="blankRed.png" onClick="userClicked(0);">'); document.write('<img height="60" width="60" src="blankGold.png" onClick="userClicked(0);">'); } document.write('<br>'); for(a=0;a<4;a++){ document.write('<img height="60" width="60" src="blankGold.png" onClick="userClicked(0);">'); document.write('<img height="60" width="60" src="blankRed.png" onClick="userClicked(0);">'); } document.write('<br>'); } } </script> <html>
Review • Checkers: Setting the Board • Creating the HTML • Function setBoard() explanation • Function setBoard()
Where are the Checkers? • A problem with the function written previously is that there are no checkers on the board. Also, there should be a way to keep track of what checkers and empty boxes are where, so later the game can let stuff move. To expand the program, an array will be used to keep track of the checkers. With the array used, the display function of setBoard() can be changed to look at variables so that the game can change dynamically.
The board[][] variable. • It could get very confusing to think of the board as 64 individual squares. Instead, we declare an array of lines of squares with this code: varboard=new Array(8); • Since there are 8 lines, we then declare 8 rows of squares with this code: for (i=0; i <8; i++) board[i]=new Array(8);
The picture files • Now that we have a board set up with blanks, it would be a good idea to get a few pictures of checkers. Notice that this version is using 4 picture files. Two of them are blank and two of them are red backgrounds with different colored checkers on them. The designer may choose whatever colors they prefer so long as the file names are correct.
var board=new Array(8); for (i=0; i <8; i++) board[i]=new Array(8); //1=red, 2=gold, 3=red with gold checker, 4=red with blue checker board[0][0]=4;board[1][0]=2;board[2][0]=4;board[3][0]=2;board[4][0]=4;board[5][0]=2;board[6][0]=4;board[7][0]=2; board[0][1]=2;board[1][1]=4;board[2][1]=2;board[3][1]=4;board[4][1]=2;board[5][1]=4;board[6][1]=2;board[7][1]=4; board[0][2]=4;board[1][2]=2;board[2][2]=4;board[3][2]=2;board[4][2]=4;board[5][2]=2;board[6][2]=4;board[7][2]=2; showBoard(); function showBoard() { for(b=0;b<8;b++){ for(a=0;a<8;a++){ if(board[a][b]==1) document.images[b*8+a].src="blankRed.png"; if(board[a][b]==2) document.images[b*8+a].src="blankGold.png"; if(board[a][b]==3) document.images[b*8+a].src="redWithGoldChecker.png"; if(board[a][b]==4) document.images[b*8+a].src="redWithBlueChecker.png"; } } }
Review • Where are the checkers? • The board[][] variable • The picture files • Example code: showBoard();
showBoard’s variables Before showBoard is called, there is a lot of information assigned to variables. For example, board[0][0]=4; is written. This sets the number 4 to the column in the first row of the board. board[0][1]=2; sets the second column in the first row to 2. By going through 64 statements such as these, the programmer can inform the computer of what exactly goes on each square.
Double For Loops • To go through the columns of the lines, variable b is used. To go through each line, variable a is used. By using this “double for loop” approach, the programmer can look at every square on the game board: for(b=0;b<8;b++){ for(a=0;a<8;a++){ board[a][b]=whatever; } }
document.images[b*8+a] • The web browser shows the 64 images and their settings by giving each one a number. Remember it starts with zero not with one. The document refers to the web page its self. The images refer to the collection of images on the page. The math b*8 multiplies the number of rows by 8. For example, if it was in row 2, column 3, the computer would do 2 * 8 is 16 and add 3 to it. This would change the picture in images[19].
Choosing the correct image There are 4 images created for the program. Each image has been given a number. The program has a comment to explain which is which: //1=red, 2=gold, 3=redwithgoldchecker, 4=redwithbluechecker As the showBoard() function goes through each square, it looks at the variable in board[][] and uses that to choose which image is required. For example, if the board[a][b] was set to 1, then it would be a blank red image. if(board[a][b]==1) document.images[b*8+a].src="blankRed.png";
Review • showBoard’s variables • Double for loops • document.images[b*8+a] • Choosing the correct image
Get ready to respond to the player To know what square the player is pressing, the userClicked function needs to be called with the number of the square. To do this, we declare the count variable, put the count variable inside the write command and increase the count each time. See the text below: varcount = 0; for(b=0;b<4;b++){ for(a=0;a<4;a++){ document.write('<img height="60" width="60" src="blankRed.png“ onClick="userClicked(' + count + ');">'); count++;
function userClicked • The userClicked function must be created so that something will happen when the person playing the game clicks a square. Try this simple example below: function userClicked(imageNumber){ document.images[imageNumber].src="blankRed.png"; }
userClicked continued • So far if everything is working, the player can turn parts of the board to be blank. However, we will need more for a person to be able to play a game. Our next version of userClicked will switch one area of the game board with another. By doing this a player can “move” their checker.
Improved userClick() In this example, instead of changing the picture, the image is given a border and reduced in size so that the border and picture fit in the same place. function userClicked(imageNumber){ document.images[imageNumber].border=5; document.images[imageNumber].height = document.images[imageNumber].height -10; document.images[imageNumber].width = document.images[imageNumber].width -9; }
Review • Get ready to respond to the player • Function userClicked • userClicked continued • Improved userClick()
UserClick that moves checker function userClicked(imageNumber){ //this will see if the user made a 2nd click and if it did it will change the checker positions var t; if(lastClicked > -1){ //convert the imageNumber into row and column numbers b = Math.floor(imageNumber /8); a = imageNumber-(8*b); b2 = Math.floor(lastClicked /8); a2 = lastClicked-(8*b2); //do the variable swap t=board[a][b]; board[a][b]=board[a2][b2]; board[a2][b2]=t; //reset last clicked so that the next click will show a fresh selection lastClicked= -1; } //if this is the first click, then set lastClicked so that it will be available next time else{ lastClicked=imageNumber; } //redisplay the board with the change in board[][] variables showBoard(); }
Other improvement ideas: aesthetics There is lots of room for improvement. Use your imagination and the Internet. Here are some ideas to get you started: • Make the boring checker and box pictures more awesome. • When the player clicks from place to place, show the first click so they can see where the checker is coming from. • Sounds when a player clicks. • More awesome page with any other great looking things.
Other Improvement Ideas: Function Make it so that if a checker gets “jumped” that it will replace the jumped checker with a blank. Make it so that the game will not let the player do an illegal move. Make it so that the computer will move after the player moves. Have the program say when the game no longer has any moves left. Make a GO CRAZY button to have the checker board scramble all over.
Rubric 20 points each • Implement the basic example codes with copy and paste to an uploaded .htm file. • Create and upload original picture files for the game. • Create original functional improvements • Create original aesthetic improvements. • Explain original functional and aesthetic improvements in a paragraph on the bottom of the page.
Review • UserClick that moves checker • Other Improvement Ideas: Aesthetics • Other Imrpvoement Ideas: Function • Rubric 20 Points Each
<html> <script type="text/javascript"> setBoard(); var board=new Array(8); for (i=0; i <8; i++) board[i]=new Array(8); //1=red, 2=gold, 3=red with gold checker, 4=red with blue checker board[0][0]=4;board[1][0]=2;board[2][0]=4;board[3][0]=2;board[4][0]=4;board[5][0]=2;board[6][0]=4;board[7][0]=2; board[0][1]=2;board[1][1]=4;board[2][1]=2;board[3][1]=4;board[4][1]=2;board[5][1]=4;board[6][1]=2;board[7][1]=4; board[0][2]=4;board[1][2]=2;board[2][2]=4;board[3][2]=2;board[4][2]=4;board[5][2]=2;board[6][2]=4;board[7][2]=2; board[0][3]=2;board[1][3]=1;board[2][3]=2;board[3][3]=1;board[4][3]=2;board[5][3]=1;board[6][3]=2;board[7][3]=1; board[0][4]=1;board[1][4]=2;board[2][4]=1;board[3][4]=2;board[4][4]=1;board[5][4]=2;board[6][4]=1;board[7][4]=2; board[0][5]=2;board[1][5]=3;board[2][5]=2;board[3][5]=3;board[4][5]=2;board[5][5]=3;board[6][5]=2;board[7][5]=3; board[0][6]=3;board[1][6]=2;board[2][6]=3;board[3][6]=2;board[4][6]=3;board[5][6]=2;board[6][6]=3;board[7][6]=2; board[0][7]=2;board[1][7]=3;board[2][7]=2;board[3][7]=3;board[4][7]=2;board[5][7]=3;board[6][7]=2;board[7][7]=3; showBoard(); varlastClicked = -1; function userClicked(imageNumber){ //this will see if the user made a 2nd click and if it did it will change the checker positions var t; if(lastClicked > -1){ //convert the imageNumber into row and column numbers b = Math.floor(imageNumber /8); a = imageNumber-(8*b); b2 = Math.floor(lastClicked /8); a2 = lastClicked-(8*b2); //do the variable swap t=board[a][b]; board[a][b]=board[a2][b2]; board[a2][b2]=t; //reset last clicked so that the next click will show a fresh selection lastClicked= -1; } //if this is the first click, then set lastClicked so that it will be available next time else{ lastClicked=imageNumber; } //redisplay the board with the change in board[][] variables showBoard(); } function showBoard() { for(b=0;b<8;b++){ for(a=0;a<8;a++){ if(board[a][b]==1) document.images[b*8+a].src="blankRed.png"; if(board[a][b]==2) document.images[b*8+a].src="blankGold.png"; if(board[a][b]==3) document.images[b*8+a].src="redWithGoldChecker.png"; if(board[a][b]==4) document.images[b*8+a].src="redWithBlueChecker.png"; } } } function setBoard(){ var count = 0; for(b=0;b<4;b++){ for(a=0;a<4;a++){ document.write('<img height="60" width="60" src="blankRed.png" onClick="userClicked(' + count + ');">'); count++; document.write('<img height="60" width="60" src="blankGold.png" onClick="userClicked(' + count + ');">'); count++; } document.write('<br>'); for(a=0;a<4;a++){ document.write('<img height="60" width="60" src="blankGold.png" onClick="userClicked(' + count + ');">'); count++; document.write('<img height="60" width="60" src="blankRed.png" onClick="userClicked(' + count + ');">'); count++; } document.write('<br>'); } } </script> <html>