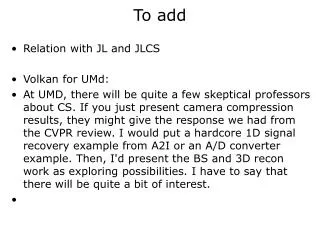
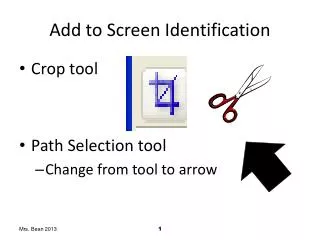
Add to Screen Identification
Add to Screen Identification. Crop tool Path Selection tool Change from tool to arrow. History Panel. Why is it called History?? Remembering what happened in the past! Click in the Main Menu bar, Window, History

Add to Screen Identification
E N D
Presentation Transcript
Add to Screen Identification • Crop tool • Path Selection tool • Change from tool to arrow Mrs. Bean 2013
History Panel • Why is it called History?? • Remembering what happened in the past! • Click in the Main Menu bar, Window, History • This panel will make it convenient to go back to a previous edit or the original file without reopening it!! Mrs. Bean 2013
Lesson 2--Borders Borders Define and Enhance the Edge of a Picture Mrs. Bean 2013
Define the Area • Make sure the border does not cover any of the photo. • Select the area where the border will be added. • Click in the Main Menu bar • Select, All or Ctrl +A. • The area will have a dotted line around it. Mrs. Bean 2013
To Add the Border • Click on Select, Modify, Border • Type the number for the width of the border, OK. • A number between 1 and 200 required. • To change features of border, click on Select, Modify: • Smooth, Expand, Contract, Feather Mrs. Bean 2013
To Add Color in the Border • Fill • Click in the Main Menu bar on Edit, Fill • The Fill Color dialog box gives you the options: • In the Use section, choose Color Mrs. Bean 2013
To Pull a Color from Photo • To pull a color from the photo • Move the pointer into the photo • Pointer becomes an eyedropper • Click on the color in photo • Check the color in the dialog box • OK Mrs. Bean 2013
Blending Section Mode Opacity Transparency 10% 100% Effect Mrs. Bean 2013
Border—Additional Method • Click the Rectangular Marquee tool. • Draw a border (only as large as it allows) which is up to 250 px. • Click in Main Menu bar Edit, Stroke. • Choose Options (same as above). Mrs. Bean 2013
Deselect • To remove dotted line: • Ctrl + D • In the Main Menu bar, click Select, Deselect Mrs. Bean 2013