Efficient CLI Authentication Steps for Logging On and Managing Cases
Learn how to log in using CLI authentication, access recent cases, manage details like dates, status, fees, and occupier information, book appointments, create reports, and sign off cases with detailed steps.

Efficient CLI Authentication Steps for Logging On and Managing Cases
E N D
Presentation Transcript
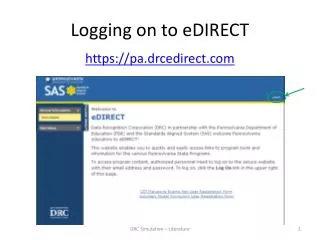
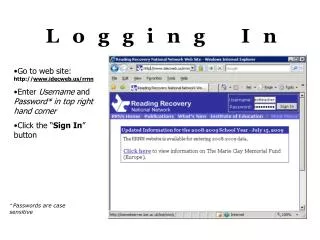
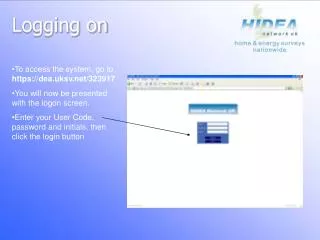
Logging on • To access the system, go to https://dea.uksv.net/323917 • You will now be presented with the logon screen. • Enter your User Code, password and initials, then click the login button
Logging On – CLI authentication • You will now need to ring the CLI number from your mobile. 01483 424 709 • The phone will ring, but not be answered, this authenticates the person trying to login as you • Although the screen says ring for 2 rings, sometimes this is not long enough for the system.
The Welcome Screen • You will now be presented with the welcome screen. • This screen contains: • Search boxes for cases • Buttons to enable you to see cases • To access new cases, click the recent cases button
Recent Cases Screen • You will now be presented with the Recent Cases screen. • This screen is for managing work, booking appointments and submitting reports • To look at details for each job, click the record.
Case Details – Inspector Tab • Dates /times can be manually inputed, to change the details you must delete out any old info first. • Status – will read allocated, when you first go into the record. Change to other settings to indicate the status of the job. • Delay – use this box to indicate the reason for a delay (if any). Expand if needed in the appointment notes field.
Case Details – Instuction Tab This is the page with most of the information about the job. • Type – This lists the type of job, either an energy certificate or Home Condition Report. • Gross Fee – Lists the fee that we get the job in at. • Occupier Name & Address – This details the occupier of the property and various notes about it. • Agent – if completed the details of the estate agent that is selling the property will be listed here, possibly along with access information.
Booking the Appointment Once you have booked the appointment, return to the inspector tab and move the status drop down to 'Booked'. Enter the date and time that the appointment has been booked for.
‘Holding the Job’ If, for some reason, after accepting the job, the vendor is unable to commit to an appointment for some time, you should put the job on 'hold'. To do so – • Adjust the status to read 'Hold' • After this a pop up box appears, either pick from the list a suitable reason, or give details about why the job has had to go on hold.
Creating the Report Once you have carried out the energy performance certificate, the information needs to be added to complete the case. To do so - • Go to the Recent Cases Page. • Click the red Create Report Button
Creating the report …Cont’d You will now be presented with the ‘Form selection' screen. • Select the Appropriate Form from the box. If with a Quest Accreditation Scheme, you should pick 'Energy Certificate'. Otherwise choose 'RRN form'.
Creating the report …Cont’d You will now be presented with the following screen. • In order to enter the information click on the '1EPC (created)' or '2 RRN (Typed)'. • If on a Quest Accreditation scheme then this will take you into the complete EPC form that will lodge the information with your accreditation body.
Non-Quest Accreditation If you are not on a Quest Accreditation Body, you will see the following You will now be presented with the following RRN Form Screen. • Copy the RRN from your software into the RRN box. • Fill in your name and the date. • This enables the RRN to be sent back through Quest to our client
Signing-off the Case After you have entered the EPC or RRN you must sign off the case. • Return to the front screen and click on 'Electronic Sign-off'. • This takes you to the following screen. Fill in the details you obtained from Quest and press OK, taking note of the warnings.
Signing-off the Case ...Contd The next screen you see is this one. It shows you the cases that you have which require signing off. • Fill in the required code (ask Quest or BRE for details). • Check that you are happy with everything, put in your password and click OK • Check again that you are happy with everything and click the OK button