Download

1 / 49
490 likes | 647 Views
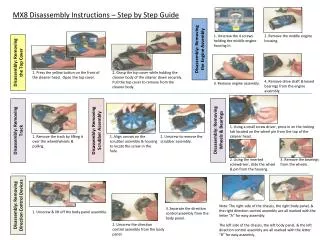
2014 ARVO Imaging Conference Abstract Submission Tutorial Step-by-Step Instructions.

E N D
2014 ARVO Imaging ConferenceAbstractSubmission Tutorial Step-by-Step Instructions
Browser requirements:* If you are using Internet Explorer to login to the abstract submission site, it MUST be IE Version 8.0 or greater. If you are unable to login using your current browser, use a different web browser. Compatible browsers include Internet Explorer (IE) 8.0 or greater, Mozilla Firefox, or Google Chrome.The online abstract submission site is supported by the following operating systems and browsers:
Login Steps: • You do not need to be an ARVO Member to submit an abstract for the Imaging conference. However if you choose to renew please access the membership page below:Renew your membership or join ARVO prior to abstract submission. • Select the link at the bottom of the Imaging Conference Abstractsweb page to access the Abstract Submission Login page. • Log in using your ARVO Membership/Account Email Address and Password. If you do not have one you must create one to access the submission site. WARNING: First (submitting) Authors who submit an abstract using another member's Login will be disqualified from submission. 4. Select ‘Please continue’ from the next screen to enter the submission site.
Submission Account Steps • Select OK when prompted to complete your submission site account information. • If you do not receive the prompt, the account has been pre-populated for you. Please select Modify Your Account to review your contact information and make any changes that may be needed. • If you update your name or email, you must also submit these update(s) to arvo@arvo.org to update your ARVO membership account record as well.
Submission Account Steps, cont. Complete Step 1: Name. All fields designated with a red * are required fields. Select Save & Continue.
Submission Account Steps, cont. Complete Step 2: Primary Contact Info. Review and confirm that your e-mail address is correct.All correspondence related to your abstract will be sent to this e-mail address. - If you update your name or email, you must also submit that update to arvo@arvo.org to update your membership record as well. - If you return to your abstract submission site at a later date, your name and email from your membership record will overwrite any updates you have made. • To endure delivery of your abstract-related communications, add ts.acsupport@thomson.comand isie@arvo.orgto your email address book or Safe Sender White List to facilitate delivery and avoid firewalls and spam filters. If you’re unsure of how to add to your Safe Sender White List, contact your email administrator. • Select Save & Continue 8.
Submission Account Steps, cont. Step 3: User ID and Password. This page will default with ID and Password information; do not make changes to this page. Select Save & Continue
Submission Account Steps, cont. Step 4: Role Request. Take no action on this page. Select Finish
Submission Account Steps, cont. The system will indicate your account has been changed. Select the Submission Tab to continue with Abstract Submission.
Abstract Submission Guidelines • Read the Abstract Submission Guidelines carefully (linked from the right info bar on the Imaging Conference web page. • Familiarize yourself with the Abstract Rejection Criteria. • Submission of your abstract indicates your understanding of and agreement to all 2014 abstract policies and guidelines.
Abstract Submission Guidelines • Enter your title in mixed case. Do not put the title in quotation marks. Do not add a period at the end of the title. • Enter your abstract body using four distinct text boxes with prepopulated headers: Purpose, Methods, Results, Conclusions. - Do not include these headers in your submission text. • The maximum abstract length (character count) is 2500 characters and spaces in the abstract title, abstract body and image captions.
Abstract Submission - Instructions • Carefully read all the Instructions provided on the “View Submissions” page.
Abstract Submission – Create a New Submission • To Create a New Submission, you must complete the following 4 steps. All fields designated with a red * are required. • By selecting Create a New Submission, you are automatically taken to Step 1: Title/Abstract body & Image upload. • DO NOT use Create a New Submission to return to a draft previously started; use View Submissions, scroll to the bottom of the page and select your previously started draft.
Abstract Submission – View Submissions • Upon first entering the Abstract Submission site, you will not have drafts or submissions to view. • Use View Submissions to return to a draft previously started; and select Edit Draft for your existing draft. • Scroll down to the bottom of the page to view your Drafts and/or Submission • You may create multiple drafts during the submission process, but only one draft can be submitted for review as an abstract presentation at the Annual Meeting.
Abstract Submission - Step 1: Abstract Title / Body and Images- Type or copy-and-paste the title and body of your abstract into the text boxes provided: Title, Purpose, Methods, Results, Conclusions.- Be careful to ensure that your text is correctly entered to appropriately correspond with each text box’s header. Do not repeat the text box headers within the text boxes.- Enter the title in mixed case. Do not put the title in quotation marks. Do not add a period at the end of your title.
Abstract Submission - Step 1: Abstract Title / Body and Images, cont.- Special Characters: In most cases, Greek letters and other special characters will transfer from your word processing software. - A Special Characters button is available if you need a special character that you are unable to find in your word processor. See next page for details.- Italics, underline, bold, superscript, subscript will not copy from Word document text. Use the Special Characters button to apply these features to your text. - Do not include diagrams, tables, boxes or borders. A diagram or table can be included with your submission as an image.
Abstract Submission – Step 1: Abstract Title / Body and Images, cont. • Formatting is available in the tool bar at the top of the text box • Special Characters – greek / special / math / latincan be addedby selecting the Ω button.
Abstract Submission – Step 1: Abstract Title / Body and Images, cont. • There is a limit of 2500 characters and spaces for the title, abstract body text and image captions of your submission. • The Current Character Count displays at the top of the screen. • Character count will not update until you select the refresh icon at the top of the page.
Abstract Submission - Step 1: Abstract Title / Body and Images, cont. • Image Specs: • JPEG or GIF format only • 600 dpi minimum resolution • 1MB max file size • 3.25" max image width • 6" max image height • Abstract submission may include a maximum of two (2) images. • First - Browse for your image. Second - Upload. Your image will display to the screen.
Abstract Submission - Step 2: Images, cont. • You may add a caption (optional) to your image. Characters and spaces in an image’s caption are included in the abstract’s total character count. • A pop-up box will appear to enter in your caption, Submit caption. • Character Count at top of page will include image(s) after Save.
Abstract Submission • Note: When you successfully complete a Step, a checkmark will appear for that step.
Abstract Submission Step 2: Details Select your Presentation Type preference from the drop down menu. Paper #1, Poster #2 – This abstract may be scheduled as a Paper, but will likely be scheduled as a Poster. Poster #1, Paper #2 – This abstract will likely be scheduled as a Poster, but may be scheduled as a Paper. Poster Only – This abstract will only be scheduled as a Poster. NOTE: Most abstracts will be scheduled as Posters. Abstracts accepted and scheduled for poster presentation must be displayed all day from 8:30am-5:30pm during the conference. First Authors must present their poster during BOTH their scheduled Poster Session time AND during the “All Posters” Session on that day.
Abstract Submission - Step 2: Details, cont.Clinical Trial Registration Research presented in an abstract that reports on a clinical trial must be registered on a publically available database approved by the WHO. Registration details must be included in with the abstract submission. To determine if the study results presented in your abstract are from a clinical trial, consider the following two questions and refer to the ARVO Statement on Registering Clinical Trials about the ARVO policy. 1. Does this study involve a therapeutic intervention in human subjects? (The intervention may be of any kind, e.g., medical, surgical/laser, or psychological/sociological.)2. Is the study prospective? (A study planned to observe events that have not yet occurred.) * If the answer is "No' to either question, then the study does not meet the current definition of a clinical trial, and does not need to be registered.* If the Answer is "Yes" to both questions, then the study does meet the definition of a clinical trial, regardless of the number of subjects involved or if it involves comparison groups (i.e., different doses of a drug, or treatment and control groups) and must be registered.
Abstract Submission - Step 2: Details, cont.Clinical Trial Registration, cont. • If your abstract reports on a clinical trial, select YES for your registry URL. If Yes - Other is selected, you must enter your registry URL in the Other Registry Site text-in box. • If your clinical trial is registered with more than one site, you only need to provide registration details for one of the sites. • Enter the registration number, the date the trial was registered, and the date the trial began. • If your work does not report on a clinical trial, select NO.
Abstract Submission - Step 2: DetailsSupport • If you have Grant Support; select YES. • In the Support Details text box, identify the support. (Example: NIH Grant EY01234) • If you select NO, you must enter None in the Support Details text box. • Select Save & Continue. If you select No here, type in None here.
Abstract Submission - Step 3: Authors Add a Co-Author • To add an author, select Add Author for access to the Person Search. Enter co-author Search Criteria (first name, last name and/or email), select Search and persons with matching criteria are returned. • If your author is not found, you will “Create an Author”. (Instructions on next slide) • Select + Add to include the author of your choice.
Abstract Submission - Step 6: Authors, cont. Add an Author, cont. • If the author does not appear in the search results, you may select“Create An Author” to create a new record for your co-author.
Abstract Submission - Step 3: Authors If there are 2 or more Departments at the same Institution represented, each Department/Institution should entered separately. • Institutional affiliations are entered while adding co-authors. • Enter the affiliations for yourself and all co-authors. • Add an Affiliation by selecting Create new Institution and entering all Institution information. • Repeat for adding multiple Authors and Affiliations.
Abstract Submission Step 3: Authors, cont. • Enter as many unique Institutions/Departments as needed for assigning to yourself and your co-authors. • Note: If three authors are affiliated with the same Institution, enter that Institution only once and it will be available for selection in the drop down box. • Remember to add secondary affiliations, if applicable.
Abstract Submission - Step 6: Authors, cont. • Select the Affiliation drop down for your own affiliation(s) and your Membership type (Member-in-Training or Regular) from the drop down lists. • Complete your Disclosure statement by selecting “Click to review and acknowledge disclosure”
Abstract Submission - Step 3: Authors Commercial Relationship Disclosures - All commercial relationships relevant to the content of the abstract must be disclosed. Click here for ARVO Commercial RelationshipsPolicy. List each commercial relationship company and its corresponding Relationship Code on a singleline. • If you list a company name multiple times for multiple disclosure codes, copy and paste from the first entry to ensure identical company name entries. • If selecting “P” (inventor/developer) you must add patent/company name or patent ID number. • If you are employed by a company, you must select “E” and enter the name of the company. • If you have no disclosures to report, select N (No Commercial Relationships). Select “Save” at the bottom of the page.
Abstract Submission Step 3: Authors, cont. • YOU MUST put Co-authors in the order they should appear on the abstract when you have finished entering all Co-authors. • Use the drop-down boxes in the far left column of the author list to indicate the proper numerical order of all Co-authors. • Failure to properly order the Co-authors NOW will result in their being incorrectly listed when the submission is published. • After you have reordered all the Co-authors, click the "Update Author Order" button at the bottom of the list.
Abstract Submission - Step 3: Authors, cont. • Provide Study Group name, if applicable. • Do not use the Study Group text box for adding additional authors – they will be deleted. • When finished, select Save & Continue.
Abstract Submission - Step 4: Review & Submit • Step 10 will display your Abstract Proof and allow you to Submit your abstract if all required information has been completed in the previous steps. • Review your Abstract Proof carefully to confirm that all information is correct. • If all is complete and correct, select Submit at the bottom of the page to submit your abstract for review.
Abstract Submission - Step 4: Proof & Submit • If your abstract has any errors, select the link(s) highlighted on the page in the red box. You will be taken to the step details to see what has been left Incomplete. Click the red Incomplete button to make your updates on the Step page. • You must complete these steps before you can submit your abstract. • After completing your changes, select Step 4 in the left column to return to Step 4, review your proof, and submit your abstract.
Abstract Submission - Step 4: Review & Submit, cont. • Return to your incomplete step(s) and provide all required information. • Select ‘Save & Continue’ after completing a step(s). • You will now see a check markbeside the step that you just completed. • Return to Step 4: Review & Submit to link to other incomplete steps or to Submit your completed abstract.
Abstract Submission - Step 4: Review & Submit, cont. Return to Step 4: Review & Submit • When all steps are complete, Step 4 will allow you to Submit (no Error box on page). • Carefully review your abstract proof. Return to any steps, as you deem necessary, to make corrections before you submit your abstract.
Abstract Submission - Step 4 Review & Submit, cont. Submit your abstract • After reviewing your submission and making any corrections, if necessary, return to Step 4 and select Submit at the bottom of the page to submit your Abstract. • Abstracts must be submitted by the modification deadline of Sunday, February 23, 11:59pm U.S. Eastern Time.
Abstract Submission Step 4: Review & Submit • After successfully submitting your abstract you will be re-directed back to the “View Submissions” page. A successfully submitted notification will appear at the top of the page in a green box.
Abstract Submission View Submissions • Select View Submissions to now see your abstract listed on the bottom of the page under Submissions. • You will also receive a system-generated email confirming the submission of your abstract.
Abstract Submission – Revisions • If you need to revise your submission, use the same Abstract Submission Link at the bottom of the Abstracts page of the Imaging Conference website to return to the Submission Site. • From the Submissions tab, select the View Submissions option, then select Edit/Return to Draft.
Abstract Submission – Revisions • Select OK to proceed with returning your Submission to Draft status for revisions. • Revised abstracts must be re-submitted by the modification deadline of Sunday, February 23, 11:59pm U.S. Eastern Time. • No changes or submissions will be allowed after the modification deadline.
Abstract Submission – Revisions • Your abstract now appears in the Drafts section when viewing submissions. • To make revisions, select Edit Draft • When your edits are completed, you must Submit the abstract again. • You will receive another system-generated email confirming the re-submission of your abstract.
Abstract Submission – Print • Once you’re completed and Submitted your abstract, select View Submissions, then select View Abstract.
Abstract Submission - Print • Select Print. • Select Close Window to return to View Submissions screen. • To ensure the integrity and security of your data, you must Log Out from the bottom of the left navigation bar.
Abstract Submission • Confirmations of Abstract Submissions will be emailed to First Authors on Tuesday, February 25, 2014. • This confirmation and all other abstract-related correspondence will be sent to the First Author’s email address provided in their Submission Site account. • To endure delivery of your abstract-related communications, add ts.acsupport@thomson.com and isie@arvo.org to your email address book or Safe Sender White List to facilitate delivery and avoid firewalls and spam filters. If you’re unsure of how to add to your Safe Sender White List, contact your email administrator. • If you updated your name or email in your Submission Site account, you must also submit those updates to arvo@arvo.orgto update your membership account record as well. • If you return to the Submission Site at a later date, your name and email from your membership account will overwrite any name/email updates you made. • Only abstracts with a Submission status (one per First Author) will be sent forward to the Annual Meeting Program Committee (AMPC) for review.
Abstract Submission • Acceptance notifications with presentation format, day/times and session assignment, will be emailed for First Authors on Tuesday, February 26, 2014. • Abstracts may be scheduled on any day of the Annual Meeting, at the discretion of the Annual Meeting Program Committee, and cannot be rescheduled. • Mark your calendar now and be prepared to be present on any day of the meeting. • First Authors of accepted abstracts must pay the Annual Meeting registration fee and attend the meeting to make their scheduled abstract presentation. • Posters must be mounted by 8:30 am on the day of their scheduled presentation; posters must remain mounted until 5:30pm that day; poster presenters must be at their posters during their scheduled poster session presentation and during the All Posters session scheduled that day. • Abstracts withdrawn after Friday, January 31, 2014, will be published. • Full text of all abstracts accepted for presentation and publication will be available on the ARVO web site on March 4, 2014.
Abstract Withdrawal & Abstract Submission Ineligibility Policy • Review ARVO’s Abstracts Withdrawal Policy, including Abstract Submission Ineligibility • Failure to comply with the ARVO Withdrawal Policy, including all First Author Obligations, will result in rejection of the First Author's abstract submission for the 2015 Annual Meeting. • If the First Author is unable to present, he/she must send a written withdrawal notice to isie@arvo.orgno later than 5pm, U.S. ET on the day prior to the scheduled presentation. • If the First Author cannot present due to illness, family emergency, change in employment, or inability to obtain a visa, prior approval of a co-author to serve as a substitute presenter may be requested. Requests must be submitted through the online substitute presenter request link that will be included in abstract acceptance notifications and will be posted on the ARVO Annual Meeting website/Abstracts in the Abstract Withdrawal Policy. Emails cannot be accepted. The deadline for submission of substitute presenter approval requests is 5pm, U.S. ET on the day prior to the scheduled presentation.
Abstract Submission Assistance • For Technical Support during abstract submission, send your request to ts.acsupport@thomson.com or contact by phone at +1.434.964.4100 or Toll Free (US Only) at 888.503.1050, Monday 12:00am – Friday 5:30pm (U.S. ET). • Policy and procedure questions should be directed to ARVO at arvoabstracts@arvo.org or contact by phone at +1.240.221.2900, Monday – Friday, 8:30am – 5:00pm U.S. ET.