
Hybridizing
This guide explores the intricate process of rose hybridization, tailored for both beginners and seasoned enthusiasts. Learn about selecting ideal parental traits, the anatomy of roses, and the steps required for successful crossbreeding. From collecting and storing pollen to sowing seeds and nurturing seedlings, this guide provides detailed instructions and practical tips to help you create beautiful hybrid roses. Dive into the art and science of rose hybridization, and discover the joy of cultivating your own unique varieties.

Hybridizing
E N D
Presentation Transcript
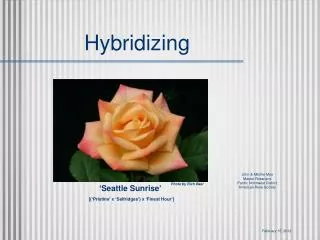
Hybridizing John & Mitchie Moe Master Rosarians Pacific Northwest District American Rose Society Photo by Rich Baer ‘Seattle Sunrise’ [(‘Pristine’ x ‘Selfridges’) x ‘Finest Hour’] February 15, 2012
Acknowledgements • Photos by authors, except where credits are shown • Excellent sources • Rose Hybridizing for Beginners, Rose Hybridizers Association • Rose Hybridizing “The Next Step”, Rose Hybridizers Association
The Concept of Hybridizing • Definition – to produce or cause to produce hybrids; to crossbreed • So then – to hybridize, take the pollen from the stamens of one flower and apply it to the pistils of another
Genetics? Photo by Jason Kottke
How it Really Works! Photo by Rich Baer Credit - Photo Files ‘Love & Peace’ ‘Blue Peter’ A cross of these two…….
Produced These Seedlings ‘Barbara’ ‘Judie’ ‘Lynn’ Seedling Seedling
But, Before You Start • Stop and picture your ideal rose • Now – what characteristics should it have? • Some possibilities include; • A particular form – e.g., HT, Fl, Mini, etc. • A specific color • Fragrance • Disease resistance
Choosing a Trait of Interest • The possibilities are endless because of DNA • Thus – focus on your interest before you begin! • Do your research, and then select your parents
A Good Place to Start • Are the parents healthy roses? • Are the parents of those parents healthy? • Are other combinations of its parents healthy? • You need a good reference book for parentage – e.g., Modern Roses or Helpmefind.com • Then plan your crosses!
The Anatomy of a Rose Roses are capable of self fertilization as each has stamens (male organs), and pistils (female organs) Texas A & M Rose Breeding & Genetics Program
Gather Your Supplies Tweezers, camel hair brush, pollen containers (35mm film, baby food jars, etc), Q-tips, tags
Selecting the bloom Stamens should be starting to show, so anthers are mature The more petals, the more it must be open Timing can be critical!
Emasculating the bloom Remove petals to expose the stamens and pistils
Emasculated Bloom Petals removed Pistils surrounded by the anthers containing pollen Anthers
Removing the anthers Carefully remove anthers with tweezers or fingers Stamens with anthers removed Stigma
Collecting Pollen Let mature anthers drop to a sheet of paper for drying to release pollen
Drying Pollen Most pollen will be released by the next day The powder-like grains of pollen will be visible on the paper
Storing Pollen Store pollen in a covered container away from sunlight at room temp for 1 – 2 weeks, or refrigerate up to 4 weeks Freeze for long term
Applying Pollen Apply generous amount of pollen by clean fingertip, Q-tip, pipe cleaner, or camel hair brush
Label your Cross Label should be weather- proof List seed parent first followed by the pollen parent Include date!
Hip Developing If pollination was initially successful, the hip will start to swell in a few weeks
Hips Maturing It takes 90 – 120 days so the seeds that are inside are mature and ripe for harvest
Hips can be any size! R. acicularis One of my crosses ‘Gemini’ x ‘Seattle Sunrise’
Hip cut opened Dried stigma Connected to ovary Seeds
Hip and seeds Harvest the hip and cut open to remove the hard, bony seeds Wash to remove all parts of the fleshy hip
Soaking seeds Soak for 1-2 days in a mild fungicide solution to prevent mold that can kill the embryo in storage
Stratifying the Seeds Store in moist Perlite for 6 weeks at room temp, followed by 6 weeks in fridge before planting
Sowing the Seeds Use a 2 inch deep tray with drain holes and plant ¼ - ½ in deep in sterile potting soil (peat/Perlite 1:1) or Sunshine #4 Add no fertilizer!
Seedling sprouting Once sprouted, give tray 16 hours of light per day Keep moist! Mist weekly with mild fungicide to prevent damp-off
Seedling after a few weeks In 5 – 6 weeks you should see some buds The waiting seems forever!
Waiting for that first bloom Watch growth for vigor, disease resistance, etc. Here are a couple of nice, healthy buds!
The first bloom! More waiting, but a nice one! Now, wasn’t the wait worth it?
The Next Step • Wait for next bloom – how many petals, how long to repeat, etc. • If a keeper, take some cuttings to see how it propagates • Plant some to check vigor, disease resistance, etc. • Evaluate – did it meet your goal?
Questions? Photo by Corinne Brown ‘Hot To Trot’ ‘Klima’ x ‘Freisinger Morgenrote’ Thank you