Creating Customized Spatial Data Maps with Appropriate Scale and Symbology
This guide provides step-by-step instructions for framing spatial data and customizing map visuals. Learn how to frame your area of interest, apply a blue background, and adjust symbology settings effectively. Discover how to organize your layer names, delete unwanted values, and enhance label readability with halos. Gain insights into setting the right scale and units for your maps, ensuring appropriate granularity based on the extent of the area being represented. Suitable for both traditional agency users and broader audiences.

Creating Customized Spatial Data Maps with Appropriate Scale and Symbology
E N D
Presentation Transcript
Frame the Spatial Data • Frame the area of interest • Should fill the area allotted • Colorize the background as blue • Right click on "Data Frame" -> Properties -> Frame -> Background
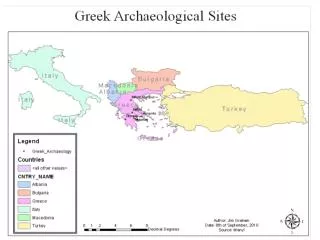
Legend Clean Up • Right click on the Layer -> Properties -> Symbology • Click on “Cluture” and press “Delete” • Click on “all other values” to disable it • Click on the “Labels” to rename them • Click on the layer to rename it • Greek_Archaeology -> “Archaeological Sites”
Halos Around Labels • Add Halos if needed: • Right click on the layer -> Properties -> Labels -> Symbol -> Properties -> Mask • Click on “Halo”
Use Appropriate Scale • Right click on the scale bar • Properties -> Scale and Units • Set the “Scale and Units” • Rarely use “Decimal Degrees” • Rare to publish a map in Geographic (more on this later) • Use metric when in doubt • Use English for traditional agency users • Better yet, use both! • Use the appropriate granularity • Miles or kilometers for large extents • Feet or meters for small extents