Download
1 / 9
90 likes | 128 Views
Guide for your 'Sandisk Extreme Portable SSD Format For Mac.' You can format your hard drive within minutes using the given steps on this page. 1 909-751-0101.<br>

E N D
Sandisk Extreme Portable SSD Format For Mac - No More Struggling! Welcome, Mac enthusiasts! Are you ready to optimize your SanDisk Extreme Portable SSD for peak performance on your Mac device? Look no further! Our goal is to make your experience with this powerful storage device as seamless and enjoyable as possible. With our step-by-step guides and detailed explanations, you'll be able to Sandisk Extreme Portable SSD Format For Mac with ease and confidence. Whether you're a beginner or a seasoned Mac user, you'll find the information you need to optimize your storage and get the most out of your SanDisk Extreme Portable SSD. So, let's get started!
Format drive for mac Like a Pro! Are you ready to get your new SanDisk Extreme Portable SSD set up and running on your Mac? Great! The process is easy and only takes a few steps. Follow along with me, and you'll have it formatted and ready to use in no time. Step 1 - Connecting The Drive To The Mac ● First, connect your SanDisk Extreme SSD to your Mac computer. ● Doing it is a piece of cake. Here's how: ● Locate a free USB port on your Mac. ● Take the USB cable that came with your SSD and plug it directly from your computer to the drive. That's it! Your SSD is now connected to your Mac and ready to be formatted for use.
Step 2 - Locating The Drive Icon ● Before you kick-start, verify if the drive icon is displayed on Mac's desktop screen. ● Are you having trouble finding the drive icon for your SanDisk SSD on your Mac's desktop screen? ● Don't worry. We've got you covered! Here's a quick guide on how to locate it: ● If you see a folder called "Extreme SSD," you're in luck—that's the icon you're looking for! ● If you don't see the icon, don't fret. ● Click the Finder icon in the Dock. ● From the menu list, select the Preferences option. ● A Finder Preferences window will appear. Go to the General tab. ● Make sure the "External Disks" option is selected. If it's not, select it. And that's it! Your SanDisk SSD should now show up on your Mac's desktop. If your drive isn't showing up on your Mac, don't worry! We've got you covered. Go through this article, and you'll be able to get your drive running again in no time. So, don't panic, and let's get your drive back up and running!
Step 3 - Open Disk Utility ● Click on the magnifying glass icon located in the top right corner of your Mac's screen. This is called Spotlight. ● In the search bar, type "Disk Utility" and hit enter. This will open the Disk Utility application.
Alternatively, you can also open Disk Utility by following these steps: ● Open Finder on your Mac. ● Go to the Applications folder. ● In the Applications folder, look for the Utilities folder and open it. ● Inside the Utilities folder, you will find the Disk Utility application. Double-click on it to open.
Now that you've successfully opened Disk Utility, you're one step closer to formatting your SanDisk Extreme Portable SSD for Mac. Step 4 - Select Your SSD ● You'll see a list of all the storage devices connected to your Mac. ● Locate the SanDisk Extreme Portable SSD and select it. ● Now you're ready to begin formatting and get the most out of your SSD storage.
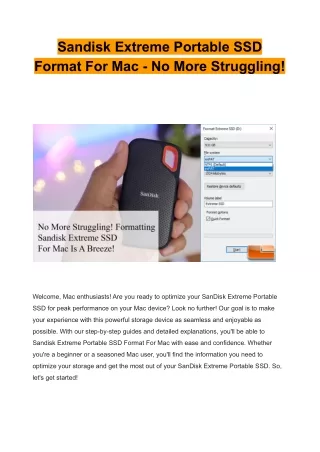
Step 5 - Formatting Hard Drive ● Once you've selected the SanDisk Extreme Portable SSD, you'll need to erase it. ● Look for the "Erase" button at the top. ● Click on it, and a new window will pop up. ● Now, it's time to choose the format that best suits your needs. ● We recommend selecting "APFS (Mac OS Extended)" or "Mac OS Extended (Journaled)" as the format. ● Give your SanDisk Extreme Portable SSD a name that is easy to remember. ● Click on the "Erase" button once more, and voila! Your SSD is now ready to store all your important files and documents.
And that's it! The formatting process will take a few minutes to complete. Once it is finished, your SanDisk Extreme Portable SSD will be ready for use on your Mac. *Attention! It is important to note that formatting a drive erases all the data on it, so ensure to back up any important files before proceeding. Also, if you plan to use the drive with both Mac and Windows, you should format it to exFAT, a file system that works with both operating systems. For New SSD Users Are you looking for the perfect guide to set up your brand new SanDisk Extreme SSD for Mac? Look no further! This article is here to make the setup process a breeze. Follow our easy steps, and you'll have your SSD up and running in no time. Don't let the setup process hold you back from enjoying the lightning-fast speeds and enhanced performance of your new drive. Let's get started!
Final Words As you can see, Sandisk Extreme Portable SSD Format For Mac is a quick and easy process that can be completed in just a few steps. We've got you covered with our step-by-step instructions. In just a few seconds and simple steps, you'll be ready to go. But wait, what if you need some extra help? No problem! We are always happy to assist you. Whether you need real-time assistance or want to learn more about formatting hard drives for Mac, we're here for you. So don't hesitate to reach out to us. Give us a call now, and let us guide you through the process. Trust us. It's quick and easy! So, what are you waiting for? Let's get started!