Download
1 / 6
60 likes | 223 Views
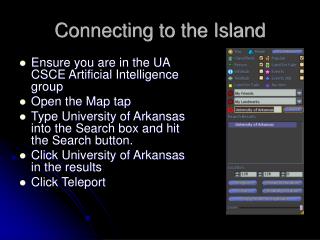
Connecting to the Projector Wirelessly. Turn on Projector, Select Input, and Start Software. 1. This is the remote for the projector. Make sure the remote is turned on (slider switch on the right side beneath the red power button), point it at the projector and push the red power button.

E N D
Turn on Projector, Select Input, and Start Software 1. • This is the remote for the projector. • Make sure the remote is turned on (slider switch on the right side beneath the red power button), point it at the projector and push the red power button. • You will hear a “beep” and the light at the bottom of the projector will begin to flash green. • On the screen you will see the projector begin its setup. To make sure it is set to the correct input, select the “EasyMP” source on the remote. • On your computer, go to • Start → • Programs→ • Projector → • EMP NS Connection v2.10 2.
EMP NS Connection Startup Options • When EMP NS Connection starts up, it may ask you for the connection mode you would like to use. Always select Advanced Connection Mode, and you may check the checkbox so that it does not ask you for this in the future. • If the following question regarding a firewall appears, select No.
Using EMP NS Connection • Once your projector is fully warmed up and on EasyMP mode, it should show up on the NS Connection window. If it is not listed, click the Automatic Search button near the top left-hand corner. • Each projector is named according to the room number that it is located in. Your projector is ready when it is listed in Standby under the Status column. • Select your projector, and click Connect in the bottom right-hand corner.
Using EMP NS Connection (continued) • Once you are connected, you will see this toolbox appear on the screen of your computer (not the projector image). This toolbox is part of the NS Connection software and it allows you to change many settings. Generally speaking, you will only need to worry about the Disconnect button. • Click the Disconnect button when you are done using the projector, and power the projector off.
The End! • Still have a question? Contact the IT Department for further assistance: • E-mail: IT.Support@lfcds.org • Call: x222