Download
1 / 37
370 likes | 555 Views
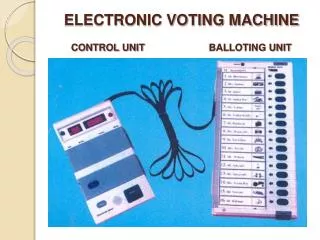
Setting up of Voting Machine before the commencement of Poll. 1. Connect BU(s) to CU 2. Conduct Mock poll 3. Seal the CU using the Green paper seal and the strip seal. Connect BU(s) to the CU.

E N D
Setting up of Voting Machine before the commencement of Poll 1. Connect BU(s) to CU 2. Conduct Mock poll 3. Seal the CU using the Green paper seal and the strip seal Learning Module for Presiding Officer
Connect BU(s) to the CU The Ballot Unit is prepared at the Returning Officer’s level and no further preparation needed at the polling station on the day of poll, except its interconnecting cable to be plugged into the control unit. In addition, the Candidate set panel of the Control Unit is duly sealed at the RO’s level. Learning Module for Presiding Officer
Trouble Shooting Learning Module for Presiding Officer
After interlinking …. • Switching ‘ON’ the power Learning Module for Presiding Officer
Close but don’t seal the rear compartment of Control Unit Closing the rear compartment • A piece of thin wire or a thick thread may be run through 2 holes and the ends of the wire may be given few twists or knot. • The rear compartment is not to be sealed as it will require to be opened again after the close of poll for switching ‘OFF’ the power and disconnecting the Ballot Unit. Learning Module for Presiding Officer
Clear EVM (Mock Poll) – 1/3 Demonstration of ‘Clearing’ voting machine Learning Module for Presiding Officer
Clear EVM (Mock Poll)– 2/3 • Demonstration of ‘Clearing’ voting machine Learning Module for Presiding Officer
Clear EVM (Mock Poll)– 3/3 Learning Module for Presiding Officer
Conducting Mock Poll 1 2 Open “Result Section” outer door and then the inner door 4 3 Learning Module for Presiding Officer
Conducting Mock Poll Press CLEAR Button to show to the Polling agents present that there are no votes polled. Learning Module for Presiding Officer
Conducting Mock Poll Press BALLOT button on Control Unit. On pressing Busy lamp in display section will glow red, simultaneously the Ready lamp on the ballot unit will also glow green candidate in Balloting Unit Ask Polling Agents to cast one/ equal no. of votes for any of the candidates and request to remember whom they voted Learning Module for Presiding Officer
Conducting Mock Poll Close the Mock Poll by pressing Close button in Control Unit Press Ballot button in Control Unit to show NOvote can be recorded further after the Close button is pressed. Invalid message is displayed Learning Module for Presiding Officer
2. 3. Polling Agent Press Candidate’s Blue Button 1. Conducting Mock Poll Press Ballot Button Candidate Lamp Ready Button RED OFF Ready Lamp Busy Lamp Beep Sound 4. Red Green 5. 6. Press Total Button Close Button Verify total Votes recorded Learning Module for Presiding Officer
Conducting Mock Poll Press Result and show the Mock Poll result Learning Module for Presiding Officer
Conducting Mock Poll THE result shows according to the number of votes cast in favourof the concerned candidates Learning Module for Presiding Officer
Conducting Mock Poll Learning Module for Presiding Officer
Order to be followed Ensure that equal number of votes are polled for all candidates Seal Switch off 7 Clear 6 Result 5 Close 4 Ballot 3 Clear 2 Learning Module for Presiding Officer
Troubleshooting Learning Module for Presiding Officer
Summary of the session Now you are able to • Conduct mock poll before commencement of election • Various steps involved in mock poll • Preparing mock poll certificate • Same steps must be repeated in case of replacement of EVM Learning Module for Presiding Officer
Mock Poll Certificate This is to certify that I ……………….. Presiding Officer at the Polling Station No….. of ……….Assembly Constituency ( or the ……… Assembly segment under …….. Parliamentary Constituency) conducted the Mock Poll at ……. AM today, the poll day i.e. 30.4.2009 following the instructions issued by the Election Commission of India. A total of ….. votes were polled in the mock poll and after the mock poll I have carefully cleared the memory and the total votes polled showed ‘0’ after clearing the memory. At the time of mock poll the following polling agents representing the candidates whose names mentioned against the names of such agents were present and I have obtained their signatures. At the time of mock poll the agents of only ……. contesting candidate were present. After waiting for ten minutes I conducted the mock poll along with other polling staff at ……. I have mentioned the name of the agent present at the time of mock poll including the name of the candidate whom he represented. (In case, no agent was present it shall be mentioned “No Polling Agent was present at the time of mock poll”). Name of Agent Name of Candidate Signature of the agent Date: Time: Name & Signature of the PrO Learning Module for Presiding Officer
Sealing of Control Unit Insert the Green Paper seal in the frames provided for both Result Learning Module for Presiding Officer
Close the Result Section inner compartment door with the Green paper seal protruding outside Sealing of Control Unit Learning Module for Presiding Officer
Front Rear Special tag for sealing Result section inner compartment Outer Paper Strip Seal (23.5” X 1”) Upper Side A B D Lower Side C Pre-gummed portion with wax paper Sealing of Control Unit after Mock poll Learning Module for Presiding Officer
Closing and Sealing of Control Unit Close the Result Section door such that the Green paper seal protrudes outside and Seal the door along with the Address tags Learning Module for Presiding Officer
A B D Closing and Sealing of Control Unit Keep the Strip Seal with pre-gummed portion ‘A’ near the base of the Green Paper Seal protruding from the lower end of the door. Remove the wax paper covering ‘A’ and paste the lower layer of Green Paper Seal. Learning Module for Presiding Officer
Closing and Sealing of Control Unit Remove wax paper covering ‘B’ and paste it above the upper layer of the Green Paper Seal. Learning Module for Presiding Officer
Closing and Sealing of Control Unit After pasting ‘B’, the pre-gummed portion ‘C’ will be on top. Remove wax paper over ‘C’ Learning Module for Presiding Officer
Closing and Sealing of Control Unit Press both the layers of Green Paper Seal protruding from the top and paste the upper layer by pressing it on ‘C’ Learning Module for Presiding Officer
Closing and Sealing of Control Unit Wrap the Strip Seal round the Control Unit from left side just (anti-clockwise) below the CLOSE button window Learning Module for Presiding Officer
Closing and Sealing of Control Unit Now the Strip Seal is finally fixed. Note that the Strip seal does not cover CLOSE button Flap. Learning Module for Presiding Officer
Summary Method of sealing control unit with strip seal • Before the commencement of the actual poll, conduct a mock poll. • After conducting mock poll and showing the result, clear the Control unit of the data by operating “Clear” button. • After clearing the data switch off the control unit and then insert the green paper seal • After inserting the green paper seals, the inner door above the result buttons shall be closed. • Then the inner door of the result section shall be sealed off with the special tag. • After fixing the special tag, close the outer door of the result section Learning Module for Presiding Officer
…Continued Method of sealing control unit with strip seal 7. Then seal the outer door with thread and address tag. 8. Fix the strip seal around the control unit to seal the result section from outside completely 9. Before the strip seal is fixed affix your signature in full immediately below the serial number and get signature of polling agent/ contesting candidates 10. The strip seal shall, then, be positioned just below rubber cap covering the “CLOSE” button. There is a slight difference in the methods of fixing the strip seal for BEL make machines and ECIL make machines. Learning Module for Presiding Officer
Precaution in sealing Important precautions while sealing with strip seal: • While fixing strip, ensure the rubber cap covering the “CLOSE” button is left clear and there is no difficulty in removing the rubber cap and operating that ‘CLOSE’ button. • The strip seal shall be fixed tight and not loose. • DAMAGED STRIPS HAVE NOT TO BE USED IN ANY CIRCUMSTANCES. • Each polling station will be supplied with four (4) strip seals. • Account for each strip seal supplied to the polling station for the conduct of poll in the Presiding Officers’ Diary. • Return every strip seal that has not been used (including the • strips (or pieces thereof) damaged accidentally) • Strip seals are kept in safe custody always Learning Module for Presiding Officer
Insert Close Clear Results Inner Door Green Paper Seal Switch OFF Control Unit Conduct Mock Poll Method of sealing control unit with strip seal Seal Inner Door of Result Section Fix Special Tag Position strip seal below Rubber Cap control Unit Signature on strip seal Seal outer door with Thread and Address Tag Fix strip seal around Learning Module for Presiding Officer