Download
1 / 4
0 likes | 7 Views
Dakzorg Dakwerken offers residential and commercial roofing services for private and commercial buildings in the Netherlands.<br><br>Dakzorg Dakwerken<br>info@dakzorg.com<br>https://dakzorg.blob.core.windows.net/dakdekker/id

E N D
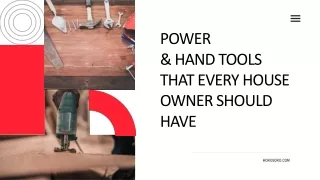
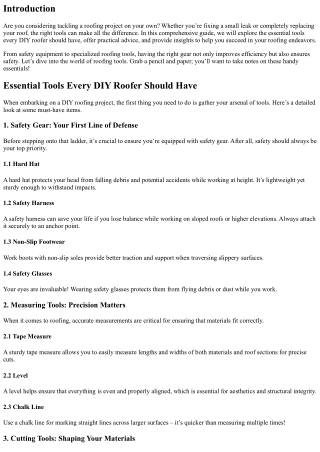
Introduction Are you considering tackling a roofing project on your own? Whether you’re fixing a small leak or completely replacing your roof, the right tools can make all the difference. In this comprehensive guide, we will explore the essential tools every DIY roofer should have, offer practical advice, and provide insights to help you succeed in your roofing endeavors. From safety equipment to specialized roofing tools, having the right gear not only improves efficiency but also ensures safety. Let’s dive into the world of roofing tools. Grab a pencil and paper; you’ll want to take notes on these handy essentials! Essential Tools Every DIY Roofer Should Have When embarking on a DIY roofing project, the first thing you need to do is gather your arsenal of tools. Here’s a detailed look at some must-have items. 1. Safety Gear: Your First Line of Defense Before stepping onto that ladder, it’s crucial to ensure you’re equipped with safety gear. After all, safety should always be your top priority. 1.1 Hard Hat A hard hat protects your head from falling debris and potential accidents while working at height. It’s lightweight yet sturdy enough to withstand impacts. 1.2 Safety Harness A safety harness can save your life if you lose balance while working on sloped roofs or higher elevations. Always attach it securely to an anchor point. 1.3 Non-Slip Footwear Work boots with non-slip soles provide better traction and support when traversing slippery surfaces. 1.4 Safety Glasses Your eyes are invaluable! Wearing safety glasses protects them from flying debris or dust while you work. 2. Measuring Tools: Precision Matters When it comes to roofing, accurate measurements are critical for ensuring that materials fit correctly. 2.1 Tape Measure A sturdy tape measure allows you to easily measure lengths and widths of both materials and roof sections for precise cuts. 2.2 Level A level helps ensure that everything is even and properly aligned, which is essential for aesthetics and structural integrity. 2.3 Chalk Line Use a chalk line for marking straight lines across larger surfaces – it’s quicker than measuring multiple times! 3. Cutting Tools: Shaping Your Materials
Cutting through roofing materials can be tough without the right tools in hand. 3.1 Utility Knife An adjustable utility knife is perfect for cutting shingles and underlayment efficiently. 3.2 Roofing Nailer This tool is designed specifically for driving nails into shingles quickly, saving both time and effort compared to using a hammer. 4. Ladders: Reaching New Heights Safely Ladders are essential for accessing various parts of your roof safely. 4.1 Extension Ladder An extension ladder allows you to reach higher elevations safely and comfortably while working on steep roofs. 4.2 Step Ladder For lower sections or repairs that require closer access, having a sturdy step ladder is indispensable. 5. Roofing Materials: Know What You Need Understanding the materials you'll be working with simplifies the process immensely. 5.1 Shingles & Underlayment Choose quality shingles suitable for your climate; they come in various types like asphalt, wood, or metal.
5.2 Flashing Flashing adds an extra layer of protection against leaks around chimneys, vents, and other protrusions on the roof surface. 6. Fasteners: Keeping Everything Together Using high-quality fasteners ensures that everything stays secure over time. 6.1 Roofing Nails Opt for galvanized nails as they resist rusting better than standard ones. 6.2 Screws In some instances, screws may be ideal for attaching metal roofing or securing flashing components firmly in place. 7. Sealants: Weatherproofing Your Roof Sealants play an important role in protecting against water damage by sealing gaps effectively. 7.1 Roofing Cement This adhesive can be used alongside flashing or patching leaks around joints where water may enter. 8. Hand Tools: The Basics You Can't Forget You might think hand tools are old-fashioned but trust me—they still pack a punch! 8.1 Hammer The good ol' hammer remains one of our most reliable companions when tackling any job! 8.2 Pry Bar Sometimes you'll need leverage; pry bars come handy when removing old shingles or adjusting materials before nailing down new ones! 9. Power Tools: Bringing Efficiency into Play Let’s face it—sometimes manual labor just isn’t cutting it anymore! 9.1 Circular Saw A circular saw helps cut through https://podcastindex.org/podcast/7238571 thicker materials quickly—perfect for those robust plywood sheets often used underneath roofs! 9.2 Drill/Driver Combo
This combo tool allows effortless drilling into wood while driving screws in simultaneously without breaking much sweat either! 10. Dump Trailer or Waste Bin: Disposal Made Easy Having somewhere convenient (and legal!) to dispose of waste ensures smooth workflow throughout each stage without clutter slowing progress down too… Frequently Asked Questions (FAQs) Q1: What types of roofs can I work on as a DIY roofer? As a DIY roofer, you can tackle asphalt shingle roofs, metal roofs, flat roofs (with proper training), and even wooden shake roofs depending on local regulations and personal skill levels! Always check guidelines before diving into projects though… Q2: Do I need special training before attempting DIY roofing? While basic home improvement skills can help greatly with many tasks involved in roofing work—including safety knowledge—consider taking classes if available locally about installation procedures specific towards whatever type(s) you're interested in applying yourself too! Q3: How much does it cost to replace my roof myself? Costs vary based mainly upon material choices being utilized along with size/location factors—but expect anywhere from $1000-$3000+ depending largely upon scope undertaken by yourself versus hiring professionals instead! Q4: Can I install new shingles over existing ones? Yes—you may lay new asphalt shingles directly atop older ones assuming they remain structurally sound! However—it’s wise first inspect underlying layers thoroughly beforehand just outta caution… Q5: What if I encounter unexpected issues during my project? Don’t panic! Take stock of what problems arise then consult online resources or local experts who specialize within area fields related directly towards those concerns faced so they can guide through accordingly… Q6: Are there any permits required for DIY roofing projects? Permitting varies based upon state/county regulations plus types being worked upon; contact local officials prior commencing renovations just verify compliance standards ahead completion phase ensuring everything stays above board legally speaking! Conclusion Armed with these essential tools every DIY roofer should have in their possession—which range from safety gear all way through proper cutting equipment—the journey towards successful home improvement becomes far easier overall! Remember folks—safety first followed closely behind by careful planning/organization throughout entire process leading up final product desired… Happy roofing!