Download
1 / 6
70 likes | 292 Views
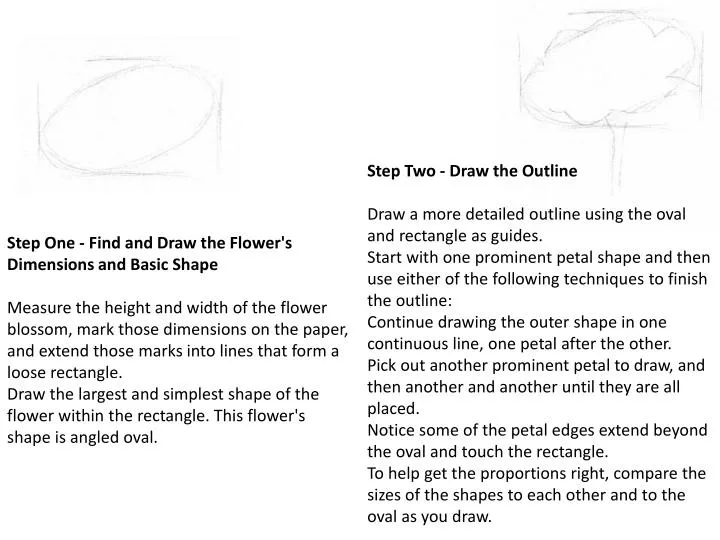
Step Two - Draw the Outline Draw a more detailed outline using the oval and rectangle as guides. Start with one prominent petal shape and then use either of the following techniques to finish the outline: Continue drawing the outer shape in one continuous line, one petal after the other.

E N D
Step Two - Draw the Outline Draw a more detailed outline using the oval and rectangle as guides. Start with one prominent petal shape and then use either of the following techniques to finish the outline: Continue drawing the outer shape in one continuous line, one petal after the other. Pick out another prominent petal to draw, and then another and another until they are all placed. Notice some of the petal edges extend beyond the oval and touch the rectangle. To help get the proportions right, compare the sizes of the shapes to each other and to the oval as you draw. Step One - Find and Draw the Flower's Dimensions and Basic Shape Measure the height and width of the flower blossom, mark those dimensions on the paper, and extend those marks into lines that form a loose rectangle. Draw the largest and simplest shape of the flower within the rectangle. This flower's shape is angled oval.
Step Three - Draw the Interior Petals and Stem If you think of the petals in the interior of this flower as shapes, it looks a lot like a jigsaw puzzle. Your job is to place each of those shapes into the outline drawing of the flower you just made. Start by drawing the shapes that complete the petals at the front of the flower. Each line in the interior of the flower connects to another line, so, the shapes will build on each other as you draw them. Work your way across and up through the interior of the flower, drawing one petal shape at a time. When you're done with the flower, add the stem. Notice how wide it is and at what points it touches the flower on each side.
Step Four - Begin Shading the Petals Using the "side of the pencil" style of shading explained here, fill a few of the petals with hatching. Start with the darkest area of each petal. That's usually where the petal is in shadow near the body of the flower. Then lighten the shading as you work out toward the edge of the petal. Tip the pencil up on its point to fill in the small areas. Each petal has a different pattern of shadow and highlight, so look closely at the model as you shade each one. It's always easier to add more graphite than it is to erase it, so consciously keep the shading a little light at first. After you've shaded a few petals and are more familiar with the texture graphite creates, go back over the shadows and darken them to their true values. Hint: Squint your eyes to help see the value of the flower and of the shading as you create it. Quickly move your eyes between the flower and the drawing to see if they "match".
Step Five - Add Shading to the Entire Flower and Stem Fill in the rest of the petals with "side of the pencil" shading. So that the lines of the interior petals don't get lost in the hatching, stop it a little short of their edges. (You won't be able to fill in the smallest petals very precisely yet.) Shade in the stem, too. To make the stem look realistic, pay careful attention to where the shadows are darkest and lightest. On this stem, the shadows were darkest on the left edge. After the petals are filled with "side of the pencil" shading, switch to "tip of the pencil" shading. Use the tip of the pencil to shade in the smallest petals in a more precise way. This is best done by leaving their edges free of shading and darkening the petal behind each one instead.
Step Six - Define Petal Edges and Add Subtle Shading Now use a dull pencil tip to darken and reshape the shadows over the entire flower and stem where they need adjusting. Keep squinting your eyes and comparing the drawing to the model as you work. If the pencil tip becomes to flat to work with in the small areas, you can make the tip round again by stroking it back and forth across scrap paper while turning the pencil. Hint: A lot of drawing is about adjusting your work until it matches reality. It's nearly impossible to get shapes and values right the first time you draw them, so constantly compare your drawing to the model and take the time to bring your drawing closer to what you see.
Step Seven - Increase Contrast and Add Final Details Use a 4B pencil, a kneaded eraser and a vinyl eraser for this step. Sometimes graphite pencil drawings of flowers need a little help to look as bright and beautiful as the real thing. A great way to do that is to create more contrast. First, with the dull tip of a 4B pencil, begin to darken the very darkest shadows even more. Pay special attention to the shadows in the creases between petals. Next, use the eraser to lighten the lightest highlights even more. Lay the edge of the eraser along the petal edge and gently pull it down into the petal to blend the highlight in a natural looking way. Darken the shadow edge of the stem, too, so that it matches the contrast of the flower To add even more interest, add the three downward angled bud casings at the bottom of the flower. (Practice on a scrap piece of paper first.) Draw them "loosely", with the side of the pencil, in just a few quick movements. If you lay down the marks so that one side or the other is a little darker, the casings will look shadowed and realistic. To make the middle one look bent, tap a highlight across its middle with the pinched tip of an eraser.