Download
1 / 40
400 likes | 626 Views
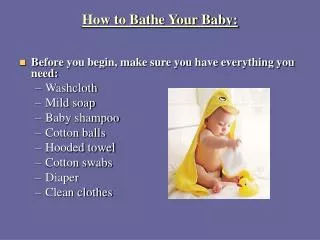
How to Bathe Your Baby:. Before you begin, make sure you have everything you need: Washcloth Mild soap Baby shampoo Cotton balls Hooded towel Cotton swabs Diaper Clean clothes. Sponge Bath Demo. Tips for Cord Care:.

E N D
How to Bathe Your Baby: • Before you begin, make sure you have everything you need: • Washcloth • Mild soap • Baby shampoo • Cotton balls • Hooded towel • Cotton swabs • Diaper • Clean clothes
Tips for Cord Care: • To prevent infection and speed the drying of the cord, some healthcare professionals suggest cleaning around the cord with a cotton swab dipped in warm weater. • To avoid irritation, don't cover the area with a diaper or plastic pants. Fold the diaper over and away from the cord area. • Continue this hygiene for a few days after the cord has fallen off completely. Don't be surprised if you see a few drops of blood the day the cord falls off. This is normal. • As the cord falls off, the center may look yellow. But if it has a puslike discharge or an offensive odor, or if the area is hot, red and swollen, call your baby's doctor.
Baby Cares: • Nail trimming:When your baby is born, she may have rather long fingernails that will need to be cut, left, so she doesn’t scratch herself. The hospital won’t do this for you because it’s considered a surgical procedure, so you may want to bring a pair of baby clippers with you to the hospital.To cut your baby's nails, push down on the finger's skin to pull the nail away from the skin as you cut. If you do nick baby's fingers, use a gauze pad to stop the bleeding. Tip: Try to sneak in nail cutting while your baby is asleep.
Diaper Rash • Diaper rash usually occurs in two stages: Irritation: This is usually caused from a combination of the moisture from the skin, urine and stool. Yeast: If the irritation gets bad enough (and any parent will tell you that it doesn't take much), the skin will become contaminated, usually with a yeast.
To help control and treat diaper rash: • Reduce skin's exposure to irritants.This is hard to do, especially in infants. Try changing the diaper more often than you are used to. Apply a liberal amount of a barrier ointment.This will protect the skin from urine and stool, which is very helpful. I suggest using a thick zinc oxide ointment. Apply this with every diaper change when the skin appears irritated.Watch for tell-tale signs of yeast infection.This type of infection usually looks like a large reddened patch with much smaller "satellite" areas around it. When an infection with yeast occurs, no amount of over-the-counter diaper rash ointment will make it go away. An antifungal medication must be used to kill the yeast. Generally, a yeast diaper rash goes away after about seven days of antifungal medication.
Circumcision Care: • After your son's circumcision there will be either a visible incision or a plastibell, which is a small plastic ring. Three or four times a day, you will need to clean the area with warm water. Soap is not necessary. • At each diaper change, you will want to apply a small amount of petroleum jelly. If your doctor sent you home with an antibiotic ointment you will want to use this as directed. • It takes about ten days for the scab over an incision to fall off, and about the same amount of time or a little longer for the plastibell to fall off. After the scab or plastibell falls off, no further care is needed outside of normal good hygiene. If the plastibell does not fall off after two weeks, contact your health care provider.
Circumcision Care: • You will also want to call your health care provider if you notice any of the following: • swelling • bleeding (other than just a drop or two) • foul smelling discharge • difficulty urinating • fever • black or blue discoloration • consistent redness that appears suddenly and does not disappear after a few
Baby Cares: • Cleaning the nose:Don't use a cotton swab or rolled up tissue to clean the inside of your baby's nose. If your baby is really stuffy, suction out the mucus with a baby nasal aspirator. Saline drops may soften the mucus first. Cradle your baby or sit her up. Squeeze the bulb and place the tip in one nostril. Release bulb and draw the mucus out. Rinse the bulb and repeat.
Baby Cares: • Temperature (underarm):Ear thermometers are common today but are not very accurate for newborns. It's best to use a traditional thermometer, left. When taking your baby's temperature, keep her entertained by singing or talking to her so she doesn't wiggle too much.Take off your baby's shirt. Carefully put the end of the thermometer into her armpit (make sure it is dry). Hold your baby's arm over the thermometer and gently press her elbow against her side. It may take four to five minutes for a reading.
Calling for help When in doubt, call your doctor. Call your baby's doctor immediately if your baby develops any of these symptoms: • Poor feeding• Poor coloring• Listlessness • Weak cry• Underarm temperature of at least 99.4 degrees F• Unusual fussiness• Sleeping more than usual• Vomiting or diarrhea• Breathing problems Baby Cares:
4 Recommended Breastfeeding Positions • 1. Cradle hold: • This is the way most of us envision nursing. You cradle baby's head in the crook of your arm and use your other hand to support your breast. Baby's face, tummy, and knees should be facing you and leaning in toward you, and her head could be a bit higher than her body. The arm that's doing the cradling supports baby's neck, spine, and bottom.
4 Recommended Breastfeeding Positions • 2. Cross-cradle hold • Instead of resting baby's head in the crook of your arm, rest it in your palm, so that baby lies on your right arm if you're using your left breast and vice versa. Again, her body should be directly facing and leaning into you. This is a great position for newborns and babies who have latch-on trouble, because it's easier to move her to your breast.
4 Recommended Breastfeeding Positions • 3. Football hold • The funny name gives you the idea that you keep baby tucked against your side, not your tummy. She rests on a pillow and your armpit goes over her body so your arm can reach under and support her neck and spine. This is a great hold for babies who have latch-on trouble and for moms who have had c-sections. Because you may need to lean over a bit for this one, experts also say it's a good hold for women with large breasts or flat nipples -- gravity helps make the breasts easier to catch hold of.
4 Recommended Breastfeeding Positions • 4. Lying down • You're tired, baby's tired -- sometimes it's easiest to nurse in bed. Lie on your side and support your neck and back with pillows. Put a pillow between your legs, too, if it helps keep your hips and back in a straight line. Cradle baby's head on your bottom arm. If you need to, put a pillow under baby, too, so neither of you has to strain. Then lean over to breastfeed -- some women use the breast that's on the bottom, but some women give baby that breast that's on the top. Another way to get into this position: Sit back in bed and get baby latched on while she's on top of you, then roll to your side, holding onto baby the whole time.
7 Tips for Getting Baby Latched On to the Breast • 1. Hold her the right way. Nurses or a lactation consultant in the hospital can help you. • 2. Lift your breast with your free hand. Especially in the first weeks, your breast will be so heavy that you'll have to support it with your fingers. Holding it also helps you guide baby to it. • 3. Hold your baby's back and neck with your other hand. Supporting those, rather than her head, will allow you to lift her easily.
7 Tips for Getting Baby Latched On to the Breast • 4. Get her to open wide. You need baby to take half or more of the areola (the dark part around your nipple) into her mouth. Try tickling her cheek or lower lip with your nipple, then waiting for her to open as wide as a yawn. • 5. Pull her to you quickly. Once baby's mouth is open, you need to get her on the breast fast, before she begins to close down. But don't bend down to her -- she'll get a better hold if you lift her to you. The hardest part: Getting used to moving her with confidence. You don't need to use force, of course, but you'll help her if you put her on gently but firmly. Her chin should press into your breast.
7 Tips for Getting Baby Latched On to the Breast • 6. Check her mouth's position. Her lips should splay out, and you shouldn't be able to see much if any of your areola. • 7. Relax and breathe. This is more for you than the baby. In the beginning, you may find yourself sitting stiffly, hunching your shoulders, and leaning over too far, which strains your lower back. Practice breathing slowly, relaxing your shoulders, and sitting back into the chair as much as you can.
Pacifiers • Personal choice to use/not to use • Sometimes confusing for baby, my disrupt supply and demand of mother’s milk supply • Babies with pacifiers found not to nurse as long • Need to satisfy suck, if not pacifier then nursing or sucking on hands or fingers/thumbs.
SIDS • What is SIDS?SIDS is the diagnosis for the sudden death of a baby under one year of age that remains unexplained
Who is at risk for SIDS? • Babies who sleep on their stomachs • Babies born to mothers who smoke during pregnancy and babies that are exposed to secondhand smoke after birth • Babies born to mothers who are under 20 years old at the time of their first pregnancy • Babies born to mothers who had no or late prenatal care • Babies who are premature or low birth weight • Babies who are placed to sleep on soft surfaces, such as soft mattresses, sofas, sofa cushions, waterbeds or sheepskins. • Babies who are placed to sleep in an area containing fluffy and loose bedding, such as pillows, quilts or other coverings, stuffed toys and other soft items
Breastfeed your baby.Don't allow anyone to smoke around your baby.Place your baby to sleep on her back at night and at naptime, unless advised otherwise by your baby's physician.Place your baby on a firm mattress, such as in a safety-approved crib or other firm surface.Remove all fluffy and loose bedding, such as fluffy blankets or other coverings, pillows, quilts and stuffed toys, from your baby's sleep area. Keep your baby's face clear of coverings.Be careful not to overheat your baby, especially when sleeping. Keep the room at a temperature that is comfortable for you.Try to avoid exposing your young baby to people with respiratory infections. Ask people to wash their hands before holding or playing with your baby.Take your baby for regular well-baby checkups and routine immunizations.Educate grandparents, babysitters, day care providers and everyone who cares for your baby about SIDS risks. What can you do to lower your baby's risk of SIDS?
Poison control at home: Keep these products in locked cupboards or out of children's reach. In the Bathroom:Aspirin, other medicines, Makeup, Deodorants, Perfume, Disinfectants, Rubbing alcohol, Hair care products, Toilet bowl cleaner In the garage or basement: Antifreeze, Motor oil, Gasoline, Kerosene, Charcoal lighter, Mouse or rat poison, Garden chemicals, Paints, Pant thinners In the kitchen: Aerosol spray, Laundry/dishwasher detergents, Bleach, Vitamins, Medicines, Drain cleaner, Other cleaning supplies All over the house: Alcohol, Lead paint (furniture, toys, walls) Cigarettes, Plants
Be sure that you... DON'T keep kerosene, gasoline, or similar products in pop cans or milk bottles. Store food and non-food items separately.NEVERuse insect sprays around food.NEVER tell a child that medicine is "candy" or that it tastes good.KEEPmedicines, cleaning products, and other poisonous household products in original containers and in locked cupboards. Inexpensive safety latches are readily available at hardware and department stores.ONLY give a prescription drug to the person it was prescribed for by the doctor. Dispose of outdated medicines promptly.
Be sure that you... CHECK all painted furniture and toys to be sure they have non-toxic finishes. Look at labels.BUY products in child-resistant containers and replace caps tightly.KEEP purses out of reach. Avoid carrying medicine, vitamins, cigarettes, and perfume in handbags.CHOOSE safe plants, labeled with botanical name, and keep out of children's reach.Never leave your child alone with a poison, even for a few seconds.
CPR = life saving knowledge • The letters in CPR stand for cardiopulmonary resuscitation, a combination of rescue breathing (mouth-to-mouth resuscitation) and chest compressions. If a child isn't breathing or circulating blood adequately, CPR can restore circulation of oxygen-rich blood to the brain. Without oxygen, permanent brain damage or death can occur in less than 8 minutes. • Call 963-WELL for class date & times offered through CSM campuses or call the Red Cross or American Heart Association.
Babies are fragile. Please don't shake a child. When a baby is vigorously shaken, the head moves back and forth. This sudden whiplash motion can cause bleeding inside the head and increased pressure on the brain, causing the brain to pull apart and resulting in injury to the baby.
Often frustrated parents or other persons responsible for a child's care feel that shaking a baby is a harmless way to make a child stop crying. The number one reason a baby is shaken is because of inconsolable crying. Almost 25 percent of all babies with Shaken Baby Syndrome die. It is estimated that 25-50 percent of parents and caretakers aren't aware of the effects of shaking a baby.
If you or someone else shakes a baby, either accidentally or on purpose, call 911 or take the child to the emergency room immediately. Bleeding in side the brain can be treated. Immediate medical attention will save your baby many future problems . . . and possibly the baby's life.
Crying & Comfort Needs • Caring for Your Newborn: Routine cares- Crying and Emotional Needs, Soothing Your Baby (pg 25), Crying & Colic (pg 38), Your Newborn’s Senses (pg 12), Your baby’s cues and Reflexes (pg 13), Bonding with Your Baby (pg 8).
Car Safety Seats: Which car safety seat is the best? • No one seat is the "best" or "safest." The "best" seat is the one that fits your child's size, is correctly installed, and is used properly every time you drive. When shopping for a car safety seat, keep the following in mind: • Price doesn't always matter. Higher prices can mean added features that may or may not make the seat easier to use. • Keep in mind that pictures or displays of car safety seats in stores may not show them being used the right way.
Important safety rules • Always use a car safety seat, starting with your baby's first ride home from the hospital. • Never place a child in a rear-facing car safety seat in the front seat of a vehicle that has an airbag. • The safest place for all children to ride is in the back seat. • Set a good example-always wear your seat belt. Help your child form a lifelong habit of buckling up. • Remember that each car safety seat is different. Read and keep the instructions that came with your seat. • Read the owner's manual that came with your car on how to correctly install car safety seats.
Rear-facing seats • All infants should ride rear-facing until they have reached at least 1 year of age and weigh at least 20 pounds. That means that if your baby reaches 20 pounds before her first birthday, she should remain rear-facing until she turns 1 year old. • There are 2 types of rear-facing seats: infant-only seats and convertible seats. Following are some important features of both:
Infant-only seats may be used until 1 year old. • Small and portable (sometimes come as part of a stroller system). • Have a 3-point or 5-point harness. • Can only be used for infants up to 20 to 22 pounds, depending on the model. • Many come with a detachable base, which can be left in the car. The seat clicks in and out of the base, which means you don't have to install it each time you use it. • Most have carrying handles.
Convertible seats • Bigger than infant-only seats. • Can also be used forward-facing for older and larger children, therefore these seats can be used longer. • Many have higher rear-facing weight limits than infant only seats. These are ideal for bigger babies. • Have the following types of harnesses: • - 5-point harness - 5 straps: 2 at the shoulders, 2 at the hips, 1 at the crotch - T-shield - A padded t-shaped or triangle-shaped shield attached to the shoulder straps - Overhead shield - A padded tray-like shield that swings down around the child
Other features to look for in rear-facing seats: • Harness slots. Look for seats that come with more than one set of harness slots to give your growing baby more room. The harness should be in the slots at or below your baby's shoulders. Check the manufacturer's instructions to be sure. • Adjustable buckles and shields. Many rear-facing seats have 2 or more buckle positions for growing babies. Many overhead shields can be adjusted as well. • Other features. Angle indicators, built-in angle adjusters that help you get the proper recline, and head support systems are other features that are made to help you install the seat the right way.
Do not use a car safety seat that: • - Is too old. Look on the label for the date it was made. Do not use seats that are more than 10 years old. Some manufacturers recommend that car safety seats only be used for 5 to 6 years. Check with the manufacturer to find out how long the company recommends using their seat. • - Has any cracks in the frame of the seat. • - Does not have a label with the date of manufacture and model number. Without these, you cannot check on recalls. • - Does not come with instructions. You need them to know how to use the seat. You can get a copy of the instruction manual by contacting the manufacturer.
Do not use a car safety seat that: • -Is missing parts. Used car safety seats often come without important parts. Check with the manufacturer to make sure you can get the right parts. • - Is a shield booster. Although shield boosters may meet current safety standards for use by children from 30 to 40 pounds, the AAP does not recommend their use. Major injuries have occurred to children in shield boosters. The only time shield boosters should be used is if the shield is removed and the seat is used with a lap/shoulder belt as a belt-positioning booster. • - Was recalled. You can find out by calling the manufacturer or contacting the following: -- Auto Safety Hot Line 888/DASH-2-DOT (888/327-4236), from 8:00 am to 10:00 pm ET, Monday through Friday.
Thank You! Enjoy you babies…Time will pass so quickly and they’ll be grown before you know it!