Download
1 / 8
80 likes | 100 Views
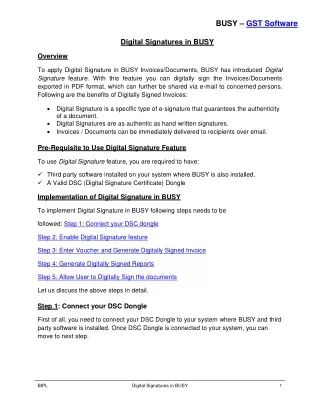
To apply Digital Signature in BUSY Invoices/Documents, BUSY has introduced Digital Signature feature. With this feature you can digitally sign the Invoices/Documents exported in PDF format, which can further be shared via e-mail to concerned persons.

E N D
BUSY – GST Software Digital Signatures in BUSY Overview To apply Digital Signature in BUSY Invoices/Documents, BUSY has introduced Digital Signature feature. With this feature you can digitally sign the Invoices/Documents exported in PDF format, which can further be shared via e-mail to concerned persons. Following are the benefits of Digitally Signed Invoices: • Digital Signature is a specific type of e-signature that guarantees the authenticity of a document. • Digital Signatures are as authentic as hand written signatures. • Invoices / Documents can be immediately delivered to recipients over email. Pre-Requisite to Use Digital Signature Feature To use Digital Signature feature, you are required to have: ✓ Third party software installed on your system where BUSY is also installed. ✓ A Valid DSC (Digital Signature Certificate) Dongle Implementation of Digital Signature in BUSY To implement Digital Signature in BUSY following steps needs to be followed: Step 1: Connect your DSC dongle Step 2: Enable Digital Signature feature Step 3: Enter Voucher and Generate Digitally Signed Invoice Step 4: Generate Digitally Signed Reports Step 5: Allow User to Digitally Sign the documents Let us discuss the above steps in detail. Step 1: Connect your DSC Dongle First of all, you need to connect your DSC Dongle to your system where BUSY and third party software is installed. Once DSC Dongle is connected to your system, you can move to next step. BIPL Digital Signatures in BUSY 1
BUSY – GST Software Step 2: Enable Digital Signature feature To enable Digital Signature feature, click → →Features/Options → →General Tab. On clicking General tab, a General window appears. Given below is the screenshot of General window. Administration Configuration → → Specify ‘Y’ in this data field, to enable Digital Signature feature and click Configuration button to configure Under General window, specify ‘Y’ under Apply Digital Signatures in Invoice/Document option and click Configuration button to configure. On clicking Configuration button, a Digital Signature Configuration window appears. Given below is the screenshot of Digital Signature Configuration window. BIPL Digital Signatures in BUSY 2
BUSY – GST Software Under Digital Signature Configuration window, following details need to be specified: •Select Digital Signature Software Vendor –Select Digital Signature Software Vendor name from the list. Under the list, those Vendor names will appear which have collaboration with BUSY. You have to select the one whose software you have installed. •Available Digital Signature Certificate(s) –Select the Authorised Signatory name from the list which needs to be printed on the Invoice/Document. Under the list, those names will appear which are registered at the time of issuing DSC dongle. •Password / PIN –Specify the Password / PIN of DSC. •‘Search String’ to Place Digital Signature –Specify Search String i.e. key word where Digital Signature is to be placed on the Invoice/Document. By default Authori will appear which means Digital Signature will appear below Authorised Signatory under Invoice/Document. Similarly, you can specify other string i.e. key word where you want Digital Signature to appear. If the string specified is not found, then Digital Signature will appear on the left hand side of the footer on Invoice/Document. Please Note: It is mandatory to connect DSC Dongle while configuring Digital Signature feature. Step 3: Enter Voucher and Generate Digitally Signed Invoice Next, enter the voucher. At the time of saving the voucher, an Invoice Printing message box appears asking to Print Invoice. Click, ‘Yes’ button to continue. On clicking ‘Yes’ button, an Invoice Printing window appears. Given below is the screenshot of Invoice Printing window. BIPL Digital Signatures in BUSY 3
BUSY – GST Software Click Export button to export the invoice to PDF file Click E-mail button to mail the PDF invoice to concerned Under Invoice Printing window, following details need to be specified: •Apply Digital Signature (only for PDF) –Specify ‘Y’ under this data field to digitally sign the invoice. This option is available only for exporting the invoice to PDF or e-mailing the PDF invoice to concerned party. •Search String to Place Digital Signature –Specify Search String i.e. key word where Digital Signature is to be placed on the Invoice. By default, string specified at the time of configuring Digital Signature feature will appear here. After entering the required details, click relevant button as per your requirement. Given below is the screenshot of Digitally Signed Invoice. Please Note: While performing this step, make sure DSC dongle is connected to your system. BIPL Digital Signatures in BUSY 4
BUSY – GST Software Digitally Signed Invoice Step 4: Generate Digitally Signed Reports You can also generate digitally signed reports. Following reports can be digitally signed: • Outstanding Analysis o Statement of A/C o Confirmation of A/C o Payment Reminder To generate digitally signed reports, click Print/Email/SMS → Select the required report option. On clicking any of the report option, a report options window appears. Given below is the screenshot of Statement of A/C report options window. →Outstanding Analysis → → BIPL Digital Signatures in BUSY 5
BUSY – GST Software Under Statement of A/C window, following details need to be specified: •Apply Digital Signature (only for PDF) –Specify ‘Y’ under this data field to digitally sign the report. This option is available only for exporting the document to PDF or e-mailing the PDF invoice to concerned party. •Search String to Place Digital Signature –Specify Search String i.e. key word where Digital Signature is to be placed on the Document. By default, string specified at the time of configuring Digital Signature feature will appear here. After entering the required details, click relevant button as per your requirement. Given below is the screenshot of Digitally Signed Report. BIPL Digital Signatures in BUSY 6
BUSY – GST Software Digitally Signed Report Step 5: Allow User to Digitally Sign the documents You can also allow sub-user to digitally sign the documents. To do the same, click Administration → →Users → →Modify option. Open the sub-user in modify mode to whom you want to give rights. Given below is the screenshot of Modify User window. BIPL Digital Signatures in BUSY 7
BUSY – GST Software Under Modify User window, specify ‘Y’ under Allow to digitally sign documents option. In the similar manner, you can give rights to various users to digitally sign the document. With this we have completed implementation of Digital Signature in BUSY. <<<☺Thank You ☺>>> BIPL Digital Signatures in BUSY 8