Download
1 / 14
140 likes | 159 Views
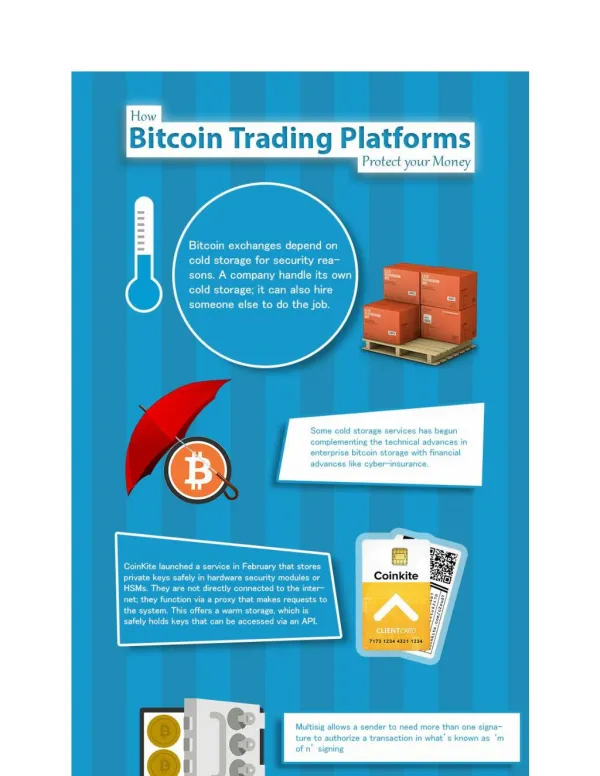
BDEP stands for u2018BUSY Data Exchange Platformu2019. With access to BDEP Service, companies can exchange their data (Invoices) with other companies using BUSY.

E N D
BUSY BUSY Data Exchange Platform Overview BDEP stands for ‘BUSY Data Exchange Platform’. With access to BDEP Service, companies can exchange their data (Invoices) with other companies using BUSY. For example, Company A sells goods to Company B. In this case Sales made by Company A is the Purchase for Company B. If both A & B are using BUSY then with the help of BDEP Service, Company A can exchange its Sale vouchers with Company B. Thus, Company B need not to enter Purchase vouchers manually, instead it will import vouchers from BDEP which are uploaded by Company A. Using BDEP Service To use BDEP Service following steps need to be performed: Step 1: Enable and Configure BDEP Service Step 2: Specify BDEP ID of Parties in Account Master Step 3: Configure ‘Upload to BDEP after Saving’ option under Voucher Configuration Step 4: Enter Sale/Purchase vouchers and upload on BDEP Step 5: a) Download data received on BDEP b) Check status of data sent to BDEP Now, let us discuss the above mentioned steps in detail: Step 1: Enable and Configure BDEP Service To enable BDEP service in BUSY, go to: Administration General Tab. Given below is the screenshot of General window. Configuration Feature/Options BIPL BUSY Data Exchange Platform 1
BUSY In General Tab, specify ‘Y’ under‘Enable BUSY data Exchange Platform’ (BDEP) option. On specifying ‘Y’ under ‘Enable BUSY data Exchange Platform (BDEP)’ option, a Configuration button appears. Click ‘Configuration’ button to configure BDEP Service. On clicking Configuration button, a BDEP Configuration window appears. Given below is the screenshot of BDEP Configuration window. BIPL BUSY Data Exchange Platform 2
BUSY If BDEP ID is not created then create a new unique BDEP ID by clicking this button These details will be automatically filled on specifying BDEP ID and Password Specify a unique BDEP ID and Password If you already have a BDEP ID for this company then specify the same here in BDEP Login Details else create a new one using Create New ID button provided in right hand side and specify the same. Please Note: You need to create a Unique BDEP ID for each company. At the left hand side of BDEP Configuration window following buttons appear: Create New ID Update Profile Change Password BIPL BUSY Data Exchange Platform 3
BUSY Forgot Password Now, let us discus the above mentioned buttons in detail: a)Create New ID– Click thisbutton to create a Unique BDEP ID and Password. On clicking Create New ID button, a Create New BDEP ID window appears. Given below is the screenshot of Create NewBDEPID window. Specify a Unique BDEP ID and Password Under Create New BDEP ID window following details needs to be specified: BDEP ID– Specify a unique BDEP ID in this data field. For Example – Smart Clothings can specify ‘Smart Clothings’ as BDEP ID. BDEP ID must be unique for every company. However, it will remain same across all financial years. Password – Specify password in this data field. Recheck Password – Specify the password again to recheck the password. BIPL BUSY Data Exchange Platform 4
BUSY Name – Specify the name of your company in this data field. Address – Specify the address of your company in this data field. Mobile – Specify the mobile no. of contact person in this data field. Email – Specify the email id of your company in this data field. Contact Person – Specify the name of contact person in this data field. Type of Trade – Specify the type of trade of your company. GSTIN – Specify the GSTIN No. of your company in this data field. b)Update Profile – Click thisbutton to update your profile details (Address, Contact Person, Mobile No. etc.). c)Change Password– Click thisbutton to change the password. d)Forgot Password– Click thisbutton, in case you forgot the password. On clicking this button, a Retrieve Password message box appears. Given below is the screenshot of Retrieve Password message box. Click Yes button to receive password on your registered E-Mail Id. Step 2: Specify BDEP ID of Parties in Account Master After configuring BDEP service, next you need to specify BDEP ID of Parties in Account master. Given below is the screenshot of ModifyAccount Master window. BIPL BUSY Data Exchange Platform 5
BUSY Specify BDEP ID of Party in this data field In Account Master window, you need to specify the BDEP ID of Party. Please Note: To use BDEP service, both the Parties (seller & buyer) must have registered for BDEP service and should have specified each other’s BDEP ID in Account Master in order to exchange data from BDEP. Step 3: Configure ‘Upload to BDEP after saving’ option under Voucher Configuration Next you need to configure ‘Upload to BDEP after saving’ option under Voucher Configuration. To configure ‘Upload to BDEP after saving’ option go to: Administration Voucher Configuration Select the Voucher and Voucher Series below is the screenshot of Voucher Configuration window for Sales Voucher. Configuration Voucher Configuration. Given BIPL BUSY Data Exchange Platform 6
BUSY In Voucher Configuration window, select the option from the list under ‘Upload to BDEP after saving’ option. Following options appear in the list: Not Reqd.– Select this option if you don’t want to upload voucher on BDEP for this series. Upload after Asking– Select this option, if you want that a message box will pop-up asking for upload of voucher on BDEP at the time of voucher saving. Upload w/o Asking– Select this option if you want to automatically upload voucher to BDEP at the time of saving. In this case, no message box will pop-up asking for upload of voucher on BDEP. Step 4: Enter Sale/Purchase vouchers and Upload on BDEP Once Configuration is done, enter the transaction i.e. Sale/Purchase voucher. At the time of saving the voucher, an Upload Voucher message box appears if you have specified ‘Upload after Asking’ under ‘Upload to BDEP after Saving’ option in Voucher Configuration. Given below is the screenshot of Upload Voucher message box. BIPL BUSY Data Exchange Platform 7
BUSY Click ‘Yes’ button to upload voucher on BDEP. You can also upload multiple vouchers on BDEP in one go through Administration Export/Import Data Export/Import (BDEP) Bulk Voucher Upload to BDEP option. On clicking Bulk Voucher Upload to BDEP option, an Upload Voucher to BDEP window appears. Given below is the screenshot of Upload Voucher to BDEP window. Data In Upload Voucher to BDEP window, specify the following details: Voucher Type – Select Voucher type for which you want to upload data on BDEP. BIPL BUSY Data Exchange Platform 8
BUSY Voucher Series – Select Voucher series for which you want to upload data on BDEP. Filter on Party – Select from the list you want to apply filter for All/Group/One Party. Party – Select Party/Party group for which you want to upload data on BDEP. After specifying required details, click downward arrow button. On clicking downward arrow button, voucher details will appear as per the details specified by you. Select the vouchers you want to upload on BDEP and click Upload to BDEP button. Thus, you can upload multiple vouchers to BDEP for different Parties and those Parties will be able to download the same from BDEP as explained below. Step 5: a)Download Data Received on BDEP through Data Export/Import (BDEP) Utility Once voucher is uploaded on BDEP, the other party can download the vouchers through Administration Data Export/Import Data Export/Import (BDEP) option. On clicking Data Received on BDEP option, a Vouchers Received on BDEP window appears displaying the voucher details which are received on BDEP i.e. which are uploaded by other parties. Given below is the screenshot of Vouchers Received on BDEP window. Data Received on BDEP Check this checkbox to view vouchers which are already downloaded or rejected BIPL BUSY Data Exchange Platform 9
BUSY Select the voucher appearing on the screen to Save or Reject. On clicking the voucher, ‘Voucher to be Saved As’window appears. Given below is the screenshot of ‘Voucher to be Saved As’ window. In ‘Voucher to be Saved As’ window, following options appear: Save As– Select this option to save the voucher. Following details needs to be specified if you want to save the voucher: oVoucher to be saved as– Select from the list whether voucher to be saved as Purchase or Sales. oSeries – Select the series in which you want to save the voucher. Reject– Select this option if you want to reject the voucher. On selecting this option, ‘Specify Reason for Rejection’ data field gets enabled. Specify the reason for rejecting the voucher. If you have selected Save As option, then at the time of saving the voucher a Mapping/Creation of Masters window appears. This window appears if masters used in the voucher are not found in your company. Given below is the screenshot of Mapping/ Creation of Masters window. BIPL BUSY Data Exchange Platform 10
BUSY Check this checkbox if you want to create all the masters Under Mapping/ Creation of Masters window various columns appear depending on the Master type. Following columns appear for Item Master: Name– This column will display the name of Item which is not found in your company data. Map To/Create– Select the option from the list i.e. either you want to map the item or create a new item. oSelect Map To option if you want to map the item with the item existing in your company with some other name. For Example, Item Shirt is existing in your company as item name Kameez. In this case you can map Item Shirt with Item Kameez. oSelect Create option if you want to create a new item. To be Mapped with Item– This column gets enabled, if you have selected Map To option in the previous column. Select the name of item existing in your company with which you want to map the item. Group– This column gets enabled, if you have selected Create option in the previous column. Specify the group of the item which is to be created. Main Unit– This column gets enabled, if you have selected Create option in the previous column. Specify the Main Unit of the item which is to be created. Tax Category– This column gets enabled, if you have selected Create option in the previous column. Specify the Tax Category of the item which is to be created. Click Save button to save the mapping information. After saving of Items mapping, window for other masters may also open up if not found in your data. BIPL BUSY Data Exchange Platform 11
BUSY Once the mapping of masters is complete, Add voucher screen will appear with all the data filled automatically. Here you can verify the voucher details, make any changes if required and save the voucher. *While downloading voucher from BDEP, if voucher no. already exists in your company then you will be prompted to either create a new voucher or modify existing voucher as shown below: In the above window following options are provided: Overwrite Selected Voucher – Select this option to overwrite the selected voucher i.e voucher which already exists in your company. Save as New Voucher – Select this option to save the voucher received as a new voucher. Reject BDEP Voucher – Select this option to reject the voucher received on BDEP. Also, specify the reason for rejecting the voucher in ‘Specify Reason for Rejection’ data field. Here you can choose whether to save it as new voucher or modify existing voucher. Block/White-Label BDEP ID: A Block/White-Label BDEP ID button is provided at the bottom of Vouchers Received on BDEP window. From here you can either block BDEP IDs or white-label BDEP IDs as described below: BIPL BUSY Data Exchange Platform 12
BUSY Block BDEP ID– Select this option if you want to block some BDEP IDs i.e. you don’t want to receive data from some specific BDEP IDs. On clicking this button, a Block BDEP ID window appears. Specify the BDEP IDs which you want to block. White-Label BDEP ID –Select this option if you want to receive data from some specific BDEP IDs only. On clicking this button, a White-Label BDEP IDwindow appears. Specify the BDEP IDs from which you want to receive data. b)Check Status of data sent to BDEP through Data Export/Import (BDEP) Utility You can view the status of data sent to BDEP i.e. whether they are downloaded, rejected or pending. Go to Administration Data Export/Import BDEP option. Data Export/Import (BDEP) Data Sent to On clicking Data Sent to BDEP option, a Vouchers Sent toBDEP window appears displaying the status of vouchers which were uploaded on BDEP. Given below is the screenshot of Vouchers Sent toBDEP window. Vouchers older than 30 days will be deleted automatically irrespective of pending, rejected or downloaded status Click this button if you want to delete all the vouchers from BDEP which are downloaded by the parties BIPL BUSY Data Exchange Platform 13
BUSY In Vouchers Sent to BDEP window, you can view status of the vouchers. Different Status will appear in different conditions: Downloaded – This status will appear when the other party has downloaded the voucher. Now, you can delete the downloaded vouchers from BDEP using F8 shortcut key. Rejected – This status will appear when the other party has rejected the voucher. Reason for rejection of the voucher is specified in next column. In case of rejected voucher, two actions are suggested: oEither modify the voucher as per the reason specified and upload it to BDEP again. OR oDelete the voucher from BDEP. Pending – This status will appear when the other party has not taken any action against the voucher. From above window you can easily check the status of vouchers sent to BDEP and delete the downloaded vouchers from BDEP. With this we have completed the process of how to use BDEP service. Note: BDEP service is available only in Standard & Enterprise Edition with an active BUSY License Subscription. <<< Thank You >>> BIPL BUSY Data Exchange Platform 14