ECE 425
ECE 425. Pulse Width Modulator. Pulse Width Modulation. PWM Basics. PWM is a method of digital control for analog devices. Avoids all use of digital to analog converter. Digital signal is used all the way to the analog device. In theory. In practice, amplification is likely to be needed.

ECE 425
E N D
Presentation Transcript
ECE 425 Pulse Width Modulator
PWM Basics • PWM is a method of digital control for analog devices. • Avoids all use of digital to analog converter. Digital signal is used all the way to the analog device. • In theory. In practice, amplification is likely to be needed. • The duty cycle determines how much energy is delivered to the device. • Used to control DC motors, valves, pumps, LEDs and more. • Also a digital communications modulation technique, digital signal processing/generation...
PWM Variables • Duty cycle: percentage of period signal is active. • Period: length of one on/off cycle. • Voltage is just logic 1/logic 0. No microcontroller control over output levels. • Same for current. It’s whatever the controller can source. No program control for this.
PWM Module • As implemented, PWM module is based on timer hardware. • Runs off same PCLK, which can be scaled independently from timer clock. • Same logic as match output compare functions. • Can have up to 6 different output waveforms running simultaneously. • Useful for things like motors that require three non-overlapping PWM phase signals
PWM Operating Modes • Continuous operation with optional interrupt generation on match. • Stop timer on match with optional interrupt generation. • Reset timer on match with optional interrupt generation. • Most channels can be single or double edged. • Making a channel double edged takes two match operations. Some restrictions apply.
Single, Double Edged • For single edged channels, the output always goes high at the start of the period. • Unless duty cycle is set to 0. • Double edged channels can put a pulse anywhere in the period. • Can be positive or negative pulse. T = 0% T = 100%
Match Registers • PWM module has 7 match registers. • Six are used for setting timing within a period. • The first (PWMMR0) sets the frequency. All channels use the same frequency. • All 7 are 32 bit registers and work like the ones in the timer. • Load a value, trigger some action when it matches the timer count.
Match Registers • All are continuously checked against the timer. • Seven 32-bit comparators • When they match, action (interrupt, stop, reset) will take place if enabled. • Addresses • MWMMR0: 0xE001_4018, MWMMR1: 0xE001_401C, MWMMR2: 0xE001_4020, etc.
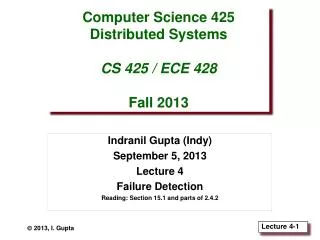
PWM Output Examples PWM2 and PWM4 are double edged. PWM5 is single edged.
Register Values for PWM Example • MR0 = 100 (time base) • Reset counter at match • MR1 = 41 • ½ of double edge PWM2 output control • MR2 = 78 • 2nd half of PWM output control • MR3 = 53 • 1st half of PWM4 output control • MR4 = 27 • 2nd half of PWM4 • MR5 = 65 • Single edge control, only one register needed (plus MR0 time base).
PWM Register Limitations • Six outputs and seven control registers. • Limited mix and match capability. • R0 and R1 control PWM1 • R1 and R2 control PWM 2 • R2 and R3 control PWM3, etc. • Because the time base register (PWMMR0) is used for PWM1, PWM1 can only be single edged. • Rises at time 0, falls when R1 matches timer.
Single Edge Control PWM • All single edge controlled PWM outputs go high at the beginning of a PWM cycle unless their match value is equal to 0. • Then output is constant logic 0. • Each PWM output will go low when its match value is reached. If no match occurs (i.e. the match value is greater than the PWM rate), the PWM output remains continuously high.
Double Edge Control • When a PWM output is set to double edge (set in PWM Control Register), its first match register says when to go high. • Its second says when to go low. • Going low can precede going high • This makes a negative pulse. • If set and clear are programmed for the same time, clear wins. • If a match value is out of range (i.e. greater than the PWM rate value), no match event occurs and that match channel has no effect on the output. • This means that the PWM output will remain always in one state, allowing always low, always high, or "no change" outputs.
PWM Control Register • Determines if an output will be single or double edged. • Enables/disables individual outputs. • Defaults are singled edged enabled. • Address: 0xE001_404C
PWMPCR Bits For bits 2 – 6, 1 means double edge and 0 single edge. For bits 9 – 14, 0 means enabled and 1 disabled. Default is all zeros. There is no double edge option for PWM1.
Frequency Control • PWM module runs off PCLK • Default is CCLK/4. May be CCLK or CCLK/2. • PWM frequency is PCLK divided by up to 232. • Same algorithm as timer module. Write a value to prescale register. When prescale count equals prescale register, PWM count increments. • For prescale = 0, PWM frequency = PCLK. • Gives a huge range. CCLK is programmable, PCLK is programmable, prescale is programmable.
Count Registers • PWM Prescale Register (PWMPR - 0xE001_400C) • Put the maximum value for prescale here. • PWM Prescale Counter register (PWMPC - 0xE001_4010) • 32-bit counter. Returns to 0 when it equals value in PWMPR. • PWM Timer Counter (PWMTC - 0xE001_4008) • 32 bit counter. Increments when PWMPC reaches its terminal count, as set in PWMPR.
PWM Counter • PWM Counter increments as indicated in previous slide. • If nothing stops it, it will count up to FFFF_FFFF, then roll over to 0. • It can be set to stop and/or cleared upon match with any of the match registers. • Going to 0 on match with MR0 would be normal operation for continuous PWM operation. That gives a constant operating frequency.
Match Actions • PWM can be set to generate an interrupt, stop the counter or have the count return to 0 on any match. • Three bits per match register. Each action (interrupt, stop, clear) is independent and can be enabled separately and in any combination. • PWM Match Control Register (PWMMCR - address 0xE001_4014).
PWM Match Control Register All default to 0 (disabled).
PWM Interrupt • Previous slide shows there are seven different PWM interrupts. • Can enable all simultaneously. • To tell what happened after an interrupt fires, need to read PWM Interrupt register (0xE001_4000). • This would be done in ISR. • Not strictly necessary if it’s the only possible interrupt. • PWM interrupts show up in VIC bit 8.
PWM Interrupt Register All higher bits are reserved. Bits are reset by writing a 1 to them. Writing zeros has no effect.
PWM Enable • The whole PWM module is disabled by default. • To use it, first must enable it by setting a bit in the PWM Timer Control Register (PWMTCR - address 0xE001_4004). • Register has a few more bits too.
PWMTCR • Bit0: set to 1 to enable PWM module. Default is zero. • Bit 1: counter reset. When set to 1, PWM counter will synchronously return to zero on the next clock rising edge. Default is zero. • Bit 3: PWM enable. Need to set this bit to enable shadow registers, which are needed to set match data. Default is zero. More on this shortly. • All other bits are reserved and should always be zeros.
Shadow Registers • Writing values to Match registers does not immediately change the Match registers. • New values are held in hidden “shadow” registers until the time is right to transfer them. • The right time is when a PWM0 match occurs. • Transfer will only take place if corresponding bit in Latch Enable Register is set.
PWM Latch Enable Register • Seven bits, one for each Match register. • All other bits are reserved and should be left at zeros. • All bits are zero by default. • When a bit is set, the value in the corresponding shadow register will be transferred to its Match register when Match 0 occurs. • But only if bit 3 of PWMCTR is also set. • Address 0xE001_4050
Transfer Procedure • Write new value(s) to Match register(s). • Set bit(s) in LER. • Order of 1 and 2 do not matter. Nothing will happen until Match 0. • Wait for Match 0. • Would not make sense if Match 0 reset is not enabled. • When that happens, all bits in LER will be cleared. • Latch register enable needs to be explicitly set every time.
Final Exam • Tuesday, May 15, JD 1102 • 3:00 – 5:00 • Open text (Hohl) plus 1 page of notes. • Fully comprehensive • Anything mentioned from the first day of class through the last may be on the exam. • Will NOT include anything done only in lab. • Definitely will include assembly language programming!
Labs, Assessment, etc. • Final lab reports are due at exam time. • All graded materials must be returned at exam time. • At least one complete set of class notes must be given to me at exam time. • May be a photo copy
Design Example • LED Dimmer • Use 1 kHz time base. • Not entirely arbitrary. Fast enough to avoid detectable flicker. Slow enough for high power (slow) LED to switch. • Use lab processor, 60 MHz CCLK • Get some hardware design in here too: drive three high power LEDs in phase, three more opposite phase. • Processor can not do this directly. Need way more current.
LED VI Curve http://www.pef.uni-lj.si/eprolab/comlab/overview/ov-elec-vi.htm
Enable PWM • PWM is disabled by default. • Need to enable it by writing to PWMTCR . • Match registers will be programmed, so shadow register transfers need to be enabled too. • Counter reset? TBD. • Result: write 10?1 for 4 LSBs to PWMTCR – (address 0xE001_4004). • Bit 2 is reserved and should always be left at 0.
PWM Reset Bit • Will not leave it reset forever. • Otherwise the counter would never move. • But for the shadow register to transfer values, the counter does need to be reset. • Might happen anyhow at rollover. • My recommendation: toggle reset via the PWMCTR register. This will be done after initializing Match 0 to the period.
Next, Frequencies • Can program CCLK, PCLK and PWM period • But CCLK has been taken off the table: it’s 60 MHz • PCLK: sensible thing is to make it the minimum, which is the default (15 MHz). • 00 to VPBDIV register • Now how do we turn the 15 MHz PCLK into a 1 kHz PWM timer period?
Timer Period • Timer period is set by Match 0 and Prescale. • No one right answer. One equation, two variables. • X * Y = 15 MHz / 1 kHz • But it might be convenient to make Match 0 100, so duty cycle can be expressed directly as a percentage. • Then need to calculate a prescale value.
Prescale Value • PCLK is 15 MHz. • We want a timer period of 1 kHz. • Already decided (?) to make Match 0 100. • So the prescale factor needs to be • (15,000,000 / 100) – 1 • Which is 14,999. • Write that to the prescale register.
Match 0 • Make the period 100. • Write that to Match Register 0. • 100 0xE001_4018 • What else? • Interrupt? No obvious need • Stop on match? • Really bad idea, would stop operation. • Reset on match. That is necessary to maintain the operating frequency.
Duty Cycle • This will be variable: change it and the LED intensity changes. • Where does it go? • What do we do with it?
Match n • It will be a second (not Match 0) register. • Single or double? • Double would not add anything, may as well make it single. • Should it generate an interrupt on match? • TBD • How about stop the count? • Definitely not. That would change the period.
Changing the Intensity • Intensity changes with the number written to the second Match register. • Assume Match 1, pick one arbitrarily. • But for the new intensity to take effect, need to enable Match Transfer each time. • Bit 1 of Latch Enable ( address 0xE001_4050) • Will be cleared automatically
Initial Value • Need to write something. • 0? 50%? 100%? • Hardly matters, especially since part of the design spec. is to have complimentary outputs. • We haven’t yet dealt with that complication. • So let’s start off writing 100 to the period register (Match 0) and 0 to the duty cycle (Match 1). • This will change as soon as we get a value from the outside world. May skip writing any duty cycle value for now.
Single Edged, One Enabled • Single edge is the default. No need for double edged, so leave that at zero. • Need to enable the output. All are disabled by default. • Edge and enable are both in PWMPCR register, address 0xE001_404C. • PWM1 enable is bit 9 • So what do we write to the register?
Complimentary Outputs • Spec calls for us to drive 6 LEDs, three in each phase. • Now we need to deal with that. • We have six channels. • One LED per channel? • One channel per phase? • One channel total with external inversion? • Might as well deal with the external hardware now. Need to know that before we can know what to write to the control register.
LED Drive • Already saw that the processor has inadequate drive for one LED, much less three. • Specified as high power, too. • Some external hardware will be necessary. • Shall we hook up LEDs in series? In parallel? • What are the advantages/disadvantages of one architecture over another?
Serial and Parallel Connections Defective diagram on the right: current limiting resistors are always needed.