SMARTpix
180 likes | 197 Views
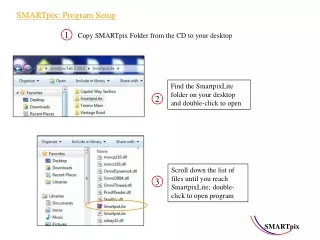
SMARTpix. SMARTpix: Program Setup. 1. Copy SMARTpix Folder from the CD to your desktop. Find the SmartpixLite folder on your desktop and double-click to open. 2. Scroll down the list of files until you reach SmartpixLite; double-click to open program. 3. SMARTpix. SMARTpix: Program Setup.

SMARTpix
E N D
Presentation Transcript
SMARTpix SMARTpix: Program Setup 1 Copy SMARTpix Folder from the CD to your desktop Find the SmartpixLite folder on your desktop and double-click to open 2 Scroll down the list of files until you reach SmartpixLite; double-click to open program 3
SMARTpix SMARTpix: Program Setup Program opens as shown below Since no road has yet been identified the Roadway Listing will be empty Click on Add Road button to initiate road fields.
SMARTpix SMARTpix: Program Setup Click on Import Images button 2 Enter Road Number and Road Name as shown above 1 Leave these 4 fields blank
SMARTpix SMARTpix: Program Setup 1 Fill out the form with Vantage Road data. Pay particular attention to the start and ending mileposts*, direction of travel i.e. increasing or decreasing direction as well as the Rename Image File option. Choose Yes 2 Click on Go ahead and Import button * NOTE Road length can be determined from the County Road Log, DMI or from the image interval used to program the DMI. An image interval of 40 feet will give us 128 pictures for this1.000 miles stretch of road
SMARTpix SMARTpix: Program Setup Browse desktop files for Vantage Road File* When found, select VantageINC folder and click OK button. * NOTE The Vantage Road File was created by you when the pictures for that road were copied or moved from the camera’s SD Card to the desktop.
SMARTpix SMARTpix: Program Setup Image Only is the default view once your pictures for Vantage Road are loaded. Click on Roadlist to verify that Vantage Road has been loaded
SMARTpix SMARTpix: Program Setup Shows thumbnail picture of Road 4 indicates that pictures have been loaded Program completed these 4 fields for you Click on Red button to delete Road 1 2 3
SMARTpix SMARTpix: Program Familiarization The mechanics or conventions for working with or querying the database are the same for Signage, Surface, or Features layouts. Consequently only the Signage layout will be discussed. Shown here is a blowup of the navigation control that allows you to move forward and backward through the image file at various speeds.
SMARTpix SMARTpix: Program Familiarization quick overview Tag feature from image you want to track such as Stop sign. Click on Signage button to select signage layout 2 1 Insert comments, notes or observations in the adjacent comment fields. Signage Comments stay with the sign that warranted some elaboration as to condition, replacement, etc. All notes entered into the Comments field are can be retrieved through a query by placing an asterisk * in the field. Using a word that appears in your notes as search criterion finds only comments that have that word embedded. 4 Insert pertinent reference to image, spreadsheet, word document,etc in these container fields 3
SMARTpix SMARTpix: Tagging Features Tagged sign Tag signs by clicking in the box Go through all the pictures for our sample road one at a time and select the signage you want to tag. In this example select Sign, Speed Limit and enter the speed limit “20” as shown on the sign. You may also tag other signs such as Pedestrian Crossing, No Parking, etc. Continue this process through the entire road. Use this button to advance pictures one at a time
Right click on a container to open Insert menu and select Insert File SMARTpix SMARTpix: Tagging Features 1 2 Insert File Menu opens. Select file to be placed in container and check “Store only a reference to the file” and click Open button. Reference to the file is now placed in the container. (See above)
SMARTpix SMARTpix: Query Database Open Signage Layout Clicking on the icon in the container will give you access to the file
SMARTpix SMARTpix: Query Database Click on Signs you want to Query 2 Click on Query button 1 Click on Run Query button 3
SMARTpix SMARTpix: Query Database Query completed: Six Speed Limit signs were found You can view the found set of signs using the navigation controls. You can also view a signage report by clicking on the Report button. To place the found set of sign images back in the database click on the Restore this set of images button
SMARTpix SMARTpix: Query Database Shown are the six images found as well as the Report Clicking on a button in the report will take you to the appropriate picture in the database
SMARTpix Calibration Procedure for the NITESTAR DMI To Turn DMI on press ON/OFFbutton Press RUN/HOLD key To place DMI in COUNT/HOLD mode Press keys in sequence DMI Display Explanation 1 CAL key Temporary calibration number set by factory RUN/HOLD key Length of course = 1000 feet MARK/ENTER key Starts calibration run Ends calibration run. 976 is the new calibration number for this example. Your number may be different RUN/HOLD key Stores your calibration number and shows course length traveled within one foot MARK/ENTER key Saves calibration number and turns DMI off Turn DMI off; press ON/OFFbutton
SMARTpix Cheat Sheet for Camera setup Procedure outlined on next page will work with either Numetrics model NS-50 or NS-60
SMARTpix Action Suggested Setting Key Reference Turn DMI on 1 Make sure “Run / Hold” is on * 2 3 Press “Clear / Reset” key 2UNIT 4 Press “2 Unit” key:select feet Press ”8 PDI” key followed by “2 Unit” key and enter distance interval in feet. Press “Mark / Enter” key 5 8PDI 2UNIT Distance interval = 40 feet 6 Press ”8 PDI” key followed by “3 PD” key and enter pulse duration. Press “Mark / Enter” key 3PD 8PDI Pulse duration = 555 7 Press “Clear / Reset” key to clear DMI. Press “2 Unit” key:select miles. Press “Run / Hold” to take DMI off hold. You are good to go. 2UNIT * The terms “Run / Hold” and “Count / Hold” are used interchangeably by Numetrics