Download
1 / 31
310 likes | 498 Views
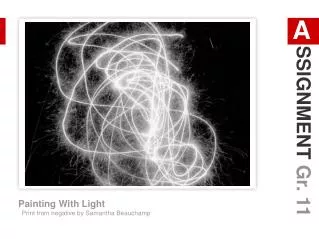
Painting with Light. x. Looking Back: Self portrait Found Kodak-moment at the Capital Hill Group Health Cooperative. I under-exposed to avoid blocking-up the fluorescent lights. The highlight-safe-exposure resulted in under exposing the subject, me. Painting with Light:.

E N D
Looking Back: Self portrait Found Kodak-moment at the Capital Hill Group Health Cooperative. I under-exposed to avoid blocking-up the fluorescent lights. The highlight-safe-exposure resulted in under exposing the subject, me. Painting with Light:
Lab Work: Basic-3 plus The basic three lab work adjustments (Levels, Brightness/Contrast, and Color) were applied making it brighter and snappier. Plus the foreground color was changed and the subject was lightened for detail. I think of these adjustments as painting- with-light. Painting with Light:
Lab Work: Plus The basic three lab work adjustments, which are 1) Levels, 2) Brightness/ Contrast, and 3) Color were applied. Although this image has gone far beyond the basic adjustments into painting with light image adjustment lab work. Painting with Light:
Looking Back: Facts The image was captured using the Nikon Coolpix 990. It was an early prosumer compact digital with only a 2 megapixel size CCD sensor chip. The superior ED glass zoom lens optics and the 300 dpi image resolution created a very high quality 2048 x 1536 pixel size images. Painting with Light:
Looking Now: 2008 My kitchen window has double pane glass. My house was newly built for me in 1982 but it’s starting to show age. Weird things have been growing between the panes of glass. Here is a macro close-up shot of a very interesting looking crystalline growth. Painting with Light:
Light-Painting: The basic three lab work adjustments (Levels, Brightness/Contrast, and Color) were applied making it brighter and snappier. The additional light-painting ‘moves’ has taken it far beyond what you’ll see in person. The actual image looks more like the previous camera original image. Painting with Light:
Lab Work: Plus The basic three lab work adjustments, which are 1) Levels, 2) Brightness/ Contrast, and 3) Color were applied. Although this image has gone far beyond the basic adjustments into painting with light image adjustment lab work. Painting with Light:
Looking Back: Late 2001 Another favorite ‘oldie’. It was captured using either Coolpix 990 or the 995. The 995 was a 3 mega pixel digital camera. These dangling things reminded me of an old Sci-Fi movie ‘Invasion of the Body Snatchers’ (1978 film) starring Donald Sutherland. Painting with Light:
Lab Work: Plus The basic three lab work adjustments (Levels, Brightness/Contrast, and Color) were applied making it snappier. Although this image has been ‘moderately’ retouched using the Clone Tool adjusted to different brush Sizes and brush Opacity. Painting with Light:
Image Quality: Like depth of field, image quality is a relative thing. Maximize the illusion of image quality by filling-the-camera-frame with the subject. Make the subject big. Don’t waste precious pixels on background detail not important to your story. Painting with Light:
Back to Now: Canon S5is The S5is is on my short-list of recommended compact digital cameras. I only have one reservation about the camera. It does not allow for user control over the ‘contrast’. The camera original image is too ‘flat’ for my taste most of the time. Painting with Light:
Lab Work: Plus The basic lab work ‘moves’ (Levels, Brightness/ Contrast, and Color) were applied making it both brighter and snappier. I’ve applied serious ‘light painting’ adjustments to this image changing contrast, tonality, and color. Painting with Light:
Lab Work: Plus The basic three lab work adjustments, which are 1) Levels, 2) Brightness/ Contrast, and 3) Color were applied. Although this image has gone far beyond the basic adjustments into painting with light image adjustment lab work. Painting with Light:
Back to the Past: This was shot as a ‘Line Assignment’ example for the Photographic Design class that I was teaching at the Seattle Art Institute. The Nikon Coolpix compact digital offered direct control over contrast. I didn’t use it because I wasn’t use to having that control in the camera. Traditionally, contrast control was mainly applied in the darkroom phase of the image creation process. Painting with Light:
Lab Work: The basic three lab work adjustments (Levels, Brightness/Contrast, and Color) were applied making it brighter and snappier. Now the image looks more like what I saw with my naked eye. Painting with Light:
Lab Work: Next stage The next stage light painting idea required a simple localized color adjustment. The basic lab work version is cool in color accurately reflecting the original scene. The warm color shift added to the foreground increase its presence and image depth. Painting with Light:
Lab Work: Plus The basic three lab work adjustments, which are 1) Levels, 2) Brightness/ Contrast, and 3) Color were applied. Although this image has gone far beyond the basic adjustments into painting with light image adjustment lab work. Painting with Light:
Eye of the Beholder: Beauty in the ordinary Yes, there is no absolutes. Although there are guiding ideas for composition, negative space, photographic design, and page layout. And as always, it’s referenced back to the image makers original story idea. Summarize by saying that ‘It’s the eye of the beholder, plus the original story idea, assisted by the basic rules of composition, image making. Painting with Light:
Canon PowerShot: S5is The Canon superzoom digital has a good close-up photography capability. Shooting advise Bracket your point-of-focus especially towards the front of the subject. Many close-up shots ends up being back-focused. Painting with Light:
Lab Work: The basic three lab work adjustments (Levels, Brightness/Contrast, and Color) were applied making it darker and moodier. Some advance image processing was applied to the image. Although, like correct camera technique, correct lab technique needs to be transparent to the viewer. Painting with Light:
Lab Work: Plus The basic three lab work adjustments, which are 1) Levels, 2) Brightness/ Contrast, and 3) Color were applied. Although this image has gone far beyond the basic adjustments into painting with light image adjustment lab work. Painting with Light:
Lab Work: Next level If I wanted to make more of a color statement, I could ‘re-color’ the red to orange, direct c As it is, I could lighten and increase the contrast in the red area to bring out the line quality. This change would be very easy to accomplish… Painting with Light:
Favorite Subject: Rain drops and puddles make infinite variety of Kodak moments… for me. Here is another ‘found shot’ on the hood of my blue car. Painting with Light:
Lab Work: This image is adjusted way beyond the basic lab work. If you had not seen the previous starting point image, you would not see how much the image has been altered from the camera original rendition. Painting with Light:
Lab Work: Plus The basic three lab work adjustments, which are 1) Levels, 2) Brightness/ Contrast, and 3) Color were applied. Although this image has gone far beyond the basic adjustments into painting with light image adjustment lab work. Painting with Light:
PowerPoint: Display problem PowerPoint has a display anomaly. It does a okay job of displaying most images. But, some images comes out looking very poor as with this image example which is set to 72 dpi and displayed at 100%. I could easily have removed this example from this show. But it gives a good opportunity to talk about limitations in output media or application formats. Add lib from here… Painting with Light:
White on White: White on white is a special category of images. When I saw this on my Fred Meyers exercise walk. It called out to me saying… white on white, form, curve, line, and texture… shoot me. Painting with Light:
Lab Work: I used basic and advanced lab work adjustments to emphasize the image characteristics that I wanted to share with the viewer. Hopefully, the final image is more than the total of all the characteristics such as white on white, form, curve, line, and texture… Painting with Light:
Lab Work: Plus The basic three lab work adjustments, which are 1) Levels, 2) Brightness/ Contrast, and 3) Color were applied. Although this image has gone far beyond the basic adjustments into painting with light image adjustment lab work. Painting with Light:
End x