Essential Guide to Wax Patterns in Dental Casting Techniques
The wax pattern is a crucial precursor in dental casting, serving as the template for the final restoration on a prepared tooth. Its precision in shaping directly impacts the quality of the final cast. Wax patterns are created using various grades of wax to ensure strength and fidelity to fine details. Proper handling and immediate investing of the wax pattern are vital to prevent distortion. This guide covers the properties of casting wax, equipment used in pattern fabrication, and techniques for achieving optimal results in dental restorations.

Essential Guide to Wax Patterns in Dental Casting Techniques
E N D
Presentation Transcript
Wax patterns • The wax pattern is precursor of the finished cast restoration that will be placed on the prepared tooth , as the wax pattern will be duplicated exactly through the investing and casting technique, the final restoration can be no better than its wax pattern, A few extra minutes spent on the wax pattern can often save hours that might be spent correcting the casting.
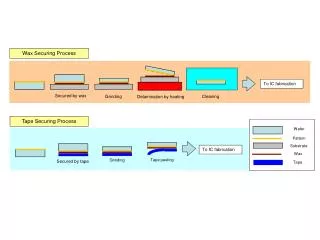
Wax pattern • Casting of wax pattern can be summarized in producing mold around wax pattern with refractory material (investment) and when set the wax pattern is heated to vaporize, the produced space (mold) is filled with molten metal through an empty channel (sprue).
Properties of casting wax Different type of wax are used to form a good pattern, soft wax is used to maximize the fitness between wax pattern and die while for obtaining accurate shape with enough strength to resist any deformation as will as to protect and support the fine details of wax pattern another type of wax is used ( medium or hard wax).
Stresses occur in the inlay wax as a result of the heating and manipulation of the wax during fabrication of the pattern. Wax. a thermoplastic material, "relaxes" as these stresses are released. The result is distortion, which is exhibited as a poor fit. To minimize this distortion, patterns should never be left off the die, and they should be invested as soon as possible after fabrication
The casting wax has several requirement: It must flow readily when heated, without distorting or loosing its smoothness. It must be capable of being carved without chipping, distorting. Evaporate without leaving any debris or residual ashes, which can contaminate the produced cast restoration.
Take the fine and sharp details of pattern and preserve it till investing without any distortion. Has acceptable strength and rigidity after cooling.
Casting wax Inlay casting wax is actually composed of several waxes. Paraffin is usually the main constituent (40% to 60%). The remaining balance consists of dammar resin (to reduce flaking) plus carnauba, ceresin, or candelilla wax (to raise the melting temperature), or beeswax. Dyes are added to provide color contrasts.
armamentarium • Bunsen burner (A) • Inlay wax (B) • Waxing instruments, PKT (no. 1, no. 2, no. 3, no. 4, no. 5, no. 7 spatula) • Cotton cleaning cloth (D)
•Sharp colored pencil (contrasting color to wax) • Separating liquid (E) • Occlusal indicator powder (zinc stearate* or powdered wax) (F) *NOTE: Zinc stearate may present health hazard if it is inhaled.
armamentarium Waxing instruments can be categorized by the intent of their design: wax addition, carving, or burnishing. Of the popular PKTs (designed by Dr. Peter K. Thomas.
specifically for the additive waxing instrument no. 1and no. 2 are wax addition instruments, no. 3 is a burnisher for refining occlusal anatomy, and nos. 4 and 5 are wax carvers.
armamentarium The PKT no. 1 instrument is used for large increments ;the smaller no. 2 is used for lesser additions. A no. 7 waxing spatula is useful for adding large amounts of wax, particularly in forming the initial coping or thimblelike layer of wax that covers all prepared surfaces. Wax carvers should be kept sharp and should never be heated
When carving wax, light pressure should be used to obtain the desired smooth surface. Burnishing is an alternative to carving for obtaining a smooth wax pattern of the desired contour, Burnishing consists of slightly warming a blunt instrument and rubbing the wax.
The instrument should not be so hot that it melts the wax surface. The PKT no. 3 instrument is useful for burnishing the occlusal surfaces. The PKT nos. 1 and 2 can be used for burnishing as well as for wax addition.
. For removing wax, burnishing is less effective than carving, but probably easier to control and leaves a smoother surface, which can particularly important when trimming excess wax near the margin. Careless (excessive) carving in this area can result in abrasion of the die, creating a ledge around The finished casting
Wax is added by heating the instrument in the bunsen flame, touching it to the wax, and quickly reheating its shank in the flame. Wax flow away from the hottest part of the instrument.
so that if the shank is heated, a bead of wax will flow off the tip, However if the tip is heated, the wax will flow up the shank of the instrument (to the considerable annoyance of inexperienced operators).
Different technique used for fabrication of wax pattern 1) Direct technique Pattern is constructed inside the mouth. It is indicated in an enclosed cavities inlay and posts. In this method hard or medium wax, the melting temperature of that type of wax is 37.
2) Indirect technique pattern is constructed outside the patient mouth. It is most popular method for wax pattern construction during cast restoration due to its good access and visualization beside time saving to the dentist and the patient. The wax has a melting temperature 25.
3) Indirect-direct technique Pattern constructed by indirect method and fine adjustment is carried out directly inside the patient mouth before its casting.
Different method of wax pattern construction 1) Dipping method To develop a thin , uniform and adapted layer of thin wax on the die. This is done by dipping the die into wax that has been thoroughly melted (using wax dipping pot).
2) Addition method To obtain a bulk of the wax pattern, then carving is carried out this is done by melting the wax and dropping it on the die until complete building of the pattern and then carved by sharp carver. The main drawback of this technique is due to strain collected from multiple addition of wax tend to release with time and subsequently distort the wax pattern.
3) Molten press method It is the most suitable method to construct accurate and adapted wax pattern. This is method is done by adding a molten wax and pressure is applied with fingers at each application, this procedure assure that the wax is closely adapted and free of irregularities , this method overcomes the most drawback of addition method.
4) Injection method This method used in producing wax pattern with fixed and accurate dimension. This method is summarized as injection the molten wax through metallic syringe (heated) into enclosed mold which is relieved by a hole opposed to the feeding hole. The wax feeding is continuing under pressure until complete hardening of the wax .
Step of wax pattern The following sequence is recommended for waxing posterior teeth: 1.Internal surface 2.Wax pattern removal and evaluation 3.Proximal surfaces 4.Axial surfaces 5.Occlusal surfaces 6.Margin finishing
Coping Fabrication The first step in making a wax pattern is the fabrication of a thin coping, or thimble on the die. The coping is usually made of wax, but heated resin sheets also can be used for this purpose, This type of coping also can be used with partial veneer crowns, and even pin-retained castings.
To prevent the wax from sticking to the die stone, coat the die thoroughly with die lubricant and allow it to soak in for several minutes. If the surface of the die appears dry after this period of time, repeat the application Remove any excess lubricant with a gentle stream of compressed air. Flow wax over the surface of the preparation on the die, using quick strokes of a hot no 7 wax spatula Overlap and remelt the margins of wax already placed on the die
Dipping the die into a small metal container filled with molten wax is yet another method that can be used for developing a uniform, thin initial coping of wax on the die.
Wax Pattern Removal The wax should be allowed to cool thoroughly before the coping is removed from the die. A constant light grip is maintained on the pattern by the thumb and forefinger of one hand while pressure is applied against them with the thumb and forefinger of the other hand, which also holds the die a small square of rubber dam will increase friction between the fingers and the pattern. If the pattern fails to move, there may be excess wax gingival to the margin.
Proximal Surfaces the part of the proximal surface that extended from the base of sulcus to the free margin of the free gingiva has been described as the emergence profile the profile natural teeth are not convex.
They tend to be flat or slightly concave from the contact area to the cemento enamel junction, any restoration must reproduce this feature. Overcontouring often makes maintaining periodontal health difficult, Excessively concave or under contoured proximal surfaces make flossing ineffective and must be avoided. Experimental data indicate that over contoured produce gingival inflammation and hyperplastic change in 4week while under contouring produced no significant change, so its better to under contour than over contour.
Contact Areas: The size and location of the contact areas should be established before waxing the remainder of the proximal surfaces. Abnormally large proximal contact areas make plaque control more difficult and can lead to periodontal disease. Very small (point) contacts may be unstable and cause drifting. Deficient contacts can also lead to food impaction; although this is not a direct cause of chronic periodontal disease, it can be very uncomfortable and painful to the patient.
Most posterior contact areas are located in the occlusal third of the crown. However, contact between the maxillary first and secondmolar occurs in the middle third " The contact areas between mandibular teeth and maxillary molars are generally centrally located. Between maxillary premolars and molars, the contact areas are usually toward the buccal surface (making the lingual embrasure larger than the buccall.
buccal and lingual surfaces should be shaped to follow the contours of the adjacent teeth. The location of the height of contour generally located in the cervical third of most teeth, except on mandibular molars it is usually in the middle third of the lingual surface. The facial contours of both maxillary and mandibular posterior teeth extend approximately 0,5 mm beyond the out line of root at the cemento enamel junction
the amount of lingual prominence differ between the maxillary and mandibular teeth, it is 0.5 mm on maxillary and mandibular first premolars, about 0.75 mm on mandibular second premolars, and nearly 1.0 mm on mandibular molars.
Occlusal morphology No discussion of the wax pattern would be complete without mention of occlusal theory and effect of articulation on the occluasl surface of wax pattern. during centric closure in the normal dentition, the lingual cusps of the maxillary posterior teeth and the buccal cusp of the mandibular posterior teeth make the contact with the occlusal fosse or the marginal ridge of the opposing teeth. They grind food like mortar during mastication and are called functional cusps.
On the other hand, the buccal cusps of the maxillary molar and the lingual cusps of the mandibular molars do not contact the opposing teeth. These cusps prevent food from over flowing, and the protect the buccal mucosa and the tongue by keeping them away from the functional cusps. Since these cusps do not make direct contact with opposing teeth, they are called non functional cusps.
The occlusal scheme can be classified by the location of the occlusal contact made by the functional cusp on the opposing tooth in centric relation. There are tow types: cusp fossa and cusp marginal ridge Cusp marginal ridge arrangement This relation is a type of occlusal scheme in which functional cusp contact the opposing occlusal surface on the marginal ridges of the opposing pair of teeth or in the fossa, this relation is basically one tooth to two tooth arrangement,
since the majority of adult exhibit the cusp-marginal ridge type of occlusion, its an occlusal pattern widely utilized in daily practice. It can be used for single restoration , the disadvantage of cusp marginal ridge occlusion is food impaction and displacement of the teeth may arise if the functional cusps wedge into the lingual embrasure .
Cusp fossa arrangement The cusp fossa relation is an occlusal pattern in which each functional cusp is nestled in to the occlusal fossa of the opposing tooth. It’s a tooth to tooth arrangement , its rarely found in its pure form in natural teeth. Each centric cusp should make contact with the occlusal fossa of the opposing tooth at three point are in the mesial and distal incline and the inner facing incline of the cusp, producing tripod contact.
Since a cusp tip itself never comes in contact with the opposing tooth, the cusp tip can be maintained for a long time with a minimum of wear. the mandibular functional cusp arise opposite the middle (buccolingually) of the maxillary tooth. Similarly the maxillary functional. cusps are positioned halfway between the mandibular buccal and lingual cusp tip. There fore , occluasl force are transmitted along the long axes of the tooth.
the functional cusps of the maxillary posterior teeth become slightly shorter as they progress distally Nonfunctional cusps are made slightly shorter than the functional cusps to insure clearance in excursive movement, the nonfunctional cusp also become slightly shorter from anterior to posterior The resulting antero posterior curvature of the occlusal plane is called the curve of spee . Presence of this feature in a reconstructed mouth help to prevent protrusive interferences
The left right curvature resulting from the non functional cusp being shorter than the functional cusp is curve of Wilson. Its prevents interferences in the lateral excursions
Margin Finishing Remove the pattern from the working cast and place it back on the freshly lubricated die. Make certain that the red line on the die finish line is still distinct Smooth any roughness on the axial surfaces with a slightly warm Burnisher To optimize the adaptation of the wax pattern (and the cast restoration) to the die, the margins must be reflowed and refinished immediately before investing the wax pattern.
The two principal objectives are (1) minimizing dissolution of the luting agent and (2) facilitating plaque control If a zone of superior adaptation (i.e., marginal gap width) between the casting and the prepared tooth surface is created, cement dissolution will reduced To obtain this superior adaptation minimum the pattern should be reflowed over a band approximately 1 mm wide, measured from the margin on to the prepared surface