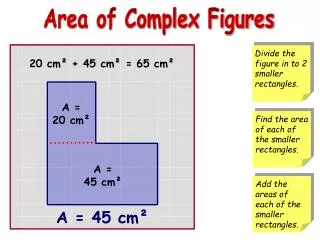
17 Signs You Work With code online learning middle school
<h1>Online Knowing in Intermediate School</h1> <p>Numerous schools are now using online understanding as a way of providing their classes to their students. This consists of elementary school to intermediate school trainees.</p> <p> </p> <p>Intermediate school is when many young trainees start going to school and also they usually start the discovering process with the intermediate school levels. This is where students have the ability to operate at their own rate as well as they are taught different topics, from mathematics and science to English as well as Spanish.</p> <p> </p> <p>When it concerns on-line knowing, these are simply the start. Online discovering is not restricted to middle school as well as is made use of throughout the years in secondary school.</p> <p> </p> <p>It can be used in secondary school if the pupil is not ready for this yet and several schools offer this in the very early primary qualities. On the internet understanding is made use of in senior high school because it is an excellent means for trainees to discover as well as develop without needing to go to a classroom setup.</p> <p> </p> <p>Some schools that supply online learning also use on-line chat rooms. Online chatroom allow the trainee to interact with their trainer or educator with their schoolmates any time. This is an excellent method for pupils to obtain details as well as ask concerns to their trainers without having to go to the institution and speak with them.</p> <p> </p> <p>The colleges that supply on the internet discovering likewise offer the student a variety of options for their class. These options can consist of lessons that are based on various topics as well as are developed utilizing different educational techniques, or lessons that are produced utilizing the same technique.</p> <p> </p> <p>Some colleges that provide online discovering additionally allow middle school pupils to take a course from their computers. This is additionally a terrific means for pupils to get their programs, which are currently based upon the exact same material that is used in the center school, in their own time.</p> <p> </p> <p>If you want on the internet understanding in your high school or in college, you need to definitely explore this type of knowing approach. These programs are utilized throughout the globe as well as are becoming more popular.</p> <p> </p> <p>Online discovering is typically an excellent way for middle school trainees to obtain some knowledge as well as assist with the work that they require to do in institution. Middle school is when numerous students start to think about professions and also start to consider entering into certain courses that will certainly help them get involved in particular majors.</p> <p> </p> <p>Some middle school pupils are searching for jobs, and also this is something that they will certainly require to learn about. On-line knowing can help the trainee gain some understanding of what they need to understand in order to end up being effective in their task search.</p> <p> </p> <p>As trainees age, they might intend to relocate to a much more conventional college and discover at a class setup. This can be a fantastic way for them to do this and it is also a wonderful means for them to discover at their own speed.</p> <p> </p> <p>On the internet discovering in middle school is also a great way for them to discover in their own time. This is a wonderful means for them to relocate with their research studies as well as to work at their very own rate without needing to go to a course or to a class setting every day.</p> <p> </p> <p>This is a wonderful means for trainees to find out at their own rate and have the ability to take their researches at their very own speed. This is a great means for students to discover at their very own speed and operate at their own pace without needing to go to a class or to a classroom setup each and every single day.</p> <p> </p> <p>There are additionally a variety of internet sites that provide complimentary lessons online for intermediate school trainees to take and make use of to acquire some understanding about the subjects that they are finding out. This is a fantastic method for pupils to take courses and discover at their very own pace.</p> <h1>Online Understanding Middle School - A Really Valuable Setting of Discovering</h1> <p>Online Learning Middle School is among one of the most beneficial types of understanding. It assists kids acquire important experience in college and also in the house. They can learn all the skills required for their future life in the work environment. They can also develop their self-confidence in recognizing that they have actually mastered the standard academic skills.</p> <p> </p> <p>Free Discovering is an efficient means of getting the youngsters acquainted with the college topics. It likewise makes them find out with the moms and dads and also brother or sisters.</p> <p> </p> <p>If you intend to discover Free Understanding, you can obtain information about it from the web. This can be the most effective means of comprehending what it is everything about.</p> <p> </p> <p>Free Online Knowing is a superb mode of learning for children. It is also very practical for grownups who want to educate the youngsters at home.</p> <p> </p> <p>Online Discovering Intermediate School is a way of obtaining expertise from web. It likewise uses chances for the kids to share their understanding with their classmates.</p> <p> </p> <p>Online Knowing Intermediate School is an extremely crucial mode of discovering. It additionally helps the youngsters to obtain aware of the subjects that are necessary for their future profession.</p> <p> </p> <p>Free Knowing is an excellent way of learning for the kids. It makes them create their confidence, while at the exact same time creating their scholastic abilities.</p> <p> </p> <p>Learning from the internet is really a very good setting of discovering for the youngsters. It makes them create their abilities to a wonderful degree. Understanding is really valuable for the educators. They can have the opportunity of instructing the subjects from the convenience of their residence.</p> <p> </p> <p>Free Discovering setting is a good mode of discovering for the kids. They also learn with the friends and family.</p> <p> </p> <p>Free Learning setting is additionally helpful for adults who want to learn more about the subject. There are different choices readily available in this setting of understanding.</p> <p> </p> <p>Free Discovering is the most effective mode of learning for the adults. This setting of discovering is extremely advantageous for both the teachers and also students.</p> <p> </p> <p>The Middle School can be a reliable setting of discovering for the trainees. This mode is valuable for the youngsters that are researching at various levels. This mode of discovering likewise helps them to learn and get acquainted with various subjects.</p> <p> </p> <p>Online Discovering Middle School can be useful for all the trainees that are studying in different levels of education and learning. This setting of learning is useful for the students who are studying at different levels of education.</p> <p> </p> <p>Free Understanding is a great setting of finding out for pupils who are researching at various levels of education and learning. It is a very useful setting of finding out for all the students that are studying at different levels of education.</p> <p> </p> <p>Online Knowing is the most effective setting of discovering for the students who are studying at different levels of education. This setting of understanding serves for the students who are researching at different levels of education.</p> <p> </p> <p>Online Understanding mode is very valuable for all the trainees who are examining at various levels of education and learning. This mode of learning is really valuable for all the students that are studying at different degrees of education.</p> <p> </p> <p>Free Discovering is a very good setting of discovering for the students that are examining at different degrees of education and learning. This mode of understanding is very valuable for the trainees that are studying at various degrees of education.</p> <p> </p> <p>Online Discovering mode is really helpful for the students that are studying at various levels of education. This mode of discovering is extremely beneficial for pupils that are examining at various degrees of education and learning.</p> <h1>Online Discovering Middle School Free Courses</h1> <p>Online discovering center schoolers have been a massive hit with several parents for a very long time, yet only recently has it been getting such an excellent credibility as a method for our youngsters to get a great education. As a brand-new moms and dad, this may be one of the very best decisions you can produce your child's future.</p> <p> </p> <p>If your youngster is at institution in a traditional setup, after that you most likely know how annoying it can be to attempt and discover a method to obtain their homework done when there is no person else to request assistance or aid. Typically, you will be entrusted to your own devices attempting to identify how to do your very own homework, and it can get really awkward as well as frustrating. In addition, there is a chance that you may even get in trouble with the instructor for not being able to do your research correctly or even get on a good academic probation for stopping working to do your homework.</p> <p> </p> <p>However, when you have a youngster in intermediate school that is undergoing this type of knowing, there are a great deal of things that can go wrong and this can actually damage their education and learning and also their self-image. On-line understanding intermediate school free as well as paid courses are a wonderful means to get them back on course, since they are a truly positive discovering experience.</p> <p> </p> <p>This is an excellent way for your youngster to be able to find out at their own speed as well as they will be able to find out at their very own speed, which is something that lots of standard schools can not attend to their students. It likewise helps them get a better feeling for the scholastic facets of the coursework that they are taking, and also they will certainly be able to comprehend the principles a lot more conveniently.</p> <p> </p> <p>On-line learning middle school free training courses are typically a very little course dimension, which is excellent for a student who needs to be able to learn in small groups. You can instruct a couple of trainees each time and this allows you to see to it that you are teaching what is being educated at a high level of understanding, as well as you are not showing what is also advanced for the ordinary student. You can additionally work with a couple of different pupils at the very same time, which offers you the flexibility to learn at your very own rate as well as without needing to bother with the various other pupils not recognizing what you are talking about.</p> <p> </p> <p>Online learning middle school free programs can be a wonderful method for you to save a great deal of cash, since there are no course costs to pay and you do not have to purchase any publications, and also materials or any type of various other materials for the courses that you show. since whatever is all on the internet and also offered to you on your computer system display.</p> <p> </p> <p>This likewise gives intermediate school pupils the chance to proceed their education and learning, due to the fact that they do not need to go to a normal institution to get a certification or degree, however they can proceed their education and learning right from their very own home and also at their very own rate. This is a fantastic possibility for your kid to get into the best curriculum without the headaches of going to a conventional college, which can be very expensive and can take a lot of time to complete.</p> <p> </p> <p>To conclude, if you have a kid that remains in senior high school or a young adult that is undergoing this learning phase as well as you intend to get your child in the most effective educational program, take into consideration an on-line understanding intermediate school program. You can find some terrific options available for your kid right online that will obtain them up to speed and also ready to continue in school right now.</p> <h1>Benefits of Middle School Free Online Knowing</h1> <p>The procedure of taking intermediate school free online courses is an exceptional option to help a youngster offset lost time and even to maintain them from falling back in various other courses. This is a particularly good alternative for a youngster that may have been having a hard time at their last few courses and also would like to boost their efficiency in institution. Numerous schools have actually located that this option is extremely beneficial to trainees which it aids them preserve the necessary info needed for their classes. An intermediate school student that is going to a free online course can function to catch up on wasted time as well as develop their understanding in a topic that is important to their success.</p> <p> </p> <p>A few of the benefits to on the internet discovering intermediate school free are that a trainee can work at their very own pace as well as can make it a point to complete the program in the time it is set aside. The pupil can likewise take a program at any time they desire, as long as they have accessibility to the Net and also a computer system that has a Net link. This can make it convenient for the trainee because they can complete the course any time as well as at their own rate.</p> <p> </p> <p>A middle school trainee that is taking a complimentary class online is commonly going to be able to discover more due to the fact that there are less interruptions at home. This can be specifically important due to the age difference in between the kid and also their schoolmates. The middle school pupil might have the ability to deal with the projects, yet they might not be able to function also with their peers as a result of the age gap. This is a substantial benefit to the kid in several methods since the youngster is not mosting likely to really feel as omitted because of the age distinction.</p> <p> </p> <p>A moms and dad can take advantage of using this kind of finding out due to the fact that they will not need to fret about the kid's research or the kid's social life. If the child is having a bumpy ride concentrating in class, it can be extremely simple to get distracted as well as lose out on important details. With the Internet, a parent will have the ability to maintain a careful eye on the kid's progression. If they see a trouble or if they think something may not be right, they can speak to the instructor or the online instructor instantly and also get the information they require to make a far better quality.</p> <p> </p> <p>Middle school trainees need to understand the value of the Internet and also just how it can help them get ahead in class. One of the simplest methods to prosper is to search for suggestions and also details online about a topic. The Web can help a kid to discover a subject that they may not know with as well as can make the topic much more understandable. because the details is readily offered in understandable language.</p> <p> </p> <p>Lots of students take pleasure in the capability to work on-line with others in the same classroom and they have accessibility to the products that they require to complete the course. This is particularly practical for pupils who have hectic routines and require to end up every one of the work in a provided amount of time. If the youngster operates at his or her very own speed, they can make one of the most out of every course they absorb the intermediate school level.</p> <p> </p> <p>Intermediate school trainees additionally benefit from the flexibility of this type of course. If a pupil has an inquiry or a problem with the information that they are finding out, they can obtain assist from the trainer without having to leave the classroom. A pupil can also ensure that they recognize exactly what they are discovering in the course, instead of needing to rely on the teacher to provide a textbook explanation. Educators can supply guidance to pupils in the course, and also they can even supply suggestions on how to make the material simpler to understand.</p> <p> </p> <p>Using on-line learning intermediate school free can be a wonderful option for all pupils. The advantages that come from on the internet discovering can profit any pupil in the class, but the advantage to a child is that the youngster can finish the class at their own pace as well as have the ability to deal with the teacher and also various other trainees who are taking the course. Utilizing the Web to finish the course can make learning more amazing as well as permit trainees to find out more effectively and also effectively.</p>
80 views • 6 slides