
Computer Graphics
E N D
Presentation Transcript
Computer Graphics Classic Rendering Pipeline Overview
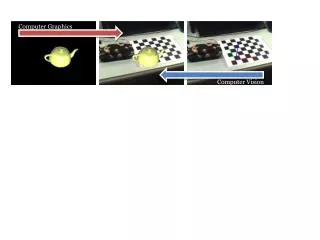
What is Rendering? • Rendering is the process of taking 3D models and producing a single 2D picture • The classic rendering approaches all work with polygons – triangles in particular • Does not include creating of the 3D models • Modeling • Does not include movement of the models • Animation/physics/AI
What is a Pipeline? • Classic rendering is done as a pipeline • Triangles travel from stage to stage • At any point in time, there are triangles at all stages of processing • Can obtain better throughput with a pipeline • Much of the pipeline is now in hardware
Classic Rendering Pipeline Model & ViewTransformations ModelSpace ViewSpace Projection ViewportMapping Normalized DeviceSpace ScreenSpace
Model Space • Model Space is the coordinate system attached to the specific model that contains the triangle • It is easiest to define models in this local coordinate system • Separation of object design from world location • Multiple instances of the object
Model & View Transformations • These are 3D transformations that simply change the coordinate system with which the triangles are defined • The triangles are not actually moved ModelCoordinateSpace WorldCoordinateSpace ViewCoordinateSpace
y y x x z z Model to World Transformation • Each object is defined w.r.t its own local model coordinate system • There is oneworld coordinate system for the entire scene y x z
Model to World Transformation • Transformation can be performed if one knows the position and orientation of the model coordinate system relative to the world coordinate system • Transformations place all objects into the same coordinate system (the world coordinate system) • There is a different transformation for each object • An object can consist of many triangles
World to View Transformation • Once all the triangles are define w.r.t. the world coordinate system, we need to transform them to view space • View space is defined by the coordinate system of the virtual camera • The camera is placed using world space coordinates • There is one transformation from world to view space for all triangles (if only one camera)
y x z World to View Transformation y • The camera’s “film” is parallel to the view xy plane • The camera points down the negative view z axis • At least for the right-handed OpenGL coordinate system • Things are opposite for the left-handed DirectX system x -z
Placing the Camera • In OpenGL the default view coordinate system is identical to the world coordinate system • The camera’s lens points down the negative z axis • There are several ways to move the view from its default position
Placing the Camera • Rotations and Translations can be performed to place the view coordinate system anywhere in the world • Higher-level functions can be used to place the camera at an exact position • gluLookAt(eye point, center point, up vector) • Similar function in DirectX
Transformation Order • Note that order of transformations is important • Points move from model space to world space • Then from world space to view (camera) space • This implies an order of: Pview = (Tworld2view) (Tmodel2world) (Pmodel) • That is, the model to world transform needs to be applied first to the point
World to View Details • Just to give you a taste of what goes on behind the scenes with gluLookAt… • It needs to form a 4x4 matrix that transforms world coordinate points into view coordinate points • To do this it simply forms the matrix that represents the series of transformation steps that get the camera coordinate system to line up with the world coordinate system • How does it do that – what would the steps be if you had to implement the function in the API?
View Space • There are several operations that take place in view space coordinates • Back-face culling • View Volume clipping • Lighting • Note that view space is still a 3D coordinate system
Back-face Culling • Back-face culling removes triangles that are not facing the viewer • “back-face” is towards the camera • Normal extends off the front-face • Default is to assume triangles are defined counter clock-wise (ccw) • At least this is the default for a right-handed coordinate system (OpenGL) • DirectX’s left-handed coordinate system is backwards (cw is front facing) Np V
Surface Normal • Each triangle has a single surface normal • The normal is perpendicular to the plane of the triangle • Easy way to define the orientation of the surface • Again, the normal is just a vector (no position) C N A B
Computing the Surface Normal • Let V1 be the vector from point A to point B • Let V2 be the vector from point A to point C • N = V1x V2 • N is often normalized • Note that order of vertices becomes important • Triangle ABC has an outward facing normal • Triangle ACB has an inward facing normal C N A B
Back-face Culling • Recall that V1. V2 = |V1| |V2| cos(q) • If both vectors are unit vectors this simplifies to V1. V2 = cos(q) • Recall that cos(q) is positive ifq [-90..+90] • Thus, if the dot product of the View vector (V) and the Polygon Normal vector (Np) is positive we can cull (remove) it 90 Np q V -90
Back-face Culling • This technique should remove approximately half the triangles in a typical scene at a very early stage in the pipeline • We always want to dump data as early as possible • Dot products are really fast to compute • Can be optimized further because all that is necessary is the sign of the dot product
Back-face Culling • When using an API such as OpenGL or DirectX there is a toggle to turn on/off back-face culling • There is also a toggle to select which side is considered the “front” side of the triangle (the side with the normal or the other side)
View Volume Clipping • View Volume Clipping removes triangles that are not in the camera’s sight • The View Volume of a perspective camera is a 3D shape that looks like a pyramid with its top cut off • Called a Frustum • Thus, this step is sometimes called Frustum clipping • The Frustum is defined by near and far clipping planes as well as the field of view • More info later when talking about projections
View Volume Clipping • View Volume Clipping happens automatically in OpenGL and DirectX • You need to be aware of it because it is easy to get black screens because you set your view volume to be the wrong size • Also, for some of the game speed-up techniques we will need to perform some view volume clipping by hand in software
Lighting • The easiest form of lighting is to just assign a color to each vertex • Again, color is a state-machine type of thing • More realistic forms of lighting involve calculating the color value based on simulated physics
Real-world Lighting • Photons emanate from light sources • Photons collide with surfaces and are: • Absorbed • Reflected • Transmitted • Eventually some of the photons make it to your eyes enabling you to see
Lighting Models • There are different ways to model real-world lighting inside a computer • Local reflection models • OpenGL • Direct3D • Global illumination models • Raytracing • Radiosity
Local Reflection Models • Calculates the reflected light intensity from a point on the surface of an object using only direct illumination • As if the object was alone in the scene • Some important artifacts not taken into account by local reflection models are: • Shadows from other objects • Inter-object reflection • Refraction
Phong Local Reflection Model • 3 types of lighting are considered in the Phong model: • Diffuse • Specular • Ambient • These 3 types of light are then combined into a color for the surface at the point in question
Diffuse • Diffuse reflection is what happens when light bounces off a matte surface • Perfect diffuse reflection is when light reflects in all directions
Diffuse • We don’t actually cast rays from the light source and scatter them in all directions, hoping one of them will hit the camera • This technique is not very efficient! • Even offline techniques such as radiosity which try and simulate diffuse lighting don’t go this far! • We just need to know the amount of light falling on a particular surface point
Diffuse N • The amount of light reflected (the brightness) of the surface at a point is proportional to the angle between the surface normal, N, and the direction of the light, L. • In particular: Id = Ii cos(q) = Ii (N.L) • Where Id is the resulting diffuse intensity, Ii is the incident intensity, and N and L are unit vectors L q
Diffuse • A couple of examples: • Ii = 0.8, q = 0 Id = 0.8 • The full amount is reflected • Ii = 0.8, q = 45 Id = 0.57 • 71% is reflected N L q = 0 N q = 45 L
Diffuse • Diffuse reflection only depends on: • Orientation of the surface • Position of the light • Does not depend on: • Viewing position • Bottom sphere is viewed from a slightly lower position than the top sphere
Specular • Specular highlights are the mirror-like reflections found on shinny metals and plastics
Specular N R • N is again the normal of the surface at the point in we are lighting • L is again the direction to the light source • R is the reflection vector • V is the direction to the viewer (camera) L V q q W
Specular N R • We want the intensity to be greatest in the direction of the reflection vector and fall off quite fast around the reflection vector • In particular: Is = Ii cosn(W) = Ii (R.V)n • Where Is is the resulting specular intensity, Ii is the incident intensity, R and V are unit vectors, and n is an index that simulates the degree of surface imperfection L V q q W
Specular • As n gets bigger the drop-off around R is faster • At n = , the surface is a perfect mirror (all reflection is directly along R • cos(0) = 1 and 1 = 1 • cos(anything bigger than 0) = number < 1 and(number < 1) = 0
Specular • Examples of various values of n: • Left: diffuse only • Middle: low n specular added to diffuse • Right: high n specular added to diffuse
Specular • Calculation of N, V and L are easy • N with a cross product on the triangle vertices • V and L with the surface point and the camera or light position, respectively • Calculation of R requires mirroring L about N, which requires a bit of geometry: R = 2 N ( N . L ) – L • Note: Foley p.730 has a good explanation of this geometry
Specular • The reflection vector, R, is time consuming to compute, so often it is approximated with the halfway vector, H, which is halfway between the light direction and the viewing direction: H = (L + V) / 2 • Then the equation is: Is = Ii (H.N)n N H L V a a
Specular • Specular reflection depends on: • Orientation of the surface • Position of the light • Viewing position • The bottom picture was taken with a slightly lower viewing position • The specular highlights changes when the camera moves
Ambient • Note in the previous examples that the part of the sphere not facing the light is completely black • In the real-world light would bounce off of other objects (like floors and walls) and eventually some light would get to the back of the sphere • This “global bouncing” is what the ambient component models • And “models” is a very loose term here because it isn’t at all close to what happens in the real-world
Ambient • The amount of ambient light added to the point being lit is simply: Ia • Note that this doesn’t depend on: • surface orientation • light position • viewing direction
Phong Local Illumination Model • The 3 components of reflected light are combined to form the total reflected light I = KaIa + KdId + KsIs • Where Ia, Id and Is are as computed previously and Ka, Kd and Ks are 3 constants that control how to mix the components • Additionally, Ka + Kd + Ks = 1 • The OpenGL and DirectX models are both based on the Phong local illumination model
OpenGL Model – Light Color • Incident light (Ii) • Represents the color of the light source • We need 3 (Iir Iib Iig) values • Example: (1.0, 0.0, 0.0) is a red light • Lighting calculations to determine Ia, Id, and Is now must be done 3 times each • Each color channel is calculated independently • Further control is gained by defining separate (Iir Iib Iig) values for ambient, diffuse, specular
OpenGL Model – Light Color • So for each light in the scene you need to define the following colors: • Ambient (r, g, b) • Diffuse (r, g, b) • Specular (r, g, b) • The ambient Iis are used in the Ia equation • The diffuse Iis are used in the Id equation • The specular Iis are used in the Is equation
OpenGL Model – Material Color • Material properties (K values) • The equations to compute Ia, Id and Is just compute how must light from the light source is reflected off the object • We must also define the color of the object • Ambient color: (r, g, b) • Diffuse color: (r, g, b) • Specular color: (r, g, b)
OpenGL Model - Color • The ambient material color is multiplied by the amount of reflected ambient light • Ka Ia • Similar process for diffuse and specular • Then, just like in the Phong model, they are all added together to produce the final color • Note that each K and I are vectors of 3 color values that are all computed independently • Also need to define a “shininess” material value to be used as the n value in the specular equation
OpenGL Model - Color • By mixing the material color with the lighting color, one can get realistic light • White light,red material • Green light,same red material