Download
1 / 8
80 likes | 82 Views
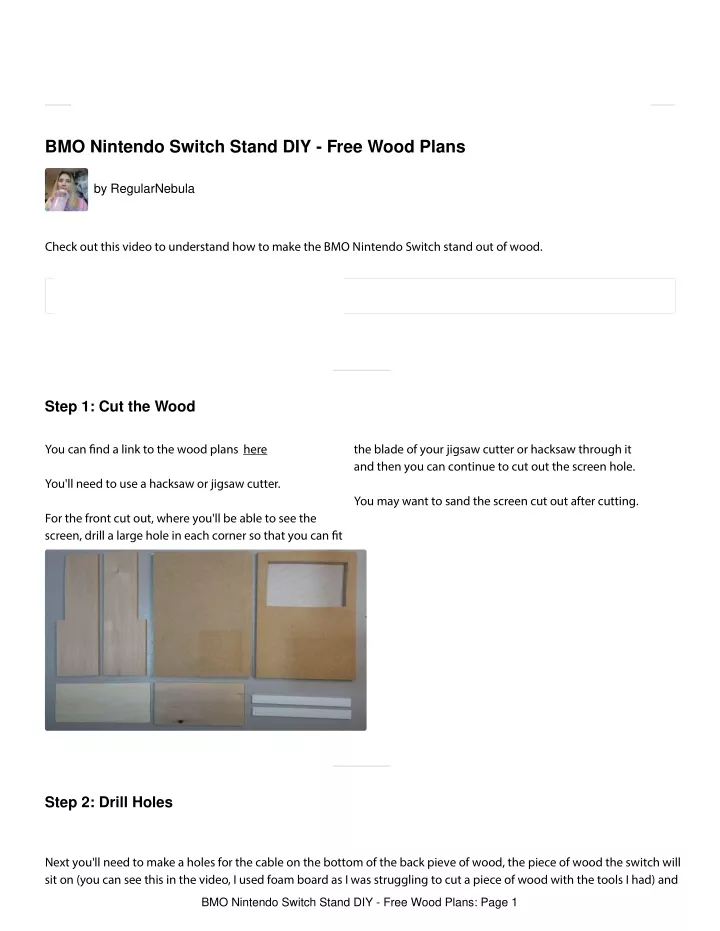
You'll need to use a hacksaw or jigsaw cutter.<br><br>For the front cut out, where you'll be able to see the screen, drill a large hole in each corner so that you can fit the blade of your jigsaw cutter or hacksaw through it and then you can continue to cut out the screen hole.<br><br>You may want to sand the screen cut out after cutting.

E N D
instructables BMO Nintendo Switch Stand DIY - Free Wood Plans by RegularNebula Check out this video to understand how to make the BMO Nintendo Switch stand out of wood. https://youtu.be/RsxWg2HFtiE Step 1: Cut the Wood You can ?nd a link to the wood plans here the blade of your jigsaw cutter or hacksaw through it and then you can continue to cut out the screen hole. You'll need to use a hacksaw or jigsaw cutter. You may want to sand the screen cut out after cutting. For the front cut out, where you'll be able to see the screen, drill a large hole in each corner so that you can ?t Step 2: Drill Holes Next you'll need to make a holes for the cable on the bottom of the back pieve of wood, the piece of wood the switch will sit on (you can see this in the video, I used foam board as I was struggling to cut a piece of wood with the tools I had) and BMO Nintendo Switch Stand DIY - Free Wood Plans: Page 1
also the left and right hand sides of BMO's "speaker". Take your cable and test taht it ?ts through the holes you made. Step 3: Glue Your Wood Together I used gorilla wood glue and some masking tape to keep it in place while it was drying. You'll need to glue in this order: the left and right hands sides onto the the back the middle back part, glue this inbetween the left and right hand sides so that it lines up at the bottom of the indent, this is the piece that will keep the Nintendo switch upright the bottom, where the cable goes through and the switch will sit on, it'll be glued onto the left and right outdents and the back switch upright support the top lastly the front Add tape along edges to help keep the wood in place while the glue drys. Gorilla wood glue takes 30 minutes to adhere and 24 hours to dry so leave it as long as you need to, according to the instructions on the wood glue you use. BMO Nintendo Switch Stand DIY - Free Wood Plans: Page 2
Make 16,000 projects with step By step plans BMO Nintendo Switch Stand DIY - Free Wood Plans: Page 3
Make 16,000 projects with step By step plans Step 4: Painting Once enough time has passed for the glue to dry and fully adhere, remove the supporting tape. Prime your wood, I used white acrylic gesso, and then paint the primed wood in a teal colour to match BMO or other colour of your choosing! BMO Nintendo Switch Stand DIY - Free Wood Plans: Page 4
Step 5: BMO Lettering, Buttons Arms and Legs Silk clay works best for the BMO lettering and buttons, it Shape the arms and the legs ensuring the arms will ?t adds to the cartoony style of BMO. Shape either with through the 'O' of the BMO lettering. Cure in the oven if your hands or biscuit cutters. Once they're dry, use some needed. super glue to stick them in place. As I only had a light rose colour in the CosClay I painted For the arms and legs I used CosClay which is a bakeable them a bluey colour. clay, similar to polymer clay, however it's a blend of clay and rubber so once cured in the oven it remains a little Once the arms and legs are done, proceed to stick them felxible. on BMO using super glue. BMO Nintendo Switch Stand DIY - Free Wood Plans: Page 5
Make 16,000 projects with step By step plans Step 6: Add Your Cable Feed your cable through the back hole, then turn upside down and push it through the part the switch will sit on. Grab your switch and plug the cable in, then gently push your switch down until it comes to rest. BMO Nintendo Switch Stand DIY - Free Wood Plans: Page 7
Step 7: All Done! You can search on the YouTube app for 'BMO Face' and you should ?nd a video of just BMOs face, your BMO Nintendo Switch dock is now complete! Very nice!!! The link to the wood plans is broken, can you upload it here? I absolutely love this and BMO is one of my favorite Adventure Time characters as well! thank you so much! yeah me too :D Nice Idea! thank you! So dope! cute i love this its so cute! Thanks so much ? can you see my new craft ? its a d.i.y dog tug toy i wanted to know....if you wanted to see my new project its a d.i.y dog tug toy of couse. um..also do you want to check out my new project? It's a d.i.y dog tug toy SO cute :D Thank you ? BMO Nintendo Switch Stand DIY - Free Wood Plans: Page 8