Download
1 / 17
180 likes | 428 Views
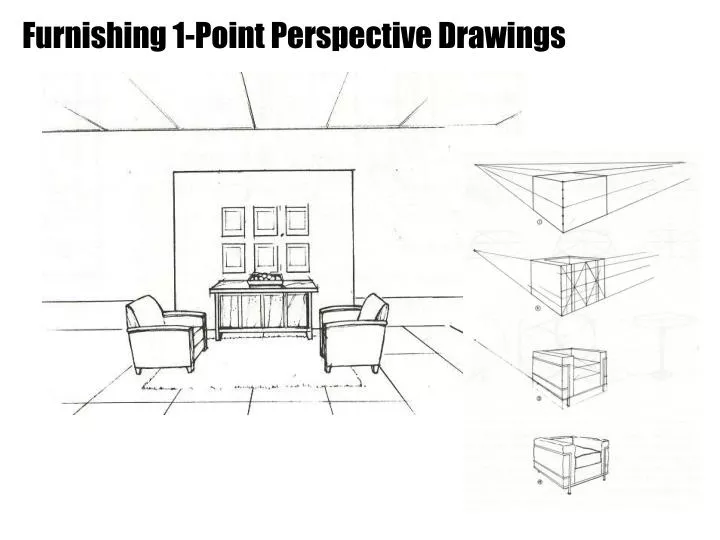
Furnishing 1-Point Perspective Drawings. Furnishing 1-Point Perspective Drawings. The Importance of Cubes. All things can be drawn within a cube or brick. This is the shortcut to drawing an object. Employing the cube insures correct perspective. Furnishing 1-Point Perspective Drawings.

E N D
Furnishing 1-Point Perspective Drawings The Importance of Cubes • All things can be drawn within a cube or brick. • This is the shortcut to drawing an object. • Employing the cube insures correct perspective.
Furnishing 1-Point Perspective Drawings Drawing Furniture Within Cubes • Draw the cube using the same proportions as the actual piece. • Use diagonal division to establish primary divisions. • Overlay the drawing and add details. • Produce a final overlay of the drawing adding more detail and soften upholstered areas.
Furnishing 1-Point Perspective Drawings Estimated One-Point Perspective: Furniture • Place a sheet of trace over your grid. Trace the HL, VP, floor and ceiling lines. • On the overlay, locate any wall changes on your plan. • Locate all furniture in the perspective plan on the floor.
Furnishing 1-Point Perspective Drawings Estimated One-Point Perspective: Furniture • Draw cubes for each piece of furniture. • Items aligned with the walls of the space, ie. sofa and coffee table will have the same VP as the walls.
Furnishing 1-Point Perspective Drawings Estimated One-Point Perspective: Furniture • Finding heights of boxes against the wall. • Use the 1’ increments along the wall to establish the height. • Horizontal lines are parallel to the HL and perspective lines go to the VP. • See sofa.
Furnishing 1-Point Perspective Drawings • Finding heights of boxes away from the wall: • Draw vertical lines up from all corners. • To establish the height of one corner, draw a line from the corner horizontally to a side wall. Draw a vertical line up the wall to the desired height. At that point, draw a horizontal line back to the vertical line at the corner of the cube. Where these 2 lines intersect is the desired height. • Extend this line to the opposite corner. At the corner, extend the line through the VP to the intersection of the vertical at the next corner. Continue in that manner around the box.
Furnishing 1-Point Perspective Drawings • Finding heights of boxes on the diagonal. • 2 lines of the box will go to a diagonal VP (DVP) on the HL on the right and 2 will create a DVP on the HL on the left. • Draw vertical lines at all corners of the box. • Find the height of 1 corner in the same way as finding the height of a box in the middle of the room. • At the height point, draw lines to the 2 DVPs and stop when they intersect the verticals. Continue around the box extending lines to the 2 DVPs. • You can also find the height of each corner and then draw lines connecting the heights of each corner.
Furnishing 1-Point Perspective Drawings Circles in Perspective • In perspective drawing circles are drawn as ellipses. • The major axis is found at the widest diameter. • The minor axis is found at the narrow diameter and is always at 90˚ to the major axis. • When found on a horizontal plane such as a floor or table top, the major axis is horizontal. • Our view of the ellipse varies according to the location of the HL.
Furnishing 1-Point Perspective Drawings How to Draw a Circle in Perspective • Draw a cube or plane in perspective that is the width of the circle. • Divide the plane with diagonals. Mark the center as located by the crossing of the diagonals. • From the center mark, extend lines vertically and horizontally (to VP or VPs); these lines will define midpoints of the enclosing plane. • Divide each half of the diagonal into thirds and make marks at these locations. • Sketch the ellipse by locating the mark two-thirds from center and drawing connecting curvilinear lines from the two-thirds mark to the adjacent midpoint mark. • Refine the ellipse.
Furnishing 1-Point Perspective Drawings Finishing the Drawing • Once you have drawn all of the necessary cubes, place a piece of trace over your drawing and draw the details of the architectural features and the furniture within the established framework.
Furnishing 1-Point Perspective Drawings Finishing the Drawing • Place another piece of trace over your drawing. • Refine the drawing. • Add details, accessories and people. • Trace this drawing onto marker paper using a black fine line marker and employing Lin’s graphic principles.
Furnishing 1-Point Perspective Drawings Characteristics of a Good Interior Perspective • The perspective should include most of the furnishings relating to the purpose of the room. For example, a perspective of a living room must include most, if not all, of the furniture in the conversation area. • Perspectives are always more meaningful if they include people. You can trace people from entourage books, but they must look like they belong in the space. • A good perspective includes accessories to make the space appear realistic. • Draw an indication of the exterior as seen through windows to enhance realism. • This drawing is a selling tool. It must give the client as much information about the space as possible. Drawing one table with one chair in a restaurant and then telling the client to imagine 20 tables with 80 chairs just like the one you drew will not sell the design. • Include background, middle-ground, and foreground. Overlap furniture for depth. • Consider the design of the space above the horizon line. Extend furnishings, accessories, plants, etc. above 3’-5’ level.
Furnishing 1-Point Perspective Drawings Characteristics of a Good Interior Perspective • The common interior horizon line is 5’ but you could have a higher horizon line if you were in a balcony looking down into the space. Or, you could have a lower horizon if you wanted to portray the room as seen at a lower vantage point, such as from a wheel chair. • The least distortion will be directly in front of the viewer or sight point. This will be the focus of your perspective. • It is usually best to have at least one vanishing point off of the paper. If both vanishing points are on the paper you will have more distortion. • Move your sight point (viewer) far enough back from the focus to see most of the interior space. • Your sight point (viewer) must be inside the space. The viewer cannot be on the other side of a wall or at a horizon level that would be impossible to attain within the illustrated space. If this done, it gives the client a false impression of the interior space. In most cases, it makes the space seem much larger than it is. • Your perspective is much more appealing if you include 3 walls or some sort of an indication of a third wall. This could be a piece of furniture that is placed perpendicular to one of the walls or possibly a plant.
Furnishing 1-Point Perspective Drawings • ASSIGNMENT #10 • Using the method discussed in class, draw a 1-point perspective of the living room from the floor plan we have been working with all semester—use the images that you collected as homework to help you construct the drawing • The finished drawing must be on 11x17 bond. The drawing must include the following overlays on individual sheets of trace: • grid • cubes for furniture • furniture drawn within the cubes • preliminary drawing including accessories, plants, people, etc… • final line drawing on bond • Trace your final drawing using fine line marker. Your final drawing must be drawn freehand—no straightedge lines • Magazine photos of furniture drawn in perspective should be handed in with overlays & final drawing