

How to Validate Data
E N D
Presentation Transcript
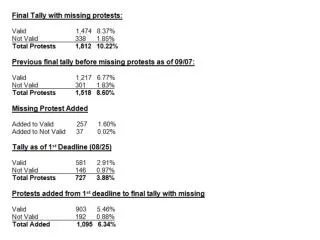
1. How to Validate Data
2. What is Validation Used For? Validation is used in Microsoft Excel. It allows the producer of the application to make sure the user of their sheet is entering the correct data. Therefore their application can work correctly and be of use to
the user.
3. First things first�!! Open a sheet in Microsoft Excel.
Click on the cell or cells you want to validate.
Now click on �Data� and choose �Validation�.
4. Now a dialogue box will appear. This is where the setting is chosen for your validation.
Drop down on the �Allow� combo box and make your choice. Select the criteria that the data in the cell needs.
5. For example� The cell will hold information about pupils in a school, therefore �Text Length� will be selected.
Choosing �between� allows Excel to validate that the data in the cell should be between 2 and 14 letters long.
6. Choose the �Input Message�. This will show how an error can be prevented by warning the user the rage of what data it will accept.
To stop an input message appearing untick the �Show input message when cell is selected�.
7. Error Alerts This is optional, but is advisable. If data is entered outside the specific range, an error box can appear.
Choose the style of warning you want. �STOP� will prevent any further data being added, until it reaches the required validation. �WARNING� and �INFORMATION� will only tell the user what is required and not stop a data entry.
Add the error alert Title and Message. REMEMBER: be polite!!
8. Look how it works! Click �OK� on the Validation box. Then select the cell you have validated, and your �Input Message� will appear.
Now test the Validation Error Message by typing in a Surname out of the validation range.
You will be able to see that your message is shown in the box.
9. If you wish to add the validation to a number of other cells in the same row, then simply �Click� on the small cross on the bottom right hand corner of the validated cell, and drag it down the cells you wish to validate.
10. Now you can Validate Data!!!!