Download
1 / 1
10 likes | 120 Views
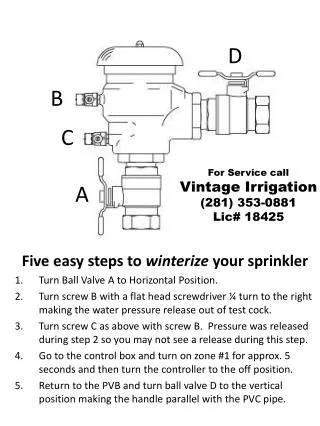
D. B. D. C. For Service call Vintage Irrigation (281) 353-0881 Lic # 18425. A. Five easy steps to winterize your sprinkler Turn Ball Valve A to Horizontal Position. Turn screw B with a flat head screwdriver ¼ turn to the right making the water pressure release out of test cock.

E N D
D B D C For Service call Vintage Irrigation (281) 353-0881 Lic# 18425 A Five easy steps to winterize your sprinkler Turn Ball Valve A to Horizontal Position. Turn screw B with a flat head screwdriver ¼ turn to the right making the water pressure release out of test cock. Turn screw C as above with screw B. Pressure was released during step 2 so you may not see a release during this step. Go to the control box and turn on zone #1 for approx. 5 seconds and then turn the controller to the off position. Return to the PVB and turn ball valve D to the vertical position making the handle parallel with the PVC pipe.