Orthographic Projection in Technical Graphics
Learn how to project 3D objects onto 2D planes for accurate measurements and visualizations in this comprehensive guide. Understand elevation, end view, and plan drawings.

Orthographic Projection in Technical Graphics
E N D
Presentation Transcript
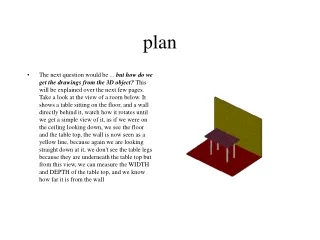
plan • The next question would be ... but how do we get the drawings from the 3D object? This will be explained over the next few pages. Take a look at the view of a room below. It shows a table sitting on the floor, and a wall directly behind it, watch how it rotates until we get a simple view of it, as if we were on the ceiling looking down, we see the floor and the table top, the wall is now seen as a yellow line, because again we are looking straight down at it, we don't see the table legs because they are underneath the table top but from this view, we can measure the WIDTH and DEPTH of the table top, and we know how far it is from the wall
Elevation • So we now can use the view in the previous page to measure the size of the table top, but we don't know the HEIGHT of the table off the floor, to do this we look in at it from the front like is shown below. From this drawing we can see the HEIGHT of the table legs and the thickness of them. Notice in this drawing the floor looks like a red line, because we are looking straight in at it, likewise for the table top, we can see the thickness of the table top here also
Locating the view for looking down on the table, is similar to a shadow been cast on the floor by the table when a skylight is directly over the table. Notice here that the shadow cast is the outline of the table top. The blue lines show the way the light casts the shadow onto the floor. We do not see the shadow cast by the legs, because the table top covers them.
Locating the view of the table looking straight in at it, is similar to a shadow been cast on the wall by the table when a window is directly in front of the table. Notice here that the shadow cast is the outline of the table top edge, and the legs. The blue lines show the way the light casts the shadow onto the wall. We do not see the shadow cast by the back legs, because the front ones covers them
Now it's time to introduce some names for what we have encountered so far. Lets start with the wall. Looking at the wall we know it is vertical, and the name we use for a flat surface in Technical Graphics is a 'Plane'. Therefore the wall is also called a 'Vertical Plane', or 'V.P.' for short. We can apply the same logic to naming the floor, what is the floor if the wall is vertical ? yes, it's horizontal, and it is also a 'Plane', so we call the floor a 'Horizontal Plane', or 'H.P.' for short. For now, just remember the line of intersection, or the line where the H.P. and the V.P. meet is called the 'XY'. (we will be dealing with this at a later stage.)
If we imagine that we are now at the right hand side of the table and we want to see what it looks like from that side, firstly we need a wall to see the view on, so we put a wall behind the table at 90º to the H.P. and V.P., now watch when the room rotates so we see what the table looks like from the end. We now see the HEIGHT of the table, and the DEPTH of the table top. Lets give this new wall a name, it is still a vertical plane, and so we call it an 'End Vertical Plane', or 'E.V.P.' for short. The view we see on it, is a view from the side of the table or end of it, so we call it an 'End View', or 'End Elevation'. The vertical plane seems to disappear when we look in from the side, but that is only because we see its thickness, like the floors thickness (due to the walls been the same colour it seems to disappear).
Locating the view of the table looking straight in at it from the right, is also similar to a shadow been cast on the wall (E.V.P.) by the table when a window is directly beside the table. Notice here that the shadow cast is the outline of the table top edge, and the legs. The blue lines show the way the light casts the shadow onto the wall. We do not see the shadow cast by the legs furthest from us, because the ones nearest the window covers them.
Lets recap on what you have learned so far. • A view is got by looking at an object and projecting it onto a plane, behind or below it. The planes are :- • The Vertical Plane. The Horizontal Plane. The End Vertical Plane
The view on the H.P. is called the 'Plan.' The view on the V.P. is called the 'Elevation.' The view on the E.V.P. is called the 'End View.'
Take a look at the birdbox below. It shows the 3D view of the bird box and the three planes. The birdbox is sitting on the H.P. The views on the three planes, show the End View, the Plan and the Elevation. Don't forget that we locate these views by looking in at right angles to the respective planes. The yellow arrow shows this direction
Now here is what the planes look like without the 3D view of the birdbox sitting in place. You can clearly see the H.P., the V.P. and the E.V.P. and the drawings on these. Try to see if you can identify :- • the plan. • the elevation. • the end view.
This is still not an easy view to draw, so what we do is fold the planes flat, along the XY and the YY lines. By doing this we can draw it on a sheet much more easily. Here you see the planes been folded back onto a lined out sheet. The V.P. remains where it is, because we assume that the sheet is vertical. We can also see here why the line of intersection between the E.V.P. and the H.P. is part of the XY also.