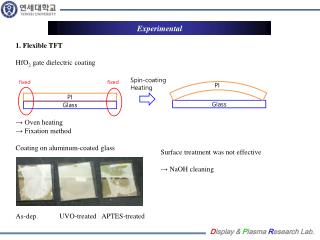
Experimental Procedure
Experiment 3. LeChâtelier’s Principle; Buffers. Experimental Procedure. Overview


Experimental Procedure
E N D
Presentation Transcript
Experiment 3. LeChâtelier’s Principle; Buffers Experimental Procedure
Overview A large number of qualitative tests and observations are performed. The effects that concentration changes and temperature changes have on a system at equilibrium are observed and interpreted using LeChâtelier’s principle. The functioning of a buffer system and the effect of a common ion on equilibria are observed.
Perform this experiment with a partner. At each circled superscript (1-21) in the procedure, stop and record your observation on the Report Sheet. Discuss your observation with your lab partner and TA. Account for the changes in appearance of the solution after each addition in terms of LeChâtelier’s principle.
A. Metal-Ammonia Ions Formation of metal-ammonia ions. Place ~ 1mL (<20 drops) of 0.1 M CuSO4 (or NiCl2) in a small, clean test tube. (1) Add drops of conc NH3 (Caution: strong ordor, do not inhale) until a color change occurs and the solution is clear (not colorless). (2) Shift of equilibrium. Add drops of 1 M HCl until the color again changes. (3)
B. Multiple Equilibria with the Silver Ion Silver carbonate equilibrium. In a 150-mm test tube add ~ ½ mL (≤10 drops) of 0.01 M AgNO3 to ~ 1/2mL of 0.1 M Na2CO3. (4) Add drops of 6 M HNO3 (Caution: 6 M HNO3 reacts with the skin!) to the precipitate until evidence of a chemical change occurs. (5)
1-1) ~0.5 mL of 0.1 M Na2CO3 1-2) ~0.5 mL (≤10 drops) 0.01 M AgNO3 1-3) Add drops of 6 M HNO3 until a chemical change occurs. 2-1) ~ 5 drops of 0.1 M HCl 2-2) Add drops of conc NH3 until evidence of a chemical change occurs. (At this point, the solution should be “Clear and colorless.”) 2-3) Reacidify with 6 M HNO3. 2-4) Add excess conc NH3. 3-1) Add drops of 0.1 M KI 4-1) Add drops of 0.1 M Na2S until evidence of chemical change has occurred.
2. Silver chloride equilibrium. To the clear solution from PART B.1, add ~ 5 drops of 0.1M HCl.(6) Add drops of conc NH3(Caution! Avoid breathing vapors and avoid skin contact) until evidence of a chemical change.(7)[At this point, the solution should be “clear and colorless.”] Reacidify the solution with 6 M HNO3 (Caution!) and record your observations.(8) What happens if excess conc NH3 is again added? Try it. (9) 3. Silver iodide equilibrium. After trying it, add drops of 0.1 M KI. (10) 4. Silver sulfide equilibrium. To the mixture from PART B.3, add drops of 0.1 M Na2S until evidence of chemical change has occurred.(11)
C. A Buffer System 1. Preparation of buffered and unbuffered systems. Transfer 10 mL of 0.10 M CH3COOH to A1 and A2 of labeled 50-mL beaker. Use a pH meter to determine the pH of the solution. (12) Now add 10 mL of 0.10 M NaCH3CO2 to each beaker. (13) Measure the pH of the solution. (14) Place 20 mL of distilled water into beaker B1 and B2 of labeled 50-mL beaker. Measure the pH of the distilled water.
2. Effect of strong acid. Add 5 mL of 0.10 M HCl to A1 and B1 beaker, estimate the pH, and record each pH change.(15) 3. Effect of strong base. Add 5 mL of 0.10 M NaOH to A2 and B2 beaker, estimate the pH, and record each pH change.(16) 4. Effect of a buffer system. Explain the observed pH change for a buffered system(as compared with an unbuffered system) when a strong acid or strong base is added to it.(17)
[Co(H2O)6]2+, [CoCl4]2- Equilibrium (Common-Ion effect) 1. Effect of concentrated HCl. Place about 10 drops of 1.0 M CoCl2 in a 75-mm test tube.(18) Add drops of concHCl (Caution: Avoid inhalation and skin contact) until a color change occurs. (20) Slowly add water to the system and stir. (20)
E. Co(H2O)6]2+, [CoCl4]2- Equilibrium (Temperature effect) 1. What does heat do? Place about 1.0 mL of CoCl2 in a 75-mm test tube into the boiling water bath. Compare the color of the hot solution with that of the original cool solution.(21)
Disposal for Parts A, C, D, and E: Dispose of the waste solutions in the Waste Salt Solutions container CLEANUP: Rinse the test tubes twice with tap water and discard in the Waste Salt Solutions container. Do two final rinses with deionized water and discard in the sinks
Use of pH meter • To prepare the electrode to make pH measurements, follow this procedure. • Remove the storage bottle from the electrode by first unscrewing the lid, then removing the bottle and lid. Thoroughly rinse the lower section of the probe, especially the region of the bulb, using distilled water. • Connect the pH Sensor to the interface and a Notebook computer. • Start the data-collect software. Press the power button. • The software will identify the pH sensors and load a default data-collection setup. You are now ready to make pH measurements. • Note: Do not completely submerge the sensor. The handle is not waterproof.
-Rinse the electrode with distilled water and place it in the sample to be measured. -Rinse the electrode with distilled water again and try another sample.
First Calibration Point a. In your program, choose to do a new calibration. b. Rinse the pH Sensor with distilled water and place it into a buffer of pH 4.0. c. Type "4" in the edit box as the pH value. Swirl the beaker containing the buffer solution gently, wait until the voltage stabilizes, then choose to Keep the calibration point. Second Calibration Point a. Rinse the pH Sensor with distilled water, and place it into a buffer of pH 7.0. b. Type "7" in the edit box as the pH value for the second calibration point. Swirl the beaker containing the buffer gently and wait until the voltage stabilizes. Click Keep, then click OK. This completes the calibration.
Maintenance and Storage of pH Meter - Short-term storage (up to 24 hours): Place the electrode in pH-4 or pH-7 buffer solution. - Long-term storage (more than 24 hours): Store the electrode in a buffer pH-4/KCl storage solution in the storage bottle. (When you are finished making measurements, rinse the tip of the electrode with distilled water. Slide the cap onto the electrode body, then screw the cap onto the storage bottle.)