Download
1 / 22
230 likes | 512 Views
COEN 445 Communication Networks and Protocols Lab 6. Wireshark Lab: TCP and UDP. Claude Fachkha. Outline. Part 1: TCP analysis using Wireshark Part 2: UDP analysis using Wireshark. Introduction. In this lab, we’ll investigate the behavior of the celebrated TCP protocol in detail. We’ll

E N D
COEN 445Communication Networks and ProtocolsLab 6 Wireshark Lab: TCP and UDP Claude Fachkha
Outline • Part 1: TCP analysis using Wireshark • Part 2: UDP analysis using Wireshark
Introduction In this lab, we’ll investigate the behavior of the celebrated TCP protocol in detail. We’ll do so by analyzing a trace of the TCP segments sent and received in transferring a 150KB file from your computer to a remote server. We’ll study TCP’s use of sequence and acknowledgement numbers for providing reliable data transfer; we’ll see TCP’s congestion control algorithm – slow start and congestion avoidance – in action; and we’ll look at TCP’s receiver-advertised flow control mechanism. We’ll also briefly consider TCP connection setup and we’ll investigate the performance (throughput and round-trip time) of the TCP connection between your computer and the server. Before beginning this lab, you’ll probably want to review sections 3.5 and 3.7 of the textbook
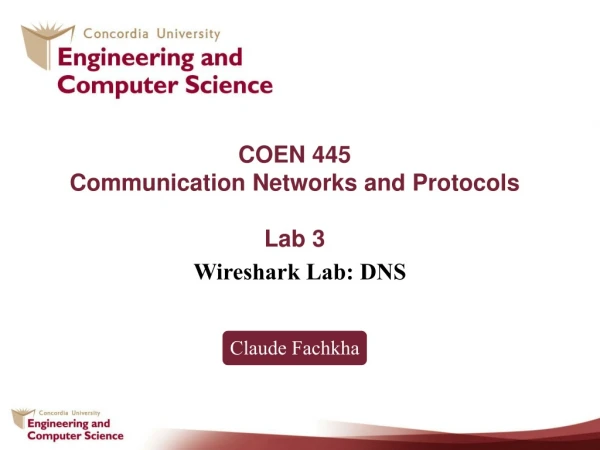
1.Capturing a bulk TCP transfer from your computer to a remote server Before beginning our exploration of TCP, we’ll need to use Wireshark to obtain a packet trace of the TCP transfer of a file from your computer to a remote server. You’ll do so by accessing a Web page that will allow you to enter the name of a file stored on your computer (which contains the ASCII text of Alice in Wonderland), and then transfer the file to a Web server using the HTTP POST method (see section 2.2.3 in the text). We’re using the POST method rather than the GET method as we’d like to transfer a large amount of data from your computer to another computer. Do the following: . Start up your web browser. Go the http://gaia.cs.umass.edu/wiresharklabs/ alice.txt and retrieve an ASCII copy of Alice in Wonderland. Store this file somewhere on your computer. . Go to http://gaia.cs.umass.edu/wireshark-labs/TCP-wireshark-file1.html You should see a screen that looks like the image in the next slide.
1.Capturing a bulk TCP transfer from your computer to a remote server (cont.)
1.Capturing a bulk TCP transfer from your computer to a remote server (cont.) • Use the Browse button in this form to enter the name of the file (full path name) on your computer containing Alice in Wonderland (or do so manually). Don’t yet press the “Upload alice.txt file” button. • Now start up Wireshark and begin packet capture (Capture->Start) and then press OK on the Wireshark Packet Capture Options screen (we’ll not need to select any options here). • Returning to your browser, press the “Upload alice.txt file” button to upload the file to the gaia.cs.umass.edu server. Once the file has been uploaded, a short congratulations message will be displayed in your browser window. • Stop Wireshark packet capture. Your Wireshark window should look similar to the window shown next.
1.Capturing a bulk TCP transfer from your computer to a remote server (cont.)
2. A first look at the captured trace Before analyzing the behavior of the TCP connection in detail, let’s take a high level view of the trace. • First, filter the packets displayed in the Wireshark window by entering “tcp” (lowercase, no quotes, and don’t forget to press return after entering!) into the display filter specification window towards the top of the Wireshark window. What you should see is series of TCP and HTTP messages between your computer and gaia.cs.umass.edu. You should see the initial three-way handshake containing a SYN message. You should see an HTTP POST message.
2. A first look at the captured trace Answer the following questions, by opening the Wireshark captured packet file tcpethereal-trace-1 in http://gaia.cs.umass.edu/wireshark-labs/wireshark-traces.zip 1. What is the IP address and TCP port number used by the client computer (source) that is transferring the file to gaia.cs.umass.edu? 2. What is the IP address of gaia.cs.umass.edu? On what port number is it sending and receiving TCP segments for this connection? If you have been able to create your own trace, answer the following question: 3. What is the IP address and TCP port number used by your client computer (source) to transfer the file to gaia.cs.umass.edu?
2. A first look at the captured trace Since this lab is about TCP rather than HTTP, let’s change Wireshark’s “listing of captured packets” window so that it shows information about the TCP segments containing the HTTP messages, rather than about the HTTP messages. To have Wireshark do this, select Analyze->Enabled Protocols. Then uncheck the HTTP box and select OK. You should now see a Wireshark window that looks like:
3. TCP Basics Answer the following questions for the TCP segments: 4. What is the sequence number of the TCP SYN segment that is used to initiate the TCP connection between the client computer and gaia.cs.umass.edu? What is it in the segment that identifies the segment as a SYN segment? 5. What is the sequence number of the SYNACK segment sent by gaia.cs.umass.edu to the client computer in reply to the SYN? What is the value of the Acknowledgement field in the SYNACK segment? How did gaia.cs.umass.edu determine that value? What is it in the segment that identifies the segment as a SYNACK segment? 6. What is the sequence number of the TCP segment containing the HTTP POST command? Note that in order to find the POST command, you’ll need to dig into the packet content field at the bottom of the Wireshark window, looking for a segment with a “POST” within its DATA field. 7. Consider the TCP segment containing the HTTP POST as the first segment in the TCP connection. What are the sequence numbers of the first six segments in the TCP connection (including the segment containing the HTTP POST)? At what time was each segment sent? When was the ACK for each segment received? Given the difference between when each TCP segment was sent, and when its acknowledgement was received, what is the RTT value for each of the six segments? What is the EstimatedRTT value (see Section 3.5.3, page 239 in text) after the receipt of each ACK? Assume that the value of the EstimatedRTTis equal to the measured RTT for the first segment, and then is computed using the EstimatedRTT equation on page 239 for all subsequent segments.
3. TCP Basics Note: Wireshark has a nice feature that allows you to plot the RTT for each of the TCP segments sent. Select a TCP segment in the “listing of captured packets” window that is being sent from the client to the gaia.cs.umass.edu server. Then select: Statistics->TCP Stream Graph->Round Trip Time Graph. 8. What is the length of each of the first six TCP segments? Note: The TCP segments in the tcp-ethereal-trace-1 trace file are all less that 1460 bytes. This is because the computer on which the trace was gathered has an Ethernet card that limits the length of the maximum IP packet to 1500 bytes (40 bytes of TCP/IP header data and 1460 bytes of TCP payload). This 1500 byte value is the standard maximum length allowed by Ethernet. If your trace indicates a TCP length greater than 1500 bytes, and your computer is using an Ethernet connection, then Wireshark is reporting the wrong TCP segment length; it will likely also show only one large TCP segment rather than multiple smaller segments. Your computer is indeed probably sending multiple smaller segments, as indicated by the ACKs it receives. This inconsistency in reported segment lengths is due to the interaction between the Ethernet driver and the Wireshark software. We recommend that if you have this inconsistency, that you perform this lab using the provided trace file.
3. TCP Basics 9. What is the minimum amount of available buffer space advertised at the received for the entire trace? Does the lack of receiver buffer space ever throttle the sender? 10. Are there any retransmitted segments in the trace file? What did you check for (in the trace) in order to answer this question? 11. How much data does the receiver typically acknowledge in an ACK? Can you identify cases where the receiver is ACKing every other received segment (see Table 3.2 on page 247 in the text). 12. What is the throughput (bytes transferred per unit time) for the TCP connection? Explain how you calculated this value.
4. TCP congestion control in action Let’s now examine the amount of data sent per unit time from the client to the server. Rather than (tediously!) calculating this from the raw data in the Wireshark window, we’ll use one of Wireshark’s TCP graphing utilities - Time-Sequence-Graph(Stevens) – to plot out data. • Select a TCP segment in the Wireshark’s “listing of captured-packets” window. Then select the menu: Statistics->TCP Stream Graph-> Time-Sequence-Graph(Stevens). You should see a plot that looks similar to the following plot. Here, each dot represents a TCP segment sent, plotting the sequence number of the segment versus the time at which it was sent. Note that a set of dots stacked above each other represents a series of packets that were sent back-to-back by the sender.
4. TCP congestion control in action Answer the following questions for the TCP segments the packet trace tcp-etherealtrace-1 in http://gaia.cs.umass.edu/wireshark-labs/wireshark-traces.zip 13. Use the Time-Sequence-Graph(Stevens) plotting tool to view the sequence number versus time plot of segments being sent from the client to the gaia.cs.umass.edu server. Can you identify where TCP’s slowstart phase begins and ends, and where congestion avoidance takes over? Comment on ways in which the measured data differs from the idealized behavior of TCP that we’ve studied in the text. 14. Answer each of two questions above for the trace that you have gathered when you transferred a file from your computer to gaia.cs.umass.edu (optional)
Outline • Part 1: TCP analysis using Wireshark • Part 2: UDP analysis using Wireshark
Introduction (part 2) In this lab, we’ll take a quick look at the UDP transport protocol. As we saw in Chapter 3 of the text, UDP is a streamlined, no-frills protocol. You may want to re-read section 3,3 in the text before doing this lab.
The Assignment Start capturing packets in Wireshark and then do something that will cause your host to send and receive several UDP packets. It’s also likely that just by doing nothing (except capturing packets via Wireshark) that some UDP packets sent by others will appear in your trace. In particular, the Simple Network Management Protocol (SNMP - chapter 9 in the text) sends SNMP messages inside of UDP, so it’s likely that you’ll find some SNMP messages (and therefore UDP packets) in your trace. After stopping packet capture, set your packet filter so that Wireshark only displays the UDP packets sent and received at your host. Pick one of these UDP packets and expand the UDP fields in the details window. If you are unable to find UDP packets or are unable to run Wireshark on a live network connection, you can download a packet trace containing some UDP packets.
The Assignment (Cont.) 1. Select one UDP packet from your trace. From this packet, determine how many fields there are in the UDP header. (You shouldn’t look in the textbook! Answer these questions directly from what you observe in the packet trace.) Name these fields. 2. By consulting the displayed information in Wireshark’s packet content field for this packet, determine the length (in bytes) of each of the UDP header fields. 3. The value in the Length field is the length of what? (You can consult the text for this answer). Verify your claim with your captured UDP packet. 4. What is the maximum number of bytes that can be included in a UDP payload? (Hint: the answer to this question can be determined by your answer to 2. above)
The Assignment (Cont.) 5. What is the largest possible source port number? (Hint: see the hint in 4.) 6. What is the protocol number for UDP? Give your answer in both hexadecimal and decimal notation. To answer this question, you’ll need to look into the Protocol field of the IP datagram containing this UDP segment (see Figure 4.13 in the text, and the discussion of IP header fields). 7. Examine a pair of UDP packets in which your host sends the first UDP packet and the second UDP packet is a reply to this first UDP packet. (Hint: for a second packet to be sent in response to a first packet, the sender of the first packet should be the destination of the second packet). Describe the relationship between the port numbers in the two packets.
References Online services - Computer Networking: A Top-Down Approach, 6/E James F. Kurose, University of Massachusetts, Amherst - See more at: Keith W. Ross, Polytechnic University, Brooklyn