Download
1 / 66
850 likes | 1.08k Views
INTRODUCTION TO ADOBE ILLUSTRATOR. Computers in Creative Arts: Chapter 3. INTRO TO VECTOR GRAPHICS.

E N D
INTRODUCTION TO ADOBE ILLUSTRATOR Computers in Creative Arts: Chapter 3
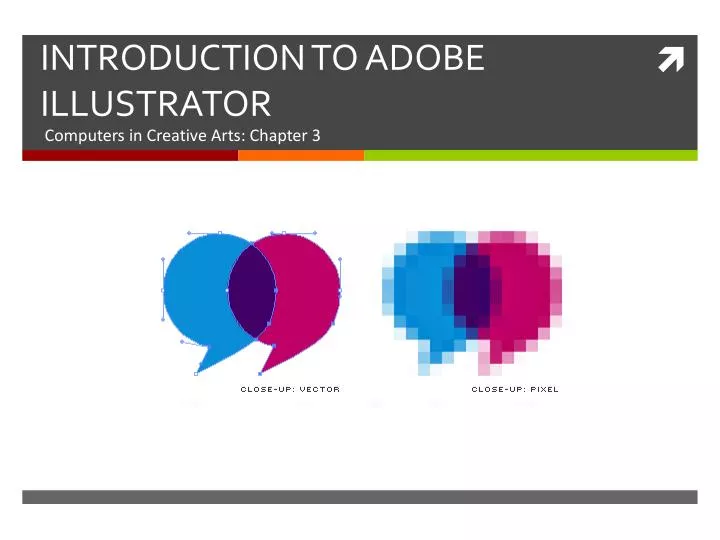
INTRO TO VECTOR GRAPHICS • Adobe Illustrator is a graphic editing program well-suited to creating graphics from scratch. It is significantly different from many other graphics programs because it deals primarily with vector graphics. Most people are more familiar with bitmap (raster) graphics, such as what PhotoShop produces.
BIT MAP GRAPHICS • Bitmap graphics: saved using a grid full of tiny squares called pixels. Bitmap images are good for continuous and/or irregular shadings and colors (such as in photographs), but do not resize well.
VECTOR GRAPHICS • Vector graphics: saved using points and lines (vectors) to describe shapes and objects. The resulting file is made up of lines and patches of color. Generally much smaller files than bitmap graphics. When vector images are resized, there is no loss of quality.
WHEN TO USE ILLUSTRATOR • When to Use Illustrator • Types of documents you might choose Illustrator to create: • Single-page document juxtaposing text and images – a handout for a class; a poster for a conference. • Simple line art; logos, buttons, and other images with clear areas of solid color. • Maps and diagrams.
WHY USE ILLUSTRATOR • It may be difficult to convince yourself to spend the amount of time necessary to learn Illustrator, when similar work can be done in Photoshop. However, for many images, especially of the types listed above, Illustrator produces a MUCH smaller file, that looks better on screen and prints much more clearly than a similar document created in Photoshop!
GETTING STARTED • Like most Adobe products, Illustrator makes use of a Toolbox and several Palettes. The Toolbox appears to the left of your Illustrator workspace, while most Palettes appear to the right.
TOOL BOX • The Toolbox contains tools that allow you to create, edit, and view your files. Any tool icon that has a small, black arrow in the lower right corner actually contains several related tools. Click-and-hold on a tool icon to see all the related tools. • Your document appears front-and-center in the Illustrator workspace. You will find it very useful to know how to zoom in and out on sections of your document. Select the • Zoom tool and click once anywhere on your document to zoom in. To zoom out, Alt-click (PC) or Option-click with the Zoom tool. Click and drag with the Zoom tool to show extreme detail. Finally, to return to your original view, double-click on • the Hand tool, next to the Zoom tool.
PALLETS • You’ll soon get acquainted with several important Illustrator palettes. Many of the palettes (such as Swatches and Brushes, shown at right) share a single window. You may have to click a tab within a palette box to show the particular palette you wish to use. To show or hide any palette, go to the Window menu, and choose the palette by name from the pull-down list.
ILLUSTRATOR CONCEPT: PATHS • When you create artwork in Illustrator, you do so by drawing lines and shapes that combine to form a whole picture. • Each item you create is called an object. • For each object, there is an outline, called a path, made up of points and lines. • Each shape you create can have a fill (filling in the space inside the path) and a stroke (tracing the path).
ILLUSTRATOR CONCEPT: PATHS • At right are a few examples of that rectangle with different fills and strokes. Note that you may choose to use no stroke to fill with a pattern or a gradient, and even to use special brushes on the stroke.
POINTS • If a line changes direction at a point, it may do so either as a corner point (as in the rectangle at left) or as a smooth point. • Smooth points and corner points are both used to create curved lines and shapes, and consist of an anchor point (the white boxes we have already seen), and one or more direction points (indicated by slightly smaller circles). • The shape of a curve is determined by the angle and distance of the direction points.
SHAPE TOOLS • The easiest thing to draw in Illustrator is an enclosed shape, such as a rectangle, ellipse, or polygon. Click the Shape tool (usually set to Rectangle ) to begin drawing, or select another shape: Rounded Rectangle, Ellipse, Polygon, or Star . • To draw the shape, just click and drag on your workspace. Thin lines will appear indicating the outline of your shape, and the shape will be completed when you release the mouse button. • Note: holding down the Shift key as you draw a Rectangle or Ellipse will restrict you to a perfect square or circle!
PENCIL TOOLS • Use the Pencil tool to create free-flowing lines and shapes. As you draw, a thin lines will appear indicating the outline of your shape, and the shape will be completed when you release the mouse button. • Re-tracing an existing shape with the Pencil tool to redraw sections of the line, or the whole thing. • Alternatively, you can use the Smooth tool to automatically smooth zig and zags out of your lines. • The Smooth tool is located under the Pencil tool in your toolbox. Click-and-hold on the Pencil tool to see the icon for the Smooth tool.
SELECTION TOOLS • Once you have created an object, the Selection tool lets you select the entire object for further manipulation. • The Direct-Selection tool lets you select parts of anobject, individual anchor points, direction points, andsegments. • Use the Direct-Selection tool to “morph” shapes, or to adjust direction points.
EXERCIZE Drawing with Shapes, Pencil, Pen and Selection Tools • 1. Draw a basic square, then see how many of these shapes you can replicate, using only the Pencil and Direct-Selection tools.
COLORS • The colors your shapes take on are determined by the colors selected in the Stroke and Fill area of your Toolbox. • Remember, Stroke refers to the outline (path) of your object, Fill refers to the color filling in that outline.
CHANGING STROKE OR FILL COLOR • Click on the Stroke or Fill icon to bring it to the forefront. • Find the Swatches Palette. Click the color you want to use. • To use no color at all, select the None button either under the Stroke and Fill controls, or in the colors palette. Applying None to Stroke will give you a patch of color with no bordering line. Applying None to Fill will give you a line with no fill color (this setting is frequently used with the Pencil tool). • If an object is selected at the time that you change stroke and fill colors, the changes will be applied to that object. If no object is selected, the next object that you draw will have these properties.
MAKING NEW COLOR CHOICES • The colors in the default Swatches Palette are fairly limited, but you can select new colors. Double-click on a color in the Stroke/Fill area to access the Color Picker. • Adjust the slider in the “rainbow” bar to choose the hue you want, then pick the desired shade from the large box. You can enter numerical color values (from a web page, or other digital image) in the text boxes. • You can add your new color to your swatches, for easy re-use. Simply click the New Swatch icon in the Swatches palette. To remove a color from your Swatches, click on that swatch, then click the Trash icon.
COLOR GRADIENTS • A gradient mixes two or more colors together in the fill area of an object. If only solid color swatches are visible, click the Gradient Swatches button to view gradients. • To apply a gradient, select the object, and click on the swatch for the gradient you want to use. Once a gradient has been applied, use the Gradient Tool and Gradient Palette (located under the Stroke Palette) to modify the gradient – changing it from linear to radial, and changing the direction and length of the transitions from one color to another. • If you particularly like a modification you have made to a gradient, click on the gradient box in the Gradient Palette, and drag it to the Swatches Palette. A new swatch will be created for your gradient.
EXERCISE • Create a new color. Add it to your Swatches Palette • Draw a shape. Copy and paste it several times. Try to replicate the following versions of the object: a. regular stroke and fill b. new color stroke, no fill c. colored fill, no stroke d. gradient fill, new color stroke • Draw a new shape. Fill it with a simple two-color gradient. Use the Gradient Tool and Gradient Palette to replicate these variations:
STROKES • In addition to the color of a line, you can also change several other properties. The Stroke Palette lets you change a number of things about your Stroke: • Weight: how thick your line appears • Cap: how the ends of your line appear • Join: how your line joins at corners • Miter Limit: how far the joined lines project at corners • Dashed Line: check this box to create a dashed line. In the boxes below, specify how long each dash should be, and how long the gaps between dashes should be.
BRUSHES • Brushes can be applied to the stroke of any object, to significantly change the appearance of the line. There are four basic types of brushes. • Calligraphic: makes your lines resemble those drawn with a calligraphy pen • Scatter: scatters copies of an object along your line • Art: stretches a single copy of an object along your line • Pattern: applies a repeating pattern to your line • You can create new brushes yourself, when you become more familiar with Illustrator.
TRANSFORMING OBJECTS • You’ve already seen how the Direct-Selection Tool can be used to move individual points of an object. There are also several built-in options for transforming objects. • The two easiest options are the Transform menu and the Transform Tools. • To use the basic Transform Tools, select an object, then the tool. • To apply transformations to an object using the menus, select the object, then go to Object > Transform on the menu. The advantage of the menus is that numeric values can be specified – Scale 150%, Rotate 32°, etc.
TRANSFORMING OBJECTS • Rotate – dragging with the Rotate Tool rotates the object around a point; by default, the center point. You can move the point of rotation, by clicking before you begin dragging. Hold down the shift key to rotate in 15-degree increments. • Reflect – click once, then again in a different location to indicate a line over which to reflect the object. • Scale – drag to resize the object. Hold down the shift key to maintain original proportions. • Shear – drag to skew the object. Hold down the shift key to stick to 15-degree increments. • Free Transform – can scale, skew, or rotate the object, depending on where you click.
LIQUIFY TOOL • A number of tools are available to “liquify” your objects. When using these tools, objects become malleable, like wet paint. • Experiment with these tools to find out what they do. All are located under the Warp Tool, except the Twist Tool (which is under the Rotate Tool.) • Take special notice of the Warp Tool, which lets you re-shape an object freehand, as if it were an image on a piece of silly putty!
LINE AND PEN TOOLS • The Line Segment Tool and Arc Tool are useful for adding details to your image. • The Line Segment Tool draws straight lines – hold down the shift key while dragging to restrict the line to 15-degree angles of rotation. • The Arc Tool draws curved lines – a quarter of an ellipse. • Far more useful, but also more difficult to use, is the Pen Tool.
LINE AND PEN TOOLS • Click multiple times in your document with the Pen Tool to create a freehand polygon shape. Each new click defines a new anchor point in the polygon. • As you near the point where you began the shape, the cursor will change, indicating it is ready to complete the shape by adding a small closed circle at lower right. • When you see this “close” cursor, you can click once to close the shape
LINE AND PEN TOOLS • When you click to add a new anchor point with the Pen Tool, you may choose to click and drag instead of clicking once. This turns a sharp corner into a smoothly curved one. • The Pen Tool is very useful for creating freehand smooth curves. • You can combine single-click anchor points (sharp corners) with click-and-drag anchor points (smooth corners) to create complex shapes that are more precise than freehand Pencil drawing.
EXERCISE • 1. Use the Line and Arc tools to draw a simple face, as below. Remember, you can change stroke weights and colors. • 2. Remove some of the arcs from the face drawing, and replace them with more complex curves using the Pen tool.
COMPLEX OBJECTS • Sometimes you want to draw an object that cannot be created with one single action. Conveniently enough, Illustrator lets you group and join objects into more complex objects. • Grouping is the simplest way to make two or more objects behave as one. Simply select one object, then hold down the Shift key as you click on one (or several) more object(s), until you have selected everything you want in the group. Then go to the Object menu, and select Group. All lines and fills are preserved in a Group, and individual component objects can be selected with the Direct-Selection tool.
COMPLEX OBJECTS • For more complex effects, you may wish to use the Pathfinder. This Palette generally is not shown by default, so go to the Window menu to turn it on.
COMPLEX OBJECTS • The most useful thing you can do with the Pathfinder is to add shapes together, or subtract one shape from another. • To add shapes, select two shapes, and click on the Add to shape area button. You will see the two shapes become one. • To subtract one shape from another, select both (making sure that the shape you want to take away is on top!) and click on the Subtract from shape area button.
COMPLEX OBJECTS • When using these Pathfinder buttons, the original two shapes are still preserved, and can be selected with the Direct-Selection tool. • To make your Pathfinder changes permanent, select the changed objects, and click the Expand button.
COMPLEX OBJECTS • In the same window as the Pathfinder, you’ll find the Align palette. You can use buttons in this palette to align multiple objects to the leftmost, rightmost, topmost, or bottom-most point in the group; or to align objects to their common vertical or horizontal center. There are also buttons to distribute objects evenly across an area, through their left, right, top, bottom, and vertical and horizontal center points.
EXERCISE • Create an eye made up of multiple ellipses grouped together. You can use Align to easily line up the centers of the objects. • Combine a star and five circles to make a stunning old-style Sheriff’s badge!
EXERCISE • Subtract one circle from another to create a crescent moon. • Align a rectangle and a rounded rectangle to create a “computer monitor”. Group the two objects, then copy the group and paste three new copies into your document. Align these grouped objects, and distribute them evenly along the line.
COMPLEX OBJECTS • Like Photoshop, Illustrator allows you to create Layers within your document. Think of each layer as a sheet of transparency paper. Multiple layers stack on top of each other, and you can control that stacking order in the Layers Palette. • Ilustrator Layers work a little bit differently than Photoshop Layers. Each shape or line that you draw is considered an Object. Each object is associated with a layer in your document.
COMPLEX OBJECTS • Think of the objects you draw as Post-It notes stuck to a transparency (the layer). You can move those Post-It notes around, and you can rearrange their stacking order. Any object in a higher layer is automatically above any object in a lower layer. Within one layer, objects may be rearranged as well.
TO CHANGE THE STACKING ORDER OF AN OBJECT WITHIN A LAYER • 1. Select the object. • 2. Under the Object menu, choose Arrange. On the pulldown menu, select an option: • Bring to Front/Send to Back – brings thecurrently selected object to the top of all the objects on the layer, or sends it all the way to the bottom. • Bring Forward – brings the currently selected object one level up in the layer • Send Backward – sends the currently selected object one level down in the layer.
OPACITY OF OBJECTS AND LAYERS • Each Layer can vary 100% opaque (solid), to 0% opaque (completely see-through; thus, invisible) with any amount of transparency in between. Individual objects within a layer may also be more or less opaque. Objects that are not 100% opaque will add together in opacity – thus, if you have two black objects that are each at 50% opacity, the area where they overlap will be 100% black.
OPACITY OF OBJECTS AND LAYERS • To change opacity of a layer, click on the small circle to the right of the layer name in the Layers Palette. Then change the Opacity setting in the Transparency Palette. • To change opacity for a single object, simply select the object and adjust its Opacity in the Transparency Palette.
TEXT IN ILLUSTRATOR • To insert a short piece of text in Illustrator, simply select the Type Tool, click where you want the text to appear, and start typing. The text will be entered as a separate object. • To enter vertical text, choose the Vertical Type Tool, then click and type. • To change text attributes, access the Type Palette or use the Type menu. With the Type Tool selected, highlight the text you want to change, then make changes in the palette or on the menu.
TEXT IN ILLUSTRATOR • For longer pieces of text, you should begin by defining a text box. Select the Type Tool, then click and drag on the Workspace to define the box. If you start by defining a text box, your text will wrap to the width of the box. You can then re-size the box, and the text will wrap to the new box size.
TEXT IN ILLUSTRATOR • If you do not start by defining your own text box, Illustrator creates one for you, but with more permanent boundaries. Illustrator-defined textboxes, when resized, will actually resize the individual letters, and will not re-wrap the text. • Text boxes of either type can be freely re-sized, just by using the Selection Tool. • Note: fonts used in an Illustrator document can only be displayed correctly when the viewer has those fonts installed on their computer. If working on more than one computer, you may have to carry font files on a disk with your Illustrator file.
COLOR IN TEXT • By default, text that you enter in Illustrator has only a fill color assigned. Select a text box with the Selection Tool, and you can change that fill color, and can add a stroke color to outline your text. Try stroking text with a dashed line!