Download
1 / 15
150 likes | 165 Views
This guide provides step-by-step instructions on calibrating and setting up sensors in the machine, including collate pocket side guides, finger calibrations, and hybrid motor calibrations.

E N D
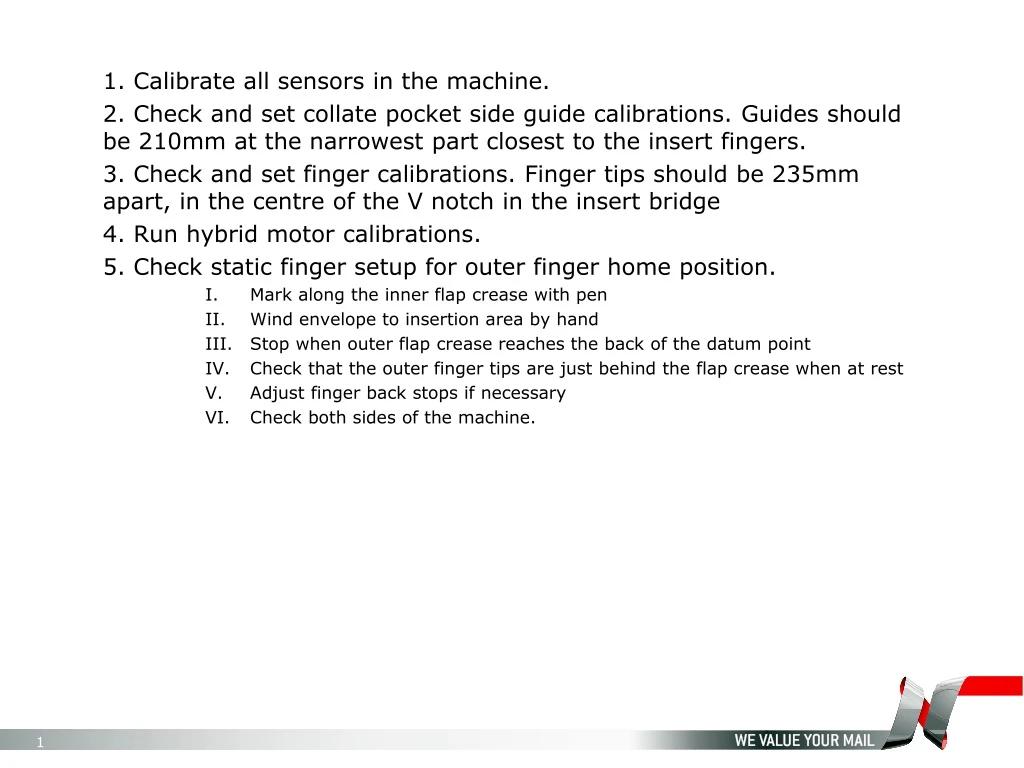
1. Calibrate all sensors in the machine. 2. Check and set collate pocket side guide calibrations. Guides should be 210mm at the narrowest part closest to the insert fingers. 3. Check and set finger calibrations. Finger tips should be 235mm apart, in the centre of the V notch in the insert bridge 4. Run hybrid motor calibrations. 5. Check static finger setup for outer finger home position. Mark along the inner flap crease with pen Wind envelope to insertion area by hand Stop when outer flap crease reaches the back of the datum point Check that the outer finger tips are just behind the flap crease when at rest Adjust finger back stops if necessary Check both sides of the machine.
Datum points Back of datum point Front of datum point 2
Operator side finger in correct position . Behind the flap crease
Drive side finger in wrong position. In front of the flap crease
Drive side finger in wrong position. In front of the flap crease
Drive side finger in correct position . Behind the flap crease
Finger home position stop Drive side Finger home position stop Stop fixing screw
Finger home position stop Operator side Finger home position stop Stop fixing screw
7. Program a simple job, envelope and single sheet. 8. Press F3 on the keyboard and select “Env only” mode. 9. Load envelopes and Plain paper into the required hoppers. 10. Select a slow speed on the display. 11. Cheat the insert head side cover microswitch and press single cycle. 12.In Service menu enter “units setup” and check in the “settings” menu that the envelope has been measured correctly. Adjust and repeat until correct. 6. Check static finger set up for middle fingers. Find “Best Fit” for all the envelopes remembering that the envelope stop position is adjustable in the job. Wind the envelope forward until the outer flap crease is at the front of the datum point Energise the middle finger solenoid in diagnostics (cheat the cover switch with a magnet) Ensure the tips of the middle fingers have entered the envelope throat Adjust the finger tips if required Energise the outer fingers to check they work with the envelope at the front of the datum point Repeat with any different style envelope the customer will be using
Check middle finger tips clear of envelope throat. Adjust tips if necessary
Operate the middle finger solenoid to check fingers open the throat. Adjust tips if necessary
Finger tips opening throat. When middle fingers switched off check the outer fingers open the throat
13. Run the envelopes and carry out dynamic setup and adjust as necessary in unit settings, checking stop position, wetter start and sealing, reverse position and seal position. 14. Come out of envelope only mode and run programmed job. 15. Check fold lengths against program. 16. In Service menu enter “units setup” and in the “settings” menu adjust the fold plate(s) required. If possible use V fold for fold plate 1, when correct use C fold for fold plate 2. This can be done as fold only but mark paper feed direction. Repeat until folds are correct 17. If more than one paper hopper program job using one more hopper each time and check collate position and adjust as necessary.