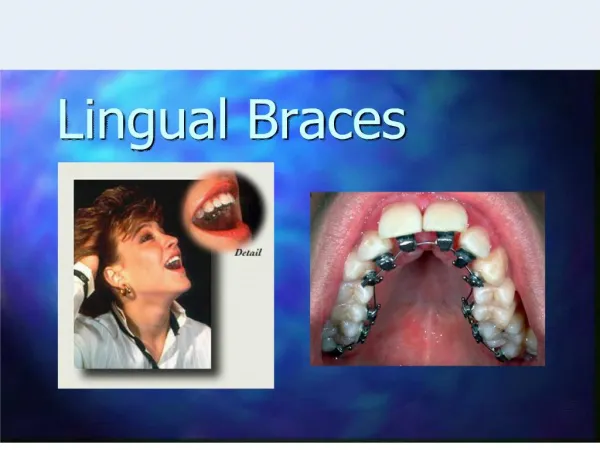
lingual braces
. History of Lingual Braces. Around 1975, two orthodontists working independently in Japan and the United States started developing their own systems to place braces on the inside surfaces of the teeth -- lingual braces.. The late Dr. Craven Kurz of CALIFORNIA (UCLA) developed the early Kurz/Ormco lingual bracket stsyem.In 1976, Kurz submitted the first lingual appliance patent to the US Patent Office, and 3 years later, with the collaborative work of Craig Andreiko, DDS, MS, and Ormco Corp, 9454

lingual braces
E N D
Presentation Transcript
1. Lingual Braces
3. History of Lingual Braces Around 1975, two orthodontists working independently in Japan and the United States started developing their own systems to place braces on the inside surfaces of the teeth -- lingual braces.
4. The late Dr. Craven Kurz of CALIFORNIA (UCLA) developed the early Kurz/Ormco lingual bracket stsyem.
In 1976, Kurz submitted the first lingual appliance patent to the US Patent Office, and 3 years later, with the collaborative work of Craig Andreiko, DDS, MS, and Ormco Corp, the popular Ormco-Kurz lingual bracket system (1979) was fabricated.
Kurz also developed numerous pliers and instruments for the clinical practice of lingual orthodontics; he was the owner of 22 patents.
5. Around the same time Professor Kinya Fujita of Kanagawa Dental University in Japan developed his own lingual system and continues to make great advances in lingual orthodontics.
6. Following this initial development and expansion of lingual orthodontics in the 1990s, interest, particularly in the United States, decreased, probably due to the poor standard of completed cases. The reasons for this were attributed to inadequate training, poorly developed laboratory systems, and the unavailability of preformed archwires
7. Problems With Early Lingual Bracket Systems Poor patient adaptation to the appliances
Fundamentally different approach to treatment planning and biomechanics
Difficulty of precise finishing
Inaccuracy and complexity of bonding
Increased incidence of debonds
8. Resurgence of Lingual With advances in indirect bonding and bracket design many clinicians have once again turned to lingual braces as an invisible and noncompliant alternative to costly removable orthodontic aligners.
9. Indirect Bonding
10. Modern Lingual Bracket Systems
11. Magic Brackets The Magic lingual bracket system is designed to improve patient comfort and to make bonding and ligation easier for the orthodontist. Archwires are inserted occlusally, so that a mirror is unnecessary, and the anatomically shaped bases allow brackets to be positioned closer to the teeth for better force application, according to the manufacturer. Integrated horizontal slots in the premolar and molar brackets enable the easy addition of sectional wires, uprighting springs, or other attachments.
12. Self Ligating Lingual Brackets In-Ovation L MTM from Dentsply/GAC represents a breakthrough in cosmetic orthodontics for cases requiring minor tooth movement. Employing extremely small, easy-to-bond, self-ligating, lingual brackets, the In-Ovation L MTM System can be bonded to the six upper and six lower anterior teeth, including wire placement, in about 30-45 minutes. A convenient indirect bonding option will be available soon, reducing placement time even further. Treatment is usually completed without the need for a wire change in just 3-6 months.For more information, visit www.gacintl.com.
13. iBraces 100% Customized invisible orthodontic appliance system
Combination of customized brackets and wires
14. Preparing an iBrace case Take a 2 phase impression of the patient�s teeth, the 1st phase acts as a custom tray for the 2nd phase. Lab form completed by the doctor specifying how the teeth are to be setup.
Trained lab technicians setup the teeth according to Andrew�s 6 keys of occlusion.
Setups are scanned into the computer.
15. iBraces cont. Brackets are designed using our ProLingual� CAD/CAM software
The occlusal plane is defined and bracket slots are set.
Brackets are printed using 3-D printing technology and then cast
Wire geometry is defined in the computer and wires are bent using our precision bending technology
Brackets are placed on malocclusion models and iTray� are made for indirect bonding
16. iBraces Precision Archwires A three or four-wire sequence is designed with a dental CAD/CAM system and then fabricated using robotic wire bending technology.��SMA wires for initial stages��Stainless steel or TMA for finishing.��Precise wire fabrication means few if any wire adjustments
at chairside
17. Customized Brackets and Archwires for Lingual Orthodontic Treatment 20 months of clinical testing and more than 600 bonded arches
The demand for maximum individuality is met by using state-of-the-art computer aided design/computer aided manufacturing technology to fuse the 2 normally separate processes of bracket fabrication and bracket positioning.
18. This customized system addresses 3 problems traditionally associated with lingual brackets Brackets are more difficult to bond and tend to debond more frequently
Finishing is more difficult
Brackets can cause speech problems or irritate the tongue
19. Brackets and Bonding Improvements Extension of the bracket base for greater bond strength
Low profile brackets
Customized bracket bases have form-fit properties between the bracket base and tooth which provide a positive lock for correct positioning
Indirect bonding with a custom bonding tray
20. Problems in the Finishing Process Inaccurate bracket positioning
Inaccurate archwire fabrication
Inaccurate fit between brackets and archwires (torque play)
21. Customized Lingual Brackets Virtual bracket production on the computer
Extended bracket bases (positive lock)
Archwires produced with CAD/CAM technology
Low profile brackets
22. Conclusions The essential advantage of custom design and manufacturing is the unlimited individuality of the appliance.
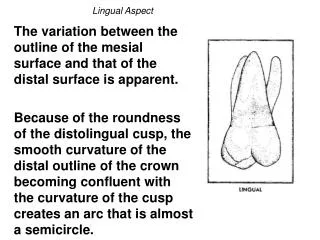
23. Differences between Lingual and Traditional Orthodontics The anatomy of the lingual surfaces of anterior teeth in the natural dentition differs greatly from the uniform labial surfaces. The irregular palatal surface is the main reason for inaccuracy of lingual bracket positioning, which in turn is a major factor affecting the finishing stage.
The anatomy of the lingual surfaces of the anterior teeth with its complex curvature and greater slope requires three-dimensional bends to achieve a simple extrusive or intrusive movement
24. Lingual Bracket Differences Small lingual arch perimeter and reduced interbracket distance make the use of compensatory bends very difficult.
The small interbracket distance also makes it almost impossible to insert a stainless steel archwire
of dimensions greater than 0.016 0.022
inches into an 0.018-inch bracket slot, or a TMA
archwire of greater dimension than 0.017
0.025 inches. The use of smaller
dimension archwires generates less friction
in LO and consequently less torque control
25. Lingual Orthodontics: Patient Selection and Diagnostic Considerations Special Considerations regarding the diagnosis and treatment planning in lingual orthodontics were presented in this article.
26. Favorable Cases Mild incisor crowding and anterior deep bite
Long and uniform lingual tooth surfaces without any fillings, crowns, or bridges
Good gingival and periodontal health
Skeletal class I pattern
Mesocephalic or mild/moderate
brachycephalic skeletal pattern
Patients who are able to adequately
open their mouths and extend their necks
27. Unfavorable Cases Dolicocephalic Skeletal Pattern
Maximum anchorage cases unless treated with TADS
Short, abraded, and irregular lingual tooth surfaces
Multiple crowns, bridges and large restorations
Patients with a limited ability to open their mouth
Patients with cervical ankylosis or other neck injuries that prevent neck extension
28. Periodontal and Gingival Considerations Lingual Orthodontics are often indicated in patients with a predisposition to gingival recession. With lingual brackets, the risk of gingival inflammation is transferred to the lingual aspect, where bone resorption and gingival recession are
generally less frequent.
29. Dental Considerations Patients with a high risk for caries, with histogenetic or color alterations of the teeth (amelogenesis imperfecta and so on), or with decalcifications can be treated with lingual orthodontics, since the caries and decalcification hazard is transferred to the lingual surface, where the esthetic and therapeutic solutions are always easier to manage, being the nonvisible surfaces of the teeth.
30. Lingual Orthodontic Treatment and Absolute Anchorage to Correct an Impacted Maxillary Canine in an Adult Patient A Case Report 24 yr old female
CC: central diastema and carious deciduous tooth
31. Class 1 occlusion
Increased overbite, normal overjet
Maxillary midline shifted to the left
32. Impacted maxillary left canine, retained primary E
Missing maxillary left first molar
33. Treatment Plan Orthodontic-Surgical Treatment
Fixed lingual appliances (0.018-in slot, Ormco, Glendora, Calif)
Closed surgical exposure of maxillary left canine
TAD (Spider Screw Orthodontic Implant) used for maximum anchorage
34. The initial archwire was 0.016 � 0.022-in copper-nickel-titanium alloy
At the end of the surgical intervention, the crown was recovered, and orthodontic traction was applied with a pigtail stainless steel wire exiting through the palatal flap.
35. The self-tapping miniscrew was placed in the palatal mucosa near the missing first molar site
36. First, the canine was brought into the palate to the occlusal level.
.016-in SS Ballista spring with a loop at it�s end was placed through the internal slot of the implant to provide extrusive forces.
37.
Adequate space for the canine was gained using an open coil on a 16 x 22 SS wire
The crown of the impacted canine was exposed by making a small incision into the bulging palatal mucosa
An eyelet was placed on the buccal aspect of the impacted tooth
38. A buccal offset and loop were placed in the archwire and an elastic tied between the buccal eyelet on the canine and the loop in the archwire to produce bucally directed force
Once the permanent canine approached it�s place in the arch, the primary canine was extracted
A .014 niti was placed through the palatal eyelet on the impacted canine and a clear elastic through the buccal eyelet that was ligated to a buccal attachment on the maxillary left 2nd molar
A coil spring was activated to distalize the maxillary left 2nd molar using the TAD for anchorage
39. Active treatment time was 19 months