Download
1 / 3
30 likes | 59 Views
RFID4U - TagMatiks Asset Tracking Lite | This Article explains how to create the asset by giving part number, asset properties and custom attributes in TagMatiks AT Lite Application

E N D
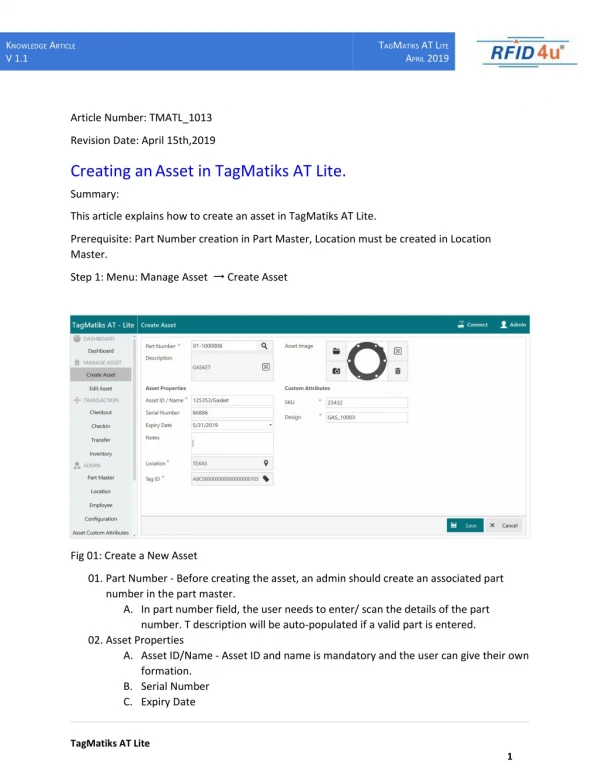
KNOWLEDGE ARTICLE V 1.1 TAGMATIKS AT LITE APRIL 2019 Article Number: TMATL_1013 Revision Date: April 15th,2019 Creating anAsset in TagMatiks AT Lite. Summary: This article explains how to create an asset in TagMatiks AT Lite. Prerequisite: Part Number creation in Part Master, Location must be created in Location Master. Step 1: Menu: Manage Asset → Create Asset Fig 01: Create a New Asset 01. Part Number - Before creating the asset, an admin should create an associated part number in the part master. A. In part number field, the user needs to enter/ scan the details of the part number. T description will be auto-populated if a valid part is entered. 02. Asset Properties A. Asset ID/Name - Asset ID and name is mandatory and the user can give their own formation. B. Serial Number C. Expiry Date TagMatiks AT Lite 1
KNOWLEDGE ARTICLE V 1.1 TAGMATIKS AT LITE APRIL 2019 D. Notes E. Location - Location is a mandatory field. This is the location where the asset is when creating the asset. Fig 02: Location Selection F. Tag ID - It is a mandatory field. Click on the tag ID field popup menu. There are two methods for assigning a tag one. i. Manual Entry/ Assign Tag: scan / enter the tag id. ii. Encode Tag: Auto-Generated ID will be encoded by connecting a reader to tag. Fig 03: Assign/Create Tag: G. SKU & Design - These field are enabled with the help of custom attribute function. Fig 04 is the Fields which we selected in the TagMatiks AT Lite Application. TagMatiks AT Lite 2
KNOWLEDGE ARTICLE V 1.1 TAGMATIKS AT LITE APRIL 2019 Fig 04: Asset Custom Attributes. 03. Asset Image: A. Optionally, add a photograph for the asset by clicking the upload button and choose the photo. From existing Jpeg file can be directly uploaded From Webcam photo can be uploaded To Zoom the Photo Uploaded in Application To Delete the Uploaded photo. TagMatiks AT Lite 3